To book Andrew Edgson for a mastering session, contact Lynley via mastering@studios301.com or 02 9698 5888
Any attempted discussion of dithering usually results in the collective groan by audio engineers everywhere; it is one of the most uninteresting and banal topics in the spectrum of audio production. However it is also one of the most common questions asked when submitting music for mastering. It is because of this that I will cover this topic, hoping to answer any of the questions that do come up.
So what is dither? A search on the Internet will very quickly tell you that dither is one of a few techniques that can be used to minimise a special type of distortion, called quantisation error. It does this by adding randomised noise to an audio signal during the process of quantisation… The three questions immediately drawn from this are:
- Why would I want to add noise to my recording?
- What is quantisation?
- What are these errors all about?
Adding noise to your recordings?
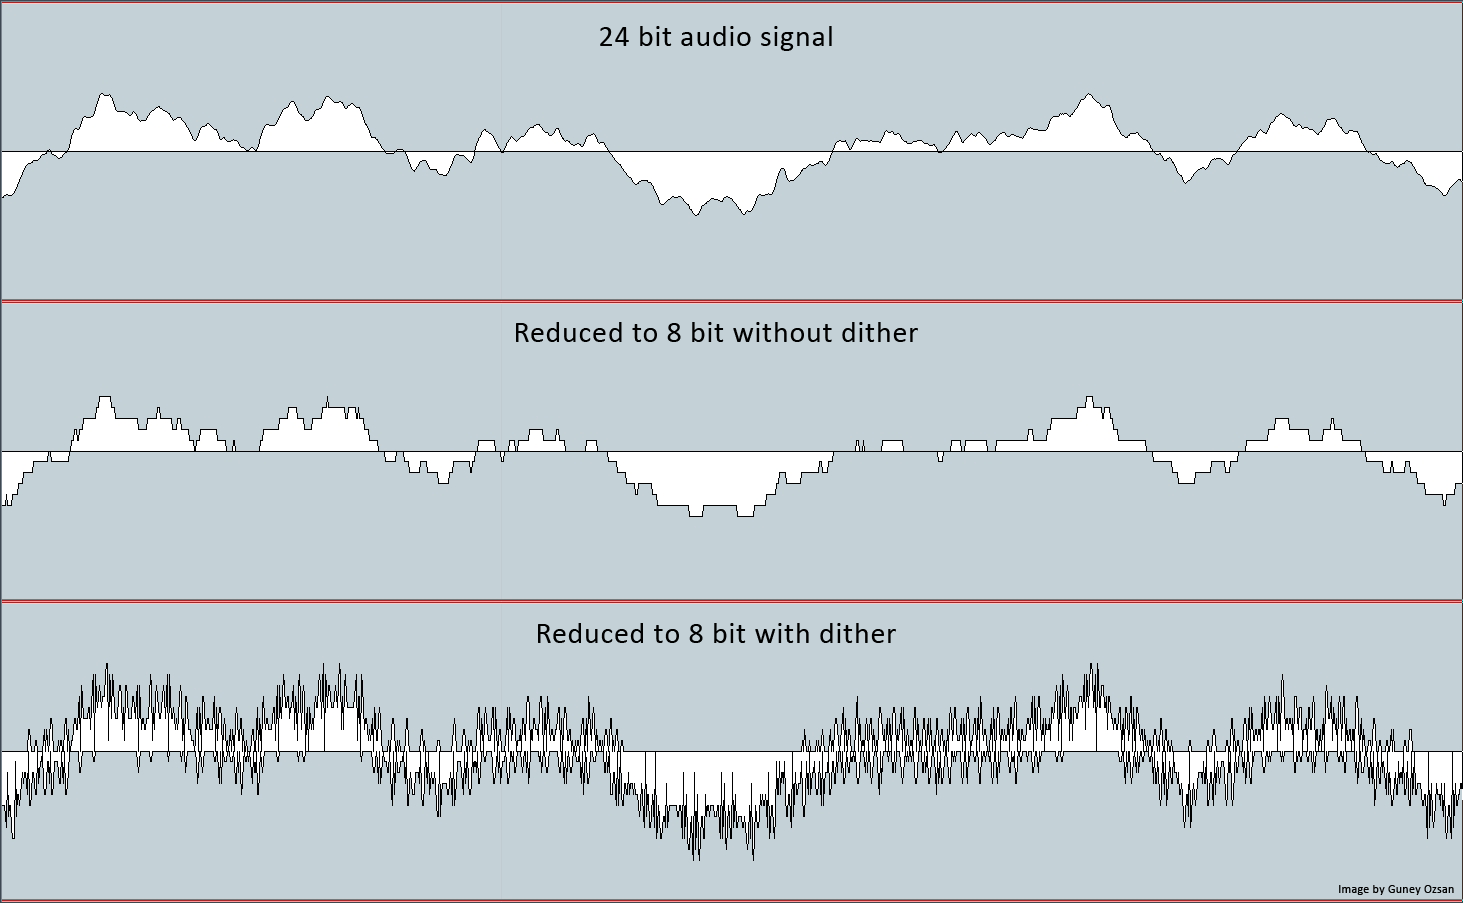
The reason we would want to add noise to your recording is really only to enhance the absolute quietest parts of the music. Imagine when a piece of music is fading out to nothing (such as the tail of a piano note), there will become a point during quantisation where for a given input there will be a result of no output (at the final quietest step, from something that is able to be heard, to nothing being able to be heard). This is an example of quantisation error, and because this is a step, anyone would hear this as an unnatural, albeit given the right playback volume.
Quantisation error increases as the number of bits used to make a recording decreases. Dither in effect smooths out the inaccuracies of the recording system, by disguising the steps between different values of amplitude.
Put simply, quantisation is part of the process that an audio signal will go through when being sampled and it is how a signal will be given a value for its amplitude (volume level). There are really two occasions when quantisation happens, either during conversion from an analogue waveform to a digital binary signal, or during a stage of digital signal processing.
The importance of dither is very much related to the level that a recording is made at, and hence the number of bits you use. It becomes more important with the quieter, or fewer number of bits used to encode the signal. When we make a 24-bit recording there are 2 (binary) to the power of 24 (number of bits) or 16,777,216 discrete values for amplitude that could be encoded to each digital sample. This covers an amazing 144dB of dynamic range, and really is more than you should ever need (just think that the noise floor of most equipment is around -95dBFS).
Examples of Dithering
Below are some audio examples that I have prepared to demonstrate dither and quantisation error, along with an unaffected source for you to compare.
Please note that these examples simulate recording a signal at a very low volume, to better demonstrate the quality degradation experienced when using a small number of bits to encode a signal. This issue can easily be overcome by recording at an appropriate level, which under normal circumstances, will cause the effect of dither to be far less obvious. I have created these examples by following these steps; you can recreate the same results if you follow them too:
1. Import the source audio into your DAW of choice.
2. Use a gain plugin to change the volume of the source file by -70dBFS.
3. Export the file as a 44.1kHz, 16-bit, WAV; with and without dither.
4. Import the files created in step 3 into your DAW.
5. Use a gain plugin to change the volume of these files by +70dBFS.
6. Export these two files as 44.1kHz, 16 -bit, WAV; with dither applied.
When to use Dither
So I hear you ask, when should dither be applied to my music?
The easy answer is… Whenever the audio goes through a process of quantisation. In practical terms, it means that dither should be used at the point of conversion from analogue to digital, and also it should be used at the final stage of any digital processing.
It is worth mentioning that there are many different types of dither to choose from, too many to mention here. Their differences mostly lie in their sound, some will shift their noise away from the most audible frequencies. My advice on choosing the right dither for your music is to use your ears and make a decision that is based on your own preference. They all sound different and all have a subtle effect over the sound of your music. However there is no right or wrong and it comes down to personal taste. Many people even find they prefer the sound of no dither.
Dither is applicable to mastering in the sense that it is the very last thing that will be done to a mastered audio file. For instance, if there was any change made to the file after the dither was applied (be it a fade, or a change in volume by even 0.1dB), the audio would need to be dithered again. The dither applied will then compensate for the re-quantisation the audio went through.
This brings up an interesting question regarding the use of dither on top of dither and how this relates to the accumulation of noise within the recording. The truth of this matter is quite simply, when working with 32-bit, 24-bit, and even 16-bit audio; dither noise will accumulate within your recording. However the level of this noise is so low that any reasonable amount of accumulated dither noise will not be noticeable.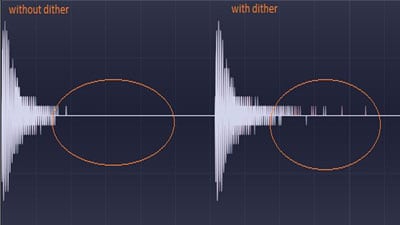
Furthermore, it is important to understand that dither is less applicable to program material that is focused on high volume. In a lot of modern music (especially applicable to electronic genres) where the instruments are digital, and hence, not captured via delicately placed microphones, the focus for these sounds is usually on their texture rather than their dynamics. Dithering on a pumping bassline which has been processed with saturators and heavy compression, for example, is less audible, and even immaterial, when compared to the effects of dither to preserve a piano’s sonic integrity. In short, dither is important about ‘very quiet passages’ and has little relevance to music that is all about being loud.
Try it yourself
If you want to experiment with dithering, here is where you can try it:
- If you are printing your mix through an analogue board, recording back into software at 24-bit; dither to 24-bit at the analogue to digital converter (provided you can turn this on or off on your convertor);
- If you are online mixing in the box and want to export to a 24-bit file; dither to 24-bits as the absolute last process;
- If you are converting between bit depths; dither to the destination bit depth;
- If you decide you want to make DSP based changes (no matter how small) to an already dithered file; dither again.
Finally if there is any advice I can give to anyone – from budding audio engineers getting started, through to the most experienced engineers in the business… when it comes to dither, I would always advise using dither when it makes the music sound better. But in regards to real noticeable improvements to audio quality, there are so many things within your control that make a significantly greater difference, such as microphone choice, microphone placement, the instrument, the room, the performance or the song. All these things matter far more to the end quality of your recording.
So with the finite amount of time that everyone has to commit to any project, I stress that you spend your precious time where it matters most. If you have any questions please don’t hesitate to ask us via mastering@studios301.com
To book Andrew Edgson for a mastering session, contact Lynley via mastering@studios301.com or 02 9698 5888