If you can make your mixes sound tighter when you are mixing, then I can take it the next level when mastering.
If you listen to the old vinyl “sound” that everyone loves, one of the reasons it sounds so pleasing is that it is mixed to accommodate the boundaries of disc cutting. When I first started out, mastering was disc cutting… That is, the master you would deliver to the factory would come back as a vinyl LP or single. As well as the mastering engineer, mixing and recording engineers always worked with the finished vinyl at the back of their mind. So, with the technical boundaries that vinyl had, engineers were watching all the peaks, controlling everything that jumped out (inevitably causing problem on vinyl) – and that’s why everything sounded so nice, round and tight.
(We also used more de-essing when we were cutting to lacquer, because the medium wasn’t very friendly to top end and would cause “sibilant” distortion, especially on vocal s’s, high hats and anything with an excessive amount of top end. So not only did you have limiters controlling the sound for tightness and roundness, you had de-essers which were giving the mix a nice rounded top-end.)
In order to achieve nice tight mixes nowadays, these techniques from working with vinyl still apply, and this is where VU Meters come in. A VU meter is like a rev counter in a car, it gives you a feel for what the car is doing, and the VU gives you a feel for the song, and how tight and “round” it is sounding.
What are VU Meters?
VU (Volume Unit) Meters essentially display an average of what we hear, rather than the very fast peaks that we don’t. Average level is important, as controlling this will make the mix sound tight. For example, with a kick drum, if you have a VU meter, you can see if the kick drum is adding kick and punch to the mix, or if it’s adding a lot of wooliness and getting in the way of everything else. If the VU meter is moving radically, just working on the kick drum, then you know by looking that you are losing tightness.
In the particular instance of a kick drum, (or other low end elements in your mix) your room acoustics might be deficient in low frequencies – and this is also where VU meters are indispensable. They are like your third ear – they will show you the energy in the low end, and if there is radical movement, then you probably have an issue with frequencies that you aren’t hearing.
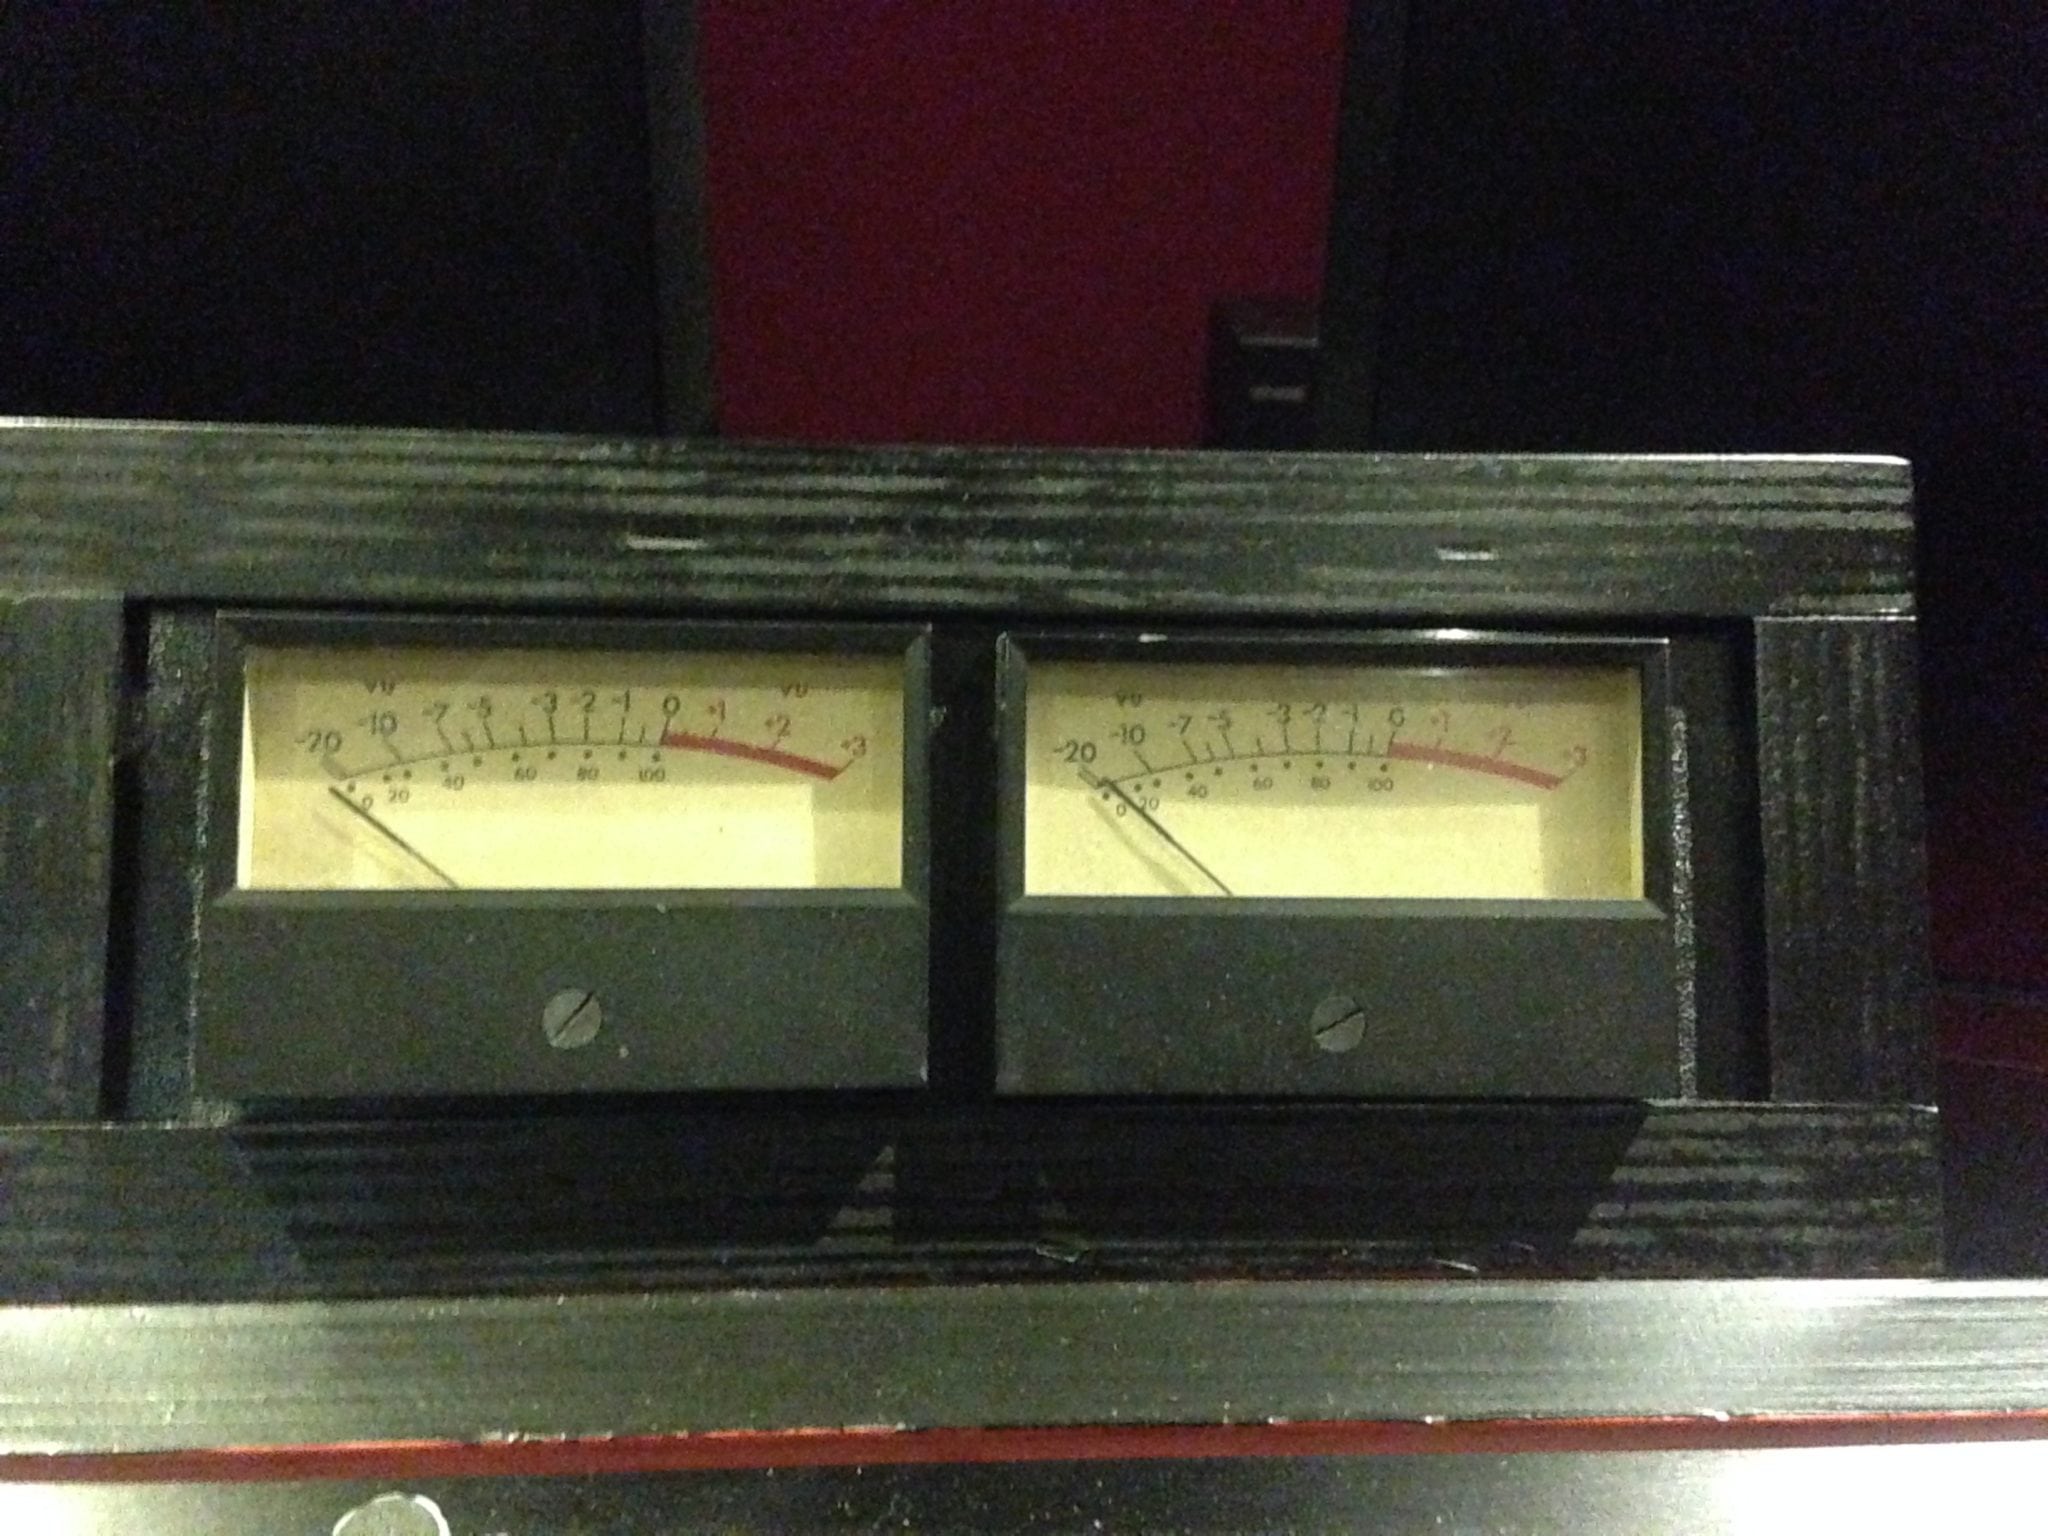
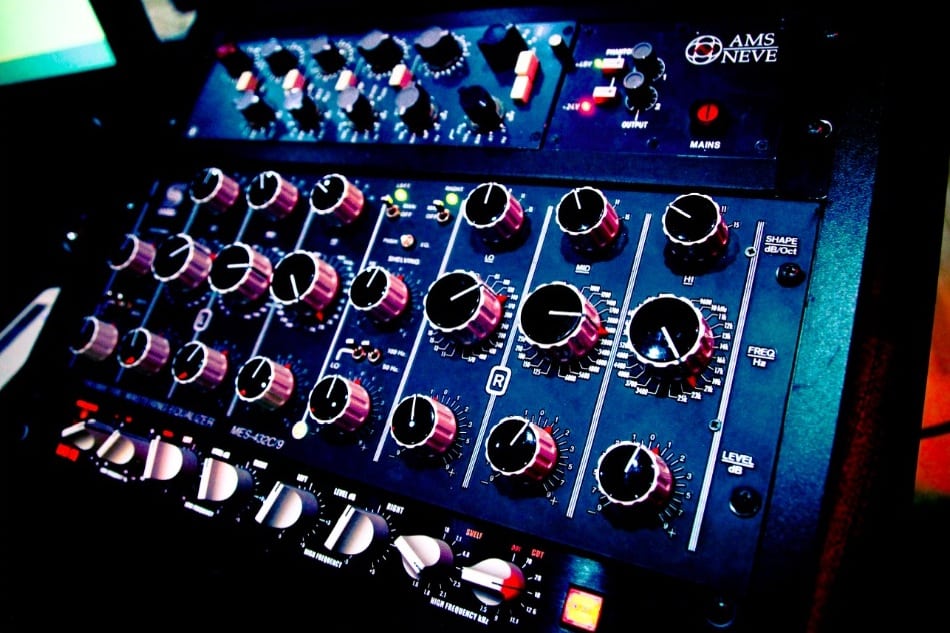
Leon’s custom VU Meters built by Stephen Crane.
Watching the VU Meters move.
In order to achieve mix tightness, VU meters should “dance” smoothly and in a gentle manner, usually in time with the music, rather than in big jumps and erratic, out of time movement. This erratic movement implies that there are drastic level changes, which will be hard to control in mastering. A common, but undesirable, scenario when I’m mastering a track is when the tom fill comes in, the VU’s have excursions of 10dB. I can go in and fix that in the stereo mix, however at that point it is going to effect the rest of the mix, because when I push the toms back down, everything else in the mix will also be pushed down.
When I get mixes from the great engineers, I usually only add a little, if any, peak limiting in mastering because it’s all been taken care of during the mix. 9 times out of 10, this was done on the individual channels of the mix (as opposed to a buss output compressor). In this instance, VU meters will show you when levels and compression are adequate in the mix.
Don’t confuse limiting or tightening with squashing. In this manner, limiting should just be controlling the peaks rather the squashing the entire signal, and your mixes will by default sound louder. Again, this is where VU meters come in – they help you see the erratic movement caused by peaks and will help you apply just enough dynamic control.
Choosing your VU Meters.
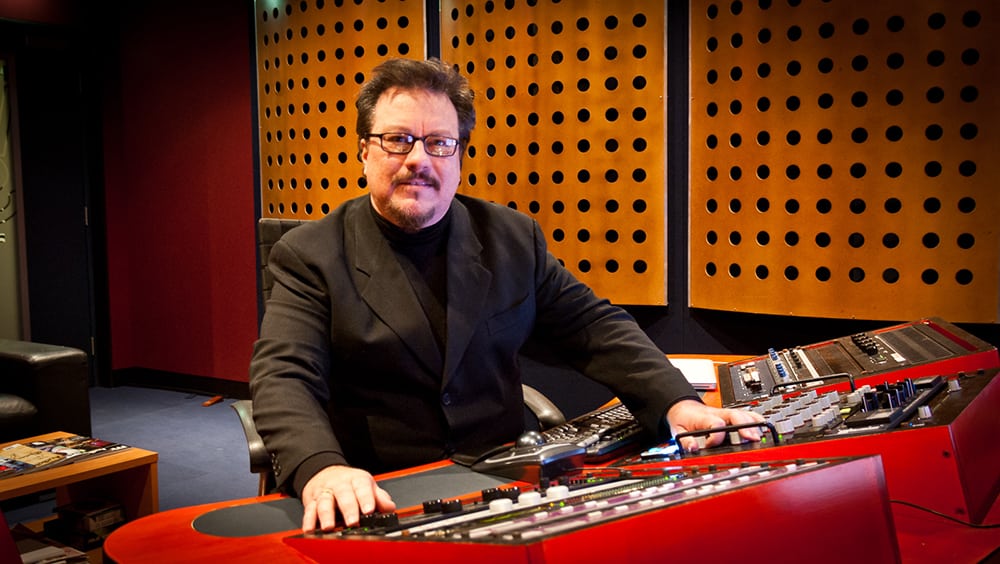
There are different types of VU meters out there, and I have spent many hours experimenting to find the ones I liked best. I encourage you to do the same – some will move faster, some slower, and you should find the ones that behave the best for your individual preference and purpose. On top of this, VU meters can usually be calibrated for both speed and volume level, and these settings are essential for getting the best out of them, though again, the particular settings are very much personal taste. The VU meters I use are custom built by Stephen Crane at Studios 301.
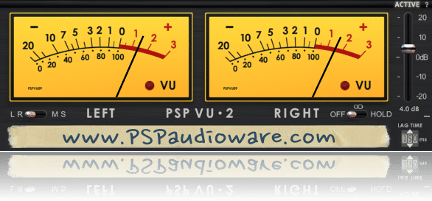
As far as software meters go, there are many options out there and I’m still experimenting with them. The main stumbling block I have found is finding software meters that behave how I want to “see” the signal, and are adjustable for the right reference level. So far, my favourite is the PSP VU2 meter plugin.
Everything is important about the gear and the studio you use it in, but if I had to pick my essential tools, they would be my monitoring – and my VU meters.
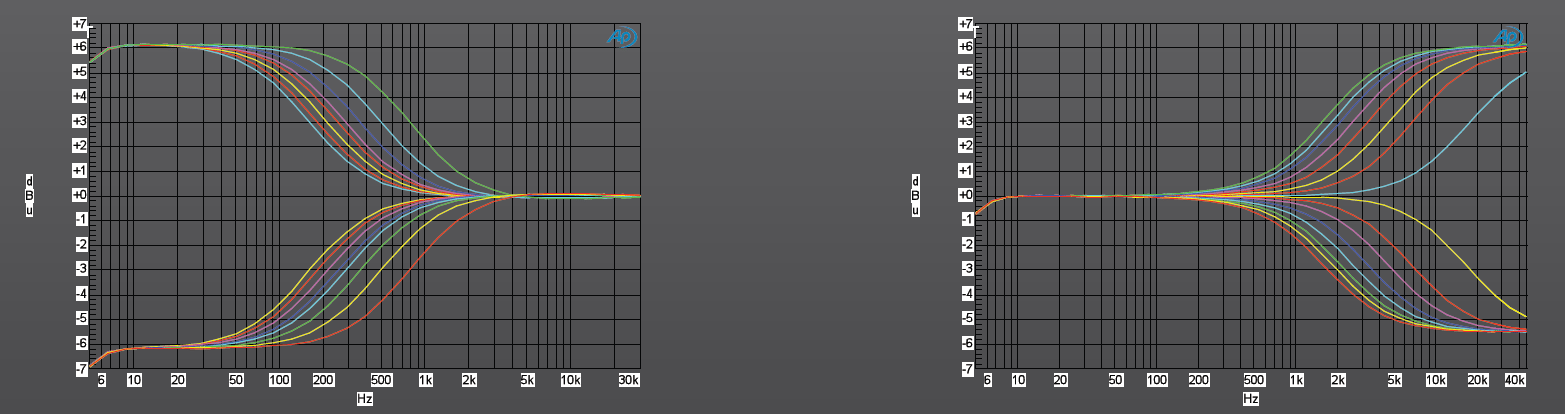
The Dangerous BAX EQ was released in 2009 and is based on the famous “Negative Feedback Tone Control” by P. J. Bandaxall designed in the 1950s. This circuit is used in many hi-fi equipment bass and treble “tilt” controls. The advantage of these curves is that they of a constant shape, being very gentle and do not “flatten off” at the limits of their audio range. It is similar to using a standard shelving equalizer with an extremely wide “Q”.
In order to further shape the upper and lower ends of the spectrum, the Dangerous BAX also offers transparent 12dB/Oct high pass and low pass filters. The designer of the Dangerous BAX, Chris Muth, spent many years on the prototypes in well-known mastering studios in order to get the most suitable frequencies. The Dangerous BAX quickly became renowned as a transparent and un-obstructive tone control, with turn over frequencies that were highly tuned for mastering.
Having owned the Dangerous BAX hardware since they became available in Australia, I can confidently say it’s the one piece of hardware that I could not do without. I would happily pay the price for the high pass filter alone. It’s one of the few equalisers that can instantly tighten the low end without affecting the punch of the kick and bass. The 12Hz and 18Hz works wonders on an 808 kick drum. Admittedly I use the BAX more for cutting rather than boosting, and mostly in the low end, although the high shelf boost can be very clean and can add that extra sparkle on mixes if required.
It also works very well after another parametric equalizer such as the GML or Sontec, as you can boost the low end in the sub region then use the BAX high pass filter to cut the extreme subsonic frequencies that may cause smaller speakers to distort. Conversely, you can use a high shelf boost on the BAX and use the low pass filter to smooth the extreme top end and make it sound more natural.
It looks deceivingly simple yet can be very powerful once you understand the depth of what the curves are capable of. I would describe the sound of the Dangerous BAX equaliser as quite transparent; it has a hint of the modern Op-Amp sound giving it a slight mid forward texture, and is fast with no loss of transients.
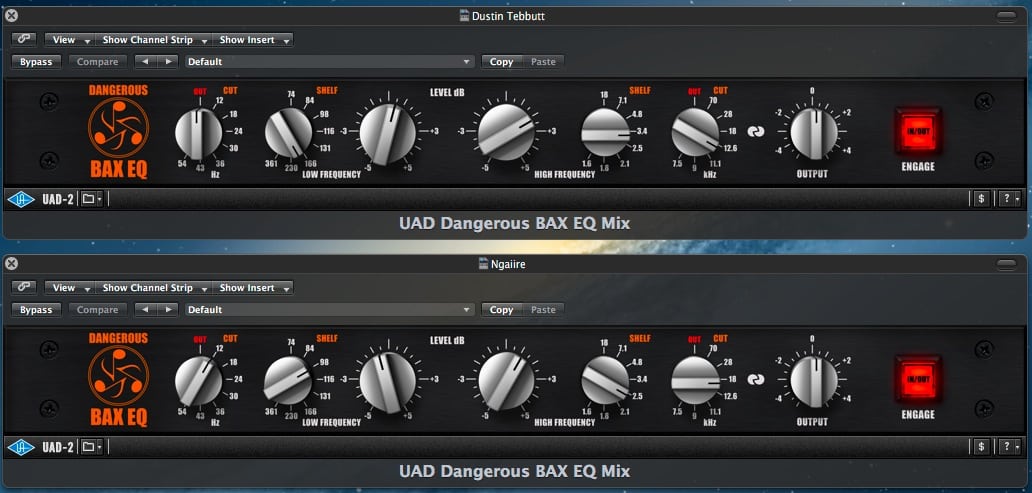
Now Universal Audio have released the Dangerous BAX on their UAD-2 platform. I’m a big fan of the Universal Audio emulations, especially the Massive Passive, which I used to own; so there is no “analogue is better” bias in this comparison – I’m approaching this with an open mind. The one caveat is that Universal Audio outsourced this emulation to Brainworx in Germany, so it’s not quite the same team that coded the Massive Passive emulation.
In order to make the comparison equal, my methodology was to use the same signal chain for the software as the hardware. The UAD BAX went through an analogue loop out if the DAW via the Prism DA-2, through the Dangerous BAX in relay hardware bypass, and into the Prism AD-2. Then the UAD BAX was bypassed and the hardware BAX inserted into the chain. This was all recorded into sequoia as a 24-bit 48kHz file. I used a variety of material that were all mastered using the hardware BAX, including folk, acoustic, electronic, and hip-hop from artists Ngaiire, Dustin Tebbutt, Flume and Suburban Dark.
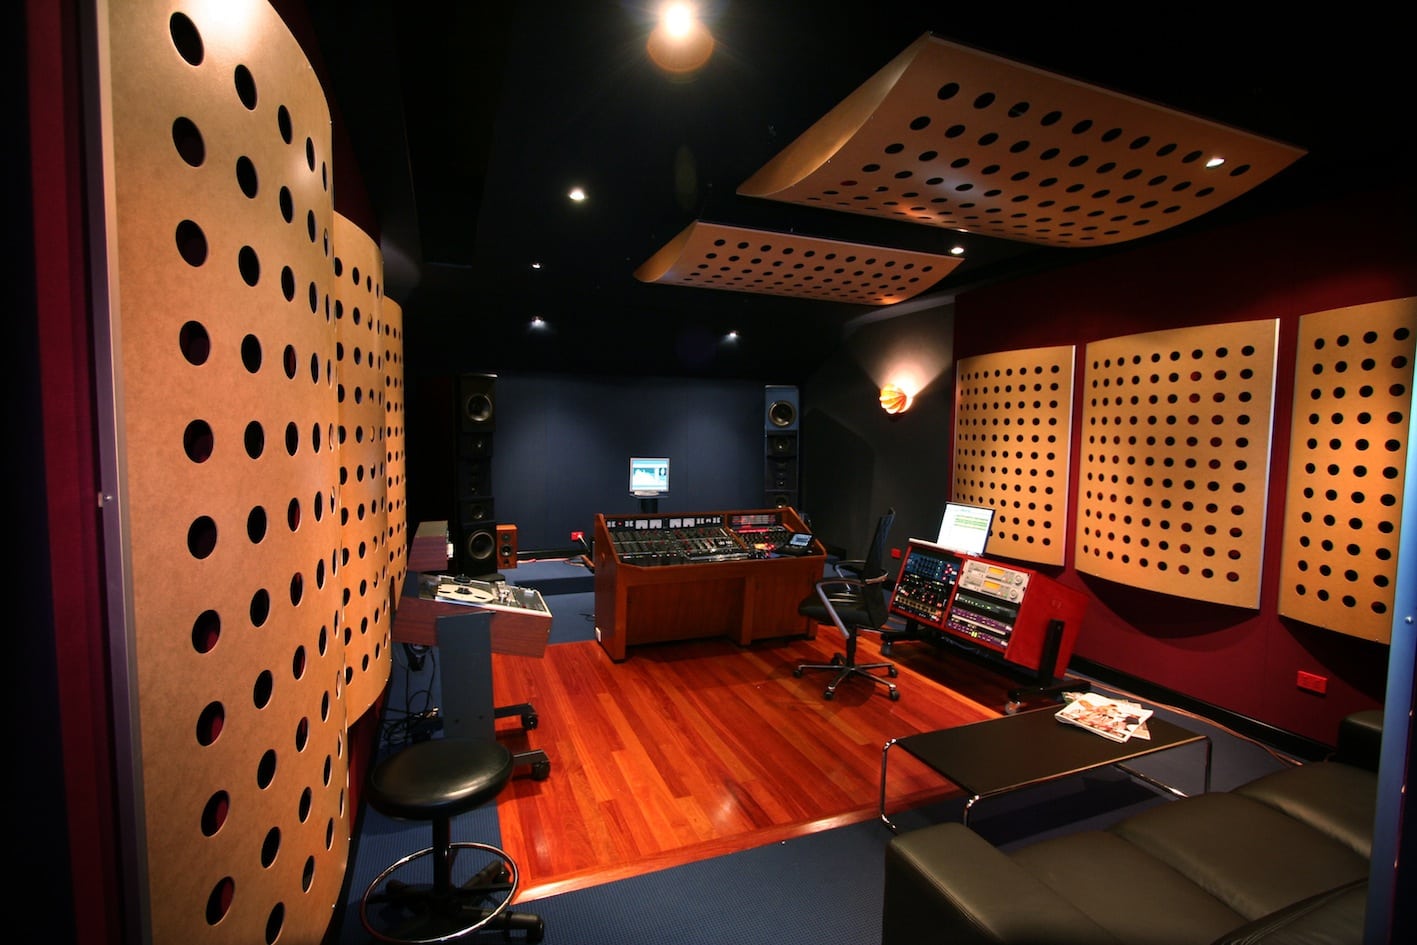
The results were then compared in Studios 301’s Mastering Suite 2 on the Duntech Sovereigns and Adam S2X’s.
Listening to the results, my immediate impressions were that the UAD version did not sound as transparent as the hardware. The high frequency shelf needed more boost on the software to sound like the hardware, and the low boost was more exaggerated on the software compared to the hardware, so I had to dial in less low end on the software for an accurate comparison. The hardware had more open, silkier highs and more tightness in the low end, especially when using the filters. Whatever settings I used, the UAD plug-in had a tendency to sound darker and thicker than the hardware, with much less perceived depth.
This is one of the main issues that I encountered using the UAD for mastering; the front to back depth was flattened, something which I always aim to retain or even enhance with mastering grade hardware. The stereo width was quite close. It sounds like the plug-in has tried to capture the essence of using hardware, yet this is precisely why the Dangerous BAX is so good – it doesn’t really have much of a sonic footprint. On complex material the UAD almost sounds compressed compared to the hardware.
I’m going to give an elusive non-scientific opinion, but the software just doesn’t have the same subtleness or musical involvement as the hardware.
The UAD BAX does have some more tricks up its sleeve, as you can use the equaliser in mastering mode, enabling mid/side processing. This enables you to cut or boost the mid or side channels separately and opens up the BAX for many more possibilities, especially on problem mixes. For example, you can strengthen the kick or snare on the center channel without affecting the panned instruments in the stereo channel. Conversely, you can tame a panned high hat or sibilance in the out of phase whist not affecting the center channel. This is one advantage of the UAD BAX.
So by now you may have gathered that I’m rather fond of the Dangerous BAX hardware, and not so taken by the UAD BAX. I just don’t think Brainworx have nailed this emulation. After recording and comparing the files on a variety of systems, I would say that the average listener could probably not tell them apart. That may be good enough in online mixing situation. However, in a mastering studio you always want that 5-10% improvement, and this is where software emulation falls short.
If you’re releasing music in 2026, whether on Spotify, Apple Music, vinyl, or any other format, you’ll need an ISRC for every track. But what exactly is an ISRC, how do you get one, and why does it matter?
This guide covers everything you need to know about ISRCs: what they are, how they work with streaming platforms, how to obtain them in Australia, and common mistakes to avoid.
What is an ISRC?
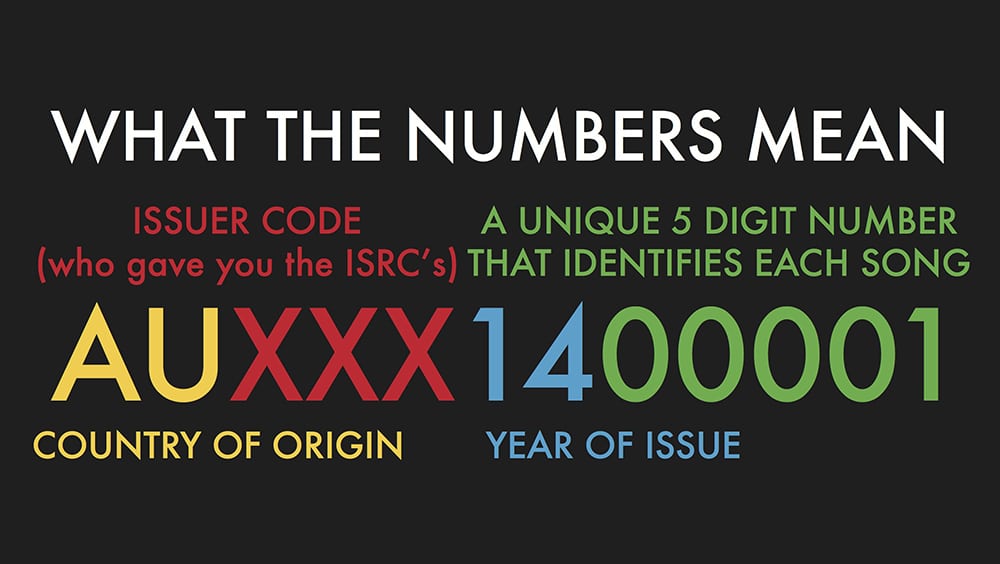
ISRC stands for International Standard Recording Code. It’s a unique 12-character alphanumeric code assigned to an individual sound recording. Think of it as a digital fingerprint for your track, distinguishing it from every other recording in existence.
An ISRC looks like this: AU-S30-24-00001
The code breaks down as follows:
Segment
Meaning
Example
Country code
Country of the registrant
AU (Australia)
Registrant code
Assigned to the organisation
S30
Year of reference
Year the code was assigned
24 (2024)
Designation code
Unique number for the recording
00001
Every distinct recording gets its own ISRC. If you release the same song as a single, then again on an album, and later as a remastered version, each version receives a separate ISRC.
Why Do ISRCs Matter?
ISRCs serve three critical functions for anyone releasing music:
1. Royalty tracking. Streaming platforms, radio broadcasters, and collection societies use ISRCs to identify recordings and attribute plays to the correct rights holders. Without an ISRC, your streams and sales may not be properly tracked, which means lost revenue.
2. Catalogue management. Labels, distributors, publishers, and organisations like ARIA and APRA AMCOS use ISRCs to catalogue recordings efficiently. When your music appears on multiple platforms and in multiple territories, the ISRC is what ties it all together.
3. Platform requirements. Most digital distributors and streaming platforms require an ISRC for every track you upload. Spotify, Apple Music, Amazon Music, TIDAL, and YouTube Music all use ISRCs as part of their metadata requirements.
If you want to earn income from your recordings, ISRCs make that possible by ensuring every play, sale, and broadcast is properly attributed to you.
ISRCs and Streaming Platforms
When you upload music through a digital distributor, each track’s ISRC is embedded in the metadata that gets sent to streaming platforms. This is how platforms like Spotify and Apple Music identify your recording, even if multiple distributors deliver the same track.
This is particularly important if you:
Switch distributors and need your existing streams to carry over
Have the same recording available on multiple services
Want to ensure radio plays and sync placements are tracked back to your recording
The ISRC stays with the recording for its entire lifecycle. It does not change if you switch distributors, re-release the track, or license it to a different territory.
How to Get ISRCs in Australia
There are two main ways to obtain ISRCs:
Option 1: Through Your Digital Distributor
The simplest approach. Most digital distributors (including DistroKid, TuneCore, CD Baby, and LANDR) automatically generate and assign ISRCs to your tracks as part of the upload process. If you’re using a distributor, you likely already have ISRCs without needing to do anything extra.
Option 2: Directly Through ARIA
If you are the rights holder for Australian recordings, you can request a registrant code from ARIA (Australian Recording Industry Association) by completing their ISRC Rights Holder Form and emailing it to isrc@aria.com.au. ARIA will provide you with a registrant code and instructions for generating your own ISRCs. This process is free and typically takes 1 to 2 business days.
Once you have a registrant code, you can create ISRCs for all your future releases without needing to contact ARIA again.
Important note for signed artists: if you are signed to a record label, your label usually handles ISRC assignment internally. Check with your label before obtaining ISRCs independently to avoid duplicate codes being issued for the same recording.
ISRC vs UPC: What’s the Difference?
This is one of the most common points of confusion for independent artists. Both are identification codes, but they serve different purposes:
A single album with 10 tracks would have one UPC (for the album as a product) and ten ISRCs (one for each track). If you release a track as both a single and as part of an album, the ISRC stays the same, but each release gets its own UPC.
Most digital distributors handle both UPC and ISRC assignment automatically.
Common ISRC Mistakes to Avoid
Assigning the same ISRC to different recordings. Each distinct recording must have its own unique ISRC. A live version, a remix, a radio edit, and a remaster of the same song each need separate codes.
Assigning different ISRCs to the same recording. If the exact same recording appears on a single and then on an album, it should keep the same ISRC. Assigning a new code makes it harder for platforms to consolidate your streams and royalties.
Not including ISRCs in your metadata. Even if your distributor generates the codes automatically, check that they appear correctly in your release metadata. Missing or incorrect ISRCs can cause royalty tracking issues.
Paying for ISRCs unnecessarily. ISRCs are free to obtain through ARIA in Australia and through most digital distributors. Be cautious of third-party services that charge significant fees for ISRC generation.
Frequently Asked Questions
What is an ISRC code? ISRC stands for International Standard Recording Code. It’s a unique 12-character code assigned to an individual sound recording, used to track plays, streams, and sales across platforms worldwide.
Are ISRCs free? Yes. In Australia, ARIA issues registrant codes at no charge. Most digital distributors also generate ISRCs automatically as part of the upload process.
Do I need an ISRC to release music on Spotify? Yes. Spotify and most other streaming platforms require an ISRC for every track. Your digital distributor will typically handle this automatically.
Does the ISRC change if I switch distributors? No. The ISRC stays with the recording permanently. If you move to a new distributor, use the same ISRCs to ensure your existing streams and data carry over.
What’s the difference between an ISRC and a UPC? An ISRC identifies a single recording (one song). A UPC identifies a product (an album, EP, or single release). An album with 10 tracks has one UPC and ten ISRCs.
Can I get ISRCs from Studios 301? Yes. We can issue ISRCs as part of your mastering session, which is particularly useful for physical formats (CD, vinyl) where the code needs to be embedded in the master. Get in touch to arrange this.
Get Your Music Mastered and Ready for Release
ISRCs are just one part of preparing your music for the world. Studios 301 offers professional online mastering with ISRC assignment included on request.
It has been nearly two years since Apple launched “Mastered For iTunes” and almost as long since Studios 301 started mastering for the format. Over this time, Leon Zervos has mastered more releases for iTunes than most other mastering engineers combined, and as a result has a few thoughts about hi quality audio, good and bad mp3’s, and a bit of nostalgia for how it once was….
To book Leon Zervos for your mastering project, contact Lynley on mastering@studios301.com or 02 9698 5888
The beginning of mp3
When all the downloading started, everyone was making/taking 128 mp3s and as a result, there was almost half a generation that got too used to listening to bad sound. They were accepting that as how music should be listened to. I even remember getting some files for mastering and they’d converted from 128kb mp3 to 44.1kHz wav. You could hear it straight away.
So I think we have to thank Apple for taking the initiative, for effectively saying “No, no, we’re going to shoot for the stars here. We want everything to be as high-res as possible.”
The change in consumer headphones
At the same time that poor quality mp3’s were being used; people were listening to music on tiny little ear buds that were shocking. They weren’t even the slightly better quality ones from Apple we currently have. Now you look in the street and see guys walking around with big headphones – Beats, Sennheiser and many other higher quality brands. It’s taking music, and the listening experience, to another level. So now people are demanding higher standards of audio and people are getting used to it.
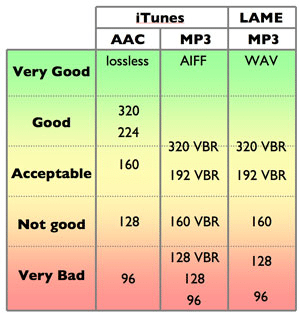
The difference between a 128kb mp3’s, 256kb AAC (iTunes) and a hi-res audio file
For a start, the stereo imaging is completely different. The imaging in a high-res file is true, It’s got depth and clarity. A 128 mp3 just sounds horrible.
An iTunes AAC file (at 256kb) is a big step up. I still think a CD at 44.1/16-bit is better – much better. But will the regular guy or girl in the street hear the difference? I don’t know. But in a studio environment, you can hear it straight away. There’s no guesswork, you can pick it.
How we got used to 128kb mp3s.
I think a lot of people don’t know because they’re not in a professional environment like we are, where we can sit down and compare things. I think if they were, they’d go, “Wow! That sounds so much better,” then they’d use that, they’d always demand that. I mean, like I said, we’re always striving for the best.
In the days of vinyl, record companies were cutting discs and they would get test pressings first, they would listen to it as well as the producer, musicians and engineers. If it wasn’t right, they’d re-cut, there would be more pressings, then re-pressings if needed, until it was perfect. There was this safety net in the process and everyone signed off on it when they were happy with the record. Nowadays, probably because of tighter deadlines, this doesn’t happen and there is no safety net. And then it comes out and then it’s down-sampled or converted and it sounds different again.
Apple is now storing files at up to 24/96 on their iTunes servers.
As part of their Mastered For iTunes initiative, Apple receive the files from the label exactly as we mastered them, at up to 24 bit, 96kHz for storage on their servers. These files don’t get sold to the customer (they go through Apple’s codec to convert to AAC), however it is intriguing that they are keeping these files on their systems. Why are they doing this?
Maybe they don’t know themselves yet, perhaps they’re just future proofing. I think keeping everything at 24/96 is the best possible thing to do. In the future, when downloads become quicker and drive space is not an issue, perhaps we will be listening to everything at 96kHz. And that’ll happen, but you probably wouldn’t even need the storage space because you’ll be listening to something that’s getting streamed at 96kHz – which would be perfect.
Referencing mixes at 128kb
I get people occasionally sending me a YouTube link to “make it sound like this”. Streaming music from YouTube and Soundcloud (as opposed to downloading) is usually at 128kb and this is not desirable for me. When the client sends me a link, sometimes I don’t even go and listen to it because I’m just not prepared to reference lo-res audio, as a comparison to what I’m doing here in my studio. At full bandwidth and with the equipment I have – it just doesn’t stack up.
Comparing a 128k stream to a hi-res file is like comparing apples to oranges.
I think it’s really dangerous because, again, it’s going back to people getting used to a bad-sounding audio and thinking that’s how it should be. If they had the high-res file (or even a CD) of the song, they could use that as a reference, because that’s what was done at the final stage and that’s what was approved by the producer/artist/label. Anything else as a reference shouldn’t be used because it’s gone through some kind of data compression and the sound has changed.
I think if you’re going get to the point where you’re mixing, and you’re calling yourself professional, you should be doing it in a professional way. Streaming it on Soundcloud or YouTube is not professional. Buy the CD or find some way to get the best possible high-res file you can get of that song. I couldn’t listen to it streaming at 128kb and use that as the reference when I know there’s something much better out there.
“Mastered for iTunes is a marketing ploy by Apple”
I think, at a professional level, a company that wants to accept files that are only of a certain quality is very good. Let’s face it, Apple are a company, they’re in business to make money. And if this is a sales pitch and they’re making money off it, fine. But the upside for music lovers is that one of the biggest companies in the world is creating awareness of higher audio quality.
Hi resolution masters (24/44 and higher)
If I were the artist, I’d want to have in my possession the best possible master that could be done. And if it’s out there and it’s available at 24-bit, it might entice more people to download and listen to it.
As engineers, we’ve always wanted to better what we do in audio. Through the years, we had quarter-inch 15 IPS tape, then we had quarter-inch 30 IPS, then it was half-inch 30 IPS. Then digital came in and has been greatly improved over the years, particularly with better convertors – always advancing. So I think it’s only natural that the industry should move forward all the time, instead of settling for something that doesn’t sound good.
When cassettes came out, you had the choice of low-noise cassettes, chrome cassettes, metal cassettes, there were different brands, and you could go and get your preferred type. With mp3’s, it’s almost like the music that was coming out a few years ago was coming out on ordinary cassettes and Apple are trying to make everything come out on noiseless metal tape. So if I were an artist, I’d want my music to come out the best way possible.
To book Leon Zervos for your mastering project, contact Lynley on mastering@studios301.com or 02 9698 5888
Hi, my name is Harvey O’Sullivan and I’m the Mastering Assistant here at Studios 301.
The nature of 301 is very dynamic and being an assistant requires a “Jack-of-all-trades” attitude. My responsibilities cover the daily maintenance of our 3 dedicated Mastering rooms, as well as preparing production masters.
A typical day for me could be breaking out the Studer to transfer some 1/4 inch tapes, replacing a broken woofer driver in one of our monitors or helping our workshop technician, Steve Crane, test modifications to our custom built AES digital signal router, the DES. Every day has its own set of tasks, be it scheduled or unexpected.
With so many projects being worked on by our mastering engineers, on multiple computers, we heavily on our network to power the backup system, nicknamed ‘Captain Tom’. This means ensuring everything is always in sync and constantly backed up across the entire complex.
That said, a lot of the Mastering Assistant’s job is, quite frankly, plugging stuff in, and testing if stuff works. It certainly helps to have a good understanding of technology and knowing how to troubleshoot on your feet.
Here an example of the ever-expanding album of “photos I take at work”:
The core of my role however, is making up Production Masters. The majority of masters end up as one of two formats: a DDP or PMCD.
A DDP is a file format that is sent off to CD manufacturing plants to press. A PMCD is a standard audio CD that has been burnt under special conditions to avoid any errors during the burning process. Its a physical object that operates as the master disc.
DDPs offer a number of advantages over the PMCD format in that they are simply a file format, which can be stored, backed up and sent digitally. It’s a specialised format requiring special software to read and playback. It’s at this point I will also enter additional track information data such as CD-TEXT and ISRC codes (serial numbers for music files) into the DDP.
PMCDs have to be treated with care, though they do come with a reference audio CD for listening to. You wouldn’t want to be chucking your PMCD in the car stereo.
Before sending these to the client, I’ll listen over the entire project, whether it’s a single, an EP or a full album; listening for any small glitch that might have snuck its way through. This requires a keen ear for detail and a great deal of concentration. This task is the absolute last step in the mastering process and is a deadly crucial one – because failure here could potentially result in an audible glitch being present on thousands of CD that have just been manufactured at great expense!
At the end of the day, what I love is getting to work with music every day and being surrounded by creative and talented people.
[Harvey O’Sullivan has been the Mastering Assistant at Studios 301 since January 2013]
If you’ve finished recording and mixing a track, there’s one more step before it’s ready for the world: mastering. But what does mastering actually involve, and why does it matter?
Audio mastering is the final stage of music production. It’s the process of preparing a finished mix for distribution, whether that means streaming on Spotify and Apple Music, pressing to vinyl, or broadcasting on radio. A mastering engineer listens to the completed mix with fresh ears, applies corrective and creative processing, and optimises the audio so it translates well across every playback system.
At Studios 301, our mastering engineers have worked on thousands of releases across every genre, from classical and jazz to electronic and pop. Here’s what the process actually looks like.
What Does a Mastering Engineer Do?
Mastering involves two distinct phases: corrective processing and creative processing.
Corrective Processing
The corrective stage addresses technical issues in the mix that may not have been apparent in the mixing environment. Every studio room has its own acoustic character, and mix engineers make decisions based on what they hear in that specific space. This can introduce subtle imbalances that only become obvious on other systems.
Common issues a mastering engineer corrects:
Frequency imbalances (too much bass, harsh high end, muddy mids)
Stereo imbalance or phase problems
Inconsistent dynamics (sections that jump in volume unexpectedly)
Unwanted noise, hum, or digital artefacts
Lack of definition in the low end
Buried vocals or instruments
The tools used at this stage include EQ, compression, multiband compression, stereo imaging, and limiting, applied with a light touch. The goal is not to alter the mix, but to polish it so it sounds its best across a wide range of playback systems, from studio monitors to phone speakers.
Creative Processing
This is where the mastering engineer’s personality comes into play. Every engineer has their own aesthetic sensibility, their own sense of what makes a record feel finished. Some favour warmth and weight; others lean towards clarity and air.
The creative stage is a conversation between the artist’s vision and the engineer’s experience. A great mastering engineer enhances what’s already there, bringing out the qualities that make a record special. This is also why many artists develop long-term relationships with a particular mastering engineer: they find someone who understands their sound.
Mastering for Streaming in 2026
One of the biggest changes in mastering over the past decade has been the shift towards streaming platforms. Each major platform applies loudness normalisation, which adjusts the playback volume of every track to a consistent level. This has significant implications for how music should be mastered.
Current loudness targets by platform:
Platform
Loudness Target
True Peak Limit
Spotify
-14 LUFS (integrated)
-1 dBTP
Apple Music
-16 LUFS (with Sound Check)
-1 dBTP
YouTube
-13 to -14 LUFS
-1 dBTP
TIDAL
-14 LUFS
-1 dBTP
Amazon Music
-14 LUFS
-2 dBTP
What this means in practice: if your master is louder than the platform’s target, it will be turned down during playback. If it’s quieter, it will be turned up (within limits). This means that crushing a master to be as loud as possible, which was common during the “loudness war” era, no longer provides a competitive advantage on streaming platforms. In fact, it can make your music sound worse, because heavily limited tracks lose dynamics and clarity when turned down by the normalisation algorithm.
A well-balanced master in the range of -14 to -9 LUFS (depending on genre) with true peaks below -1 dBTP will translate well across all major platforms.
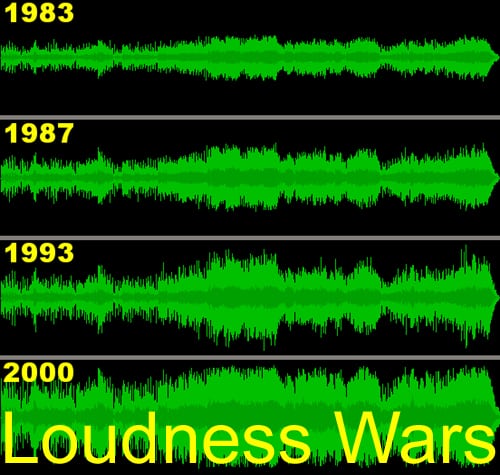
The desire to make records sound louder than the competition has existed since the days of vinyl. Known as the “loudness war”, this arms race accelerated through the CD era and peaked in the early 2000s, when many records were mastered at extreme levels that sacrificed dynamics for sheer volume.
The psychoacoustic reason is simple: when two recordings are played side by side, the louder one almost always sounds “better” to the listener (up to a point). This incentivised labels, DJs and radio stations to push for ever-louder masters.
Digital recording removed the physical limitations of vinyl and tape, making it technically possible to push levels even further. But the tradeoff was clear: overly limited masters sounded “squashed”, flat, and fatiguing. The music may have been louder, but it lost the dynamics and punch that made it feel alive.
Streaming normalisation has effectively ended the loudness war. When every track is played at the same perceived volume, there’s no advantage to being louder. The focus has shifted back to dynamics, clarity and musicality, which is exactly where mastering should be.
How Online Mastering Works
At Studios 301, we offer online mastering for artists and labels worldwide. The process is straightforward:
Upload your files. Submit your finished mixes through our online portal, along with any notes on your preferences (reference tracks, loudness targets, format requirements).
Our engineers master your tracks. Your music is mastered on the same equipment, and by the same engineers who have worked on thousands of major label and independent releases.
Review and approve. You receive your mastered files back (typically within a few business days).
Online mastering removes the need to travel to a studio while delivering the same professional results. Whether you’re in Sydney, London, or Los Angeles, you get access to the full Studios 301 mastering team.
How to Prepare Your Tracks for Mastering
Before sending your finished mixes for mastering, there are a few important steps to follow. Getting this right ensures the mastering engineer has the best possible material to work with.
Your checklist:
Remove limiting from the master bus. If you’ve been mixing through a mastering chain (such as iZotope Ozone or T-RackS), turn off the final limiter before bouncing. Leave any other processing that shaped your mix balance, but remove the brickwall limiting stage.
Check your levels. After removing the limiter, play back the loudest section of the track and make sure no signal exceeds 0 dB. Pull the output level down if needed to leave headroom.
Bounce at the project sample rate and 24-bit. Whether your session is at 44.1kHz, 48kHz, or 96kHz, bounce at the native sample rate. Always use 24-bit (not 16-bit) to preserve dynamic range.
Include reverb tails. Make sure your bounce extends past the end of the last audible sound, including any reverb or delay tails that ring out.
Label your files clearly. Include the track number, song title, and version (e.g., “01_SongTitle_Mix_v3.wav”).
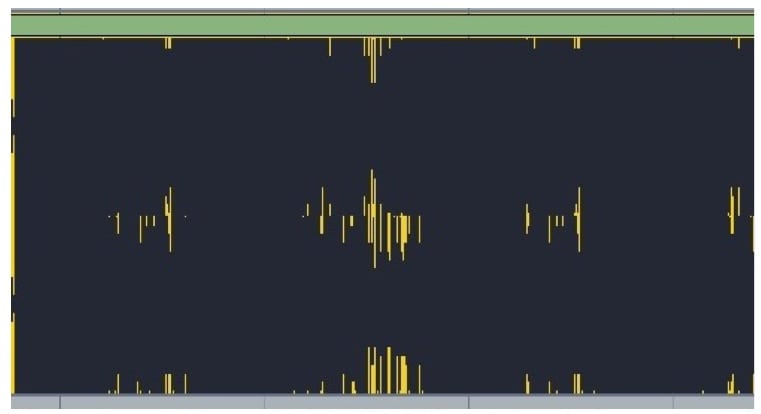
What your waveform should look like:
You want visible peaks and valleys in the waveform, showing natural dynamics. If the waveform looks like a solid rectangle (a “brick”), the mix has been over-limited and leaves very little room for the mastering engineer to work.
You do not want this, which resembles a brick:
this is an example of an overlimited waveform.
A mix with healthy dynamics gives the mastering engineer the space to apply both corrective and creative processing. An over-limited mix is like handing someone a finished product and asking them to improve it: the options are severely restricted.
How to Choose a Mastering Engineer
Choosing the right mastering engineer is an important decision. Here are a few things to consider:
Listen to their previous work. Our mastering engineers have credits or a portfolio you can review. Pay attention to whether their work sounds the way you like within your genre.
Consider the relationship. Mastering is a collaborative process. An engineer who understands your style will deliver great results.
Understand the turnaround. For time-sensitive releases, confirm the expected delivery timeline before booking.
What is audio mastering? Mastering is the final stage of music production, where a finished mix is polished, balanced and optimised for distribution. A mastering engineer applies corrective processing (fixing technical issues) and creative processing (enhancing the overall sound), then formats the audio for the intended release platform.
How much does mastering cost? At Studios 301, mastering is priced per track or per album. Contact us for a quote based on your project. Online mastering is available for artists and labels worldwide.
Do I need mastering if I’m only releasing on Spotify? Yes. Streaming platforms apply loudness normalisation, but they don’t correct frequency imbalances, phase issues, or dynamics problems. Professional mastering ensures your music sounds its best on every platform and every playback system.
What’s the difference between mixing and mastering? Mixing is the process of balancing and processing individual tracks (vocals, drums, guitars, etc.) into a stereo mix. Mastering takes that finished stereo mix and prepares it for release, addressing overall tonal balance, dynamics, loudness and format-specific requirements.
How loud should my master be for streaming? Most streaming platforms normalise playback to around -14 LUFS. A master in the range of -14 to -9 LUFS (depending on genre) with true peaks below -1 dBTP will translate well across all major platforms.
Should I master my own music? While it’s technically possible, professional mastering brings a fresh perspective, a calibrated listening environment, and specialised tools and experience. An impartial set of ears on your music can reveal issues that are difficult to hear after spending weeks mixing.
Get Your Music Mastered at Studios 301
Ready to take your mixes to the next level? Studios 301 offers professional online mastering for artists, producers and labels worldwide.