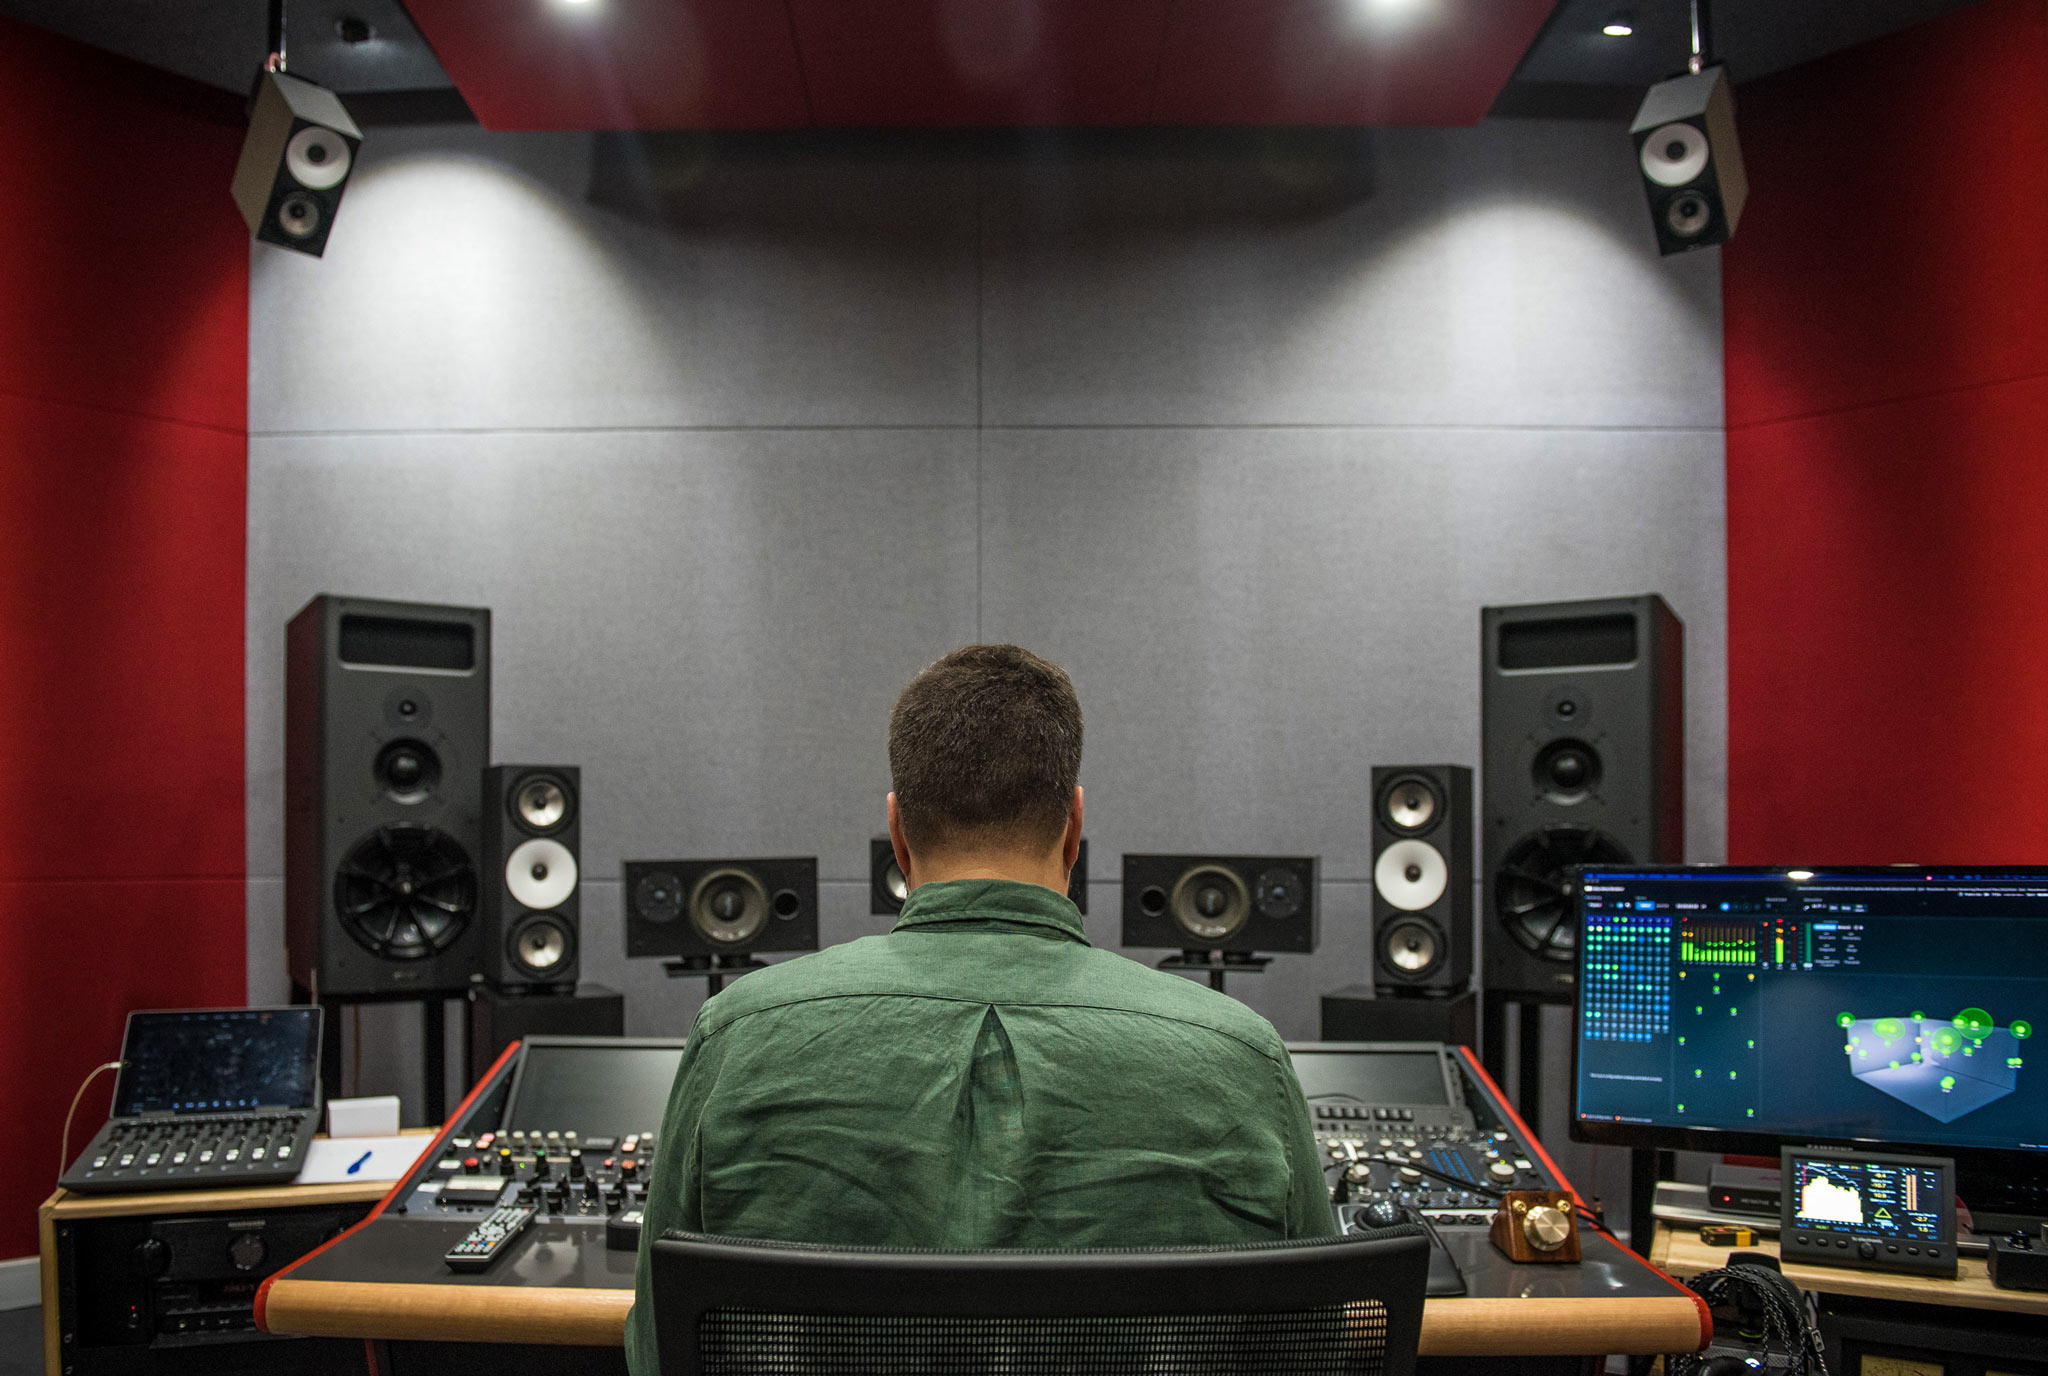
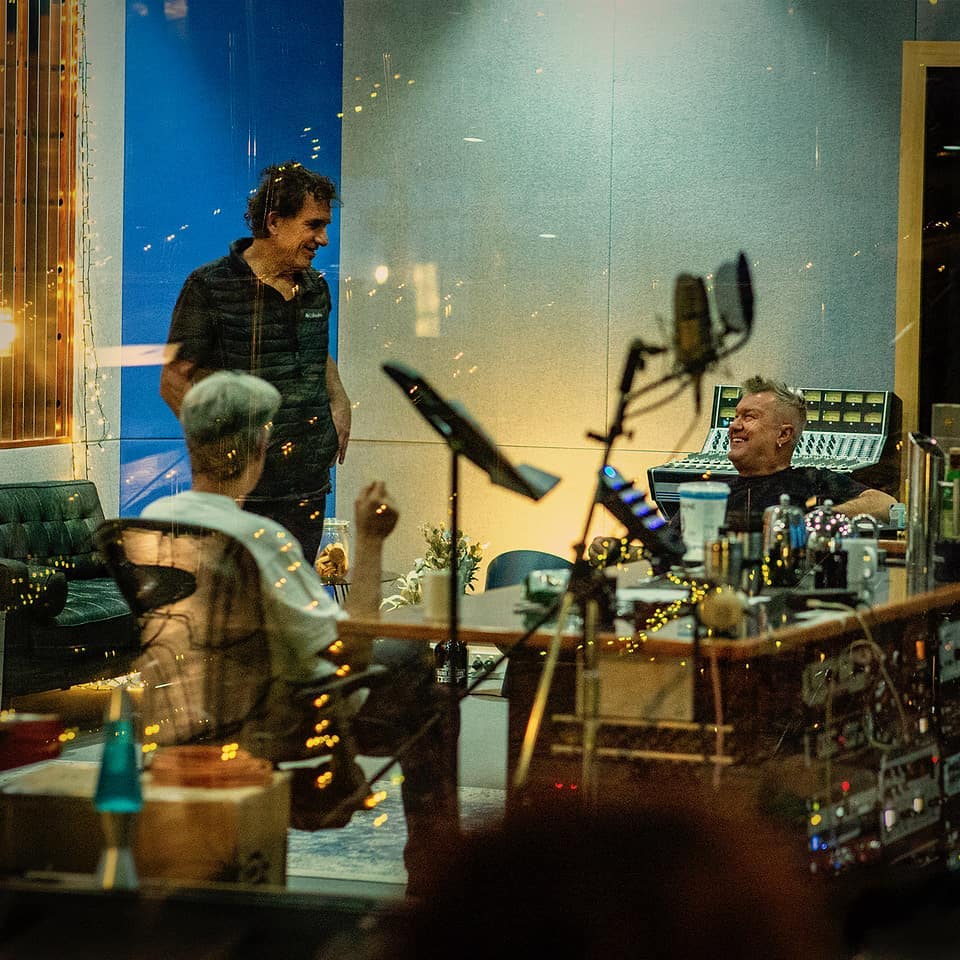
Stefan Du Randt breaks down the mixing of DOBBY’s “Ancestor” in Dolby Atmos Music and highlights the tricks and techniques to mixing a track in spatial audio.
From surrounding to immersive, Dolby Atmos is the next step in the evolution of spatial audio. Dolby Atmos Music takes your listening experience beyond the ordinary and puts you “inside” of every song, giving you unparalleled clarity for every detail of the music.
With more access to this technology than ever before, there’s never been a better time to take your listeners on a cinematic journey with Dolby Atmos Music. Ready to take your music to the next level?
The way we listen to audio is changing – it’s becoming bigger, bolder and more immersive than ever before.
While the Dolby Atmos logo can now be found practically everywhere (on your TV, in your local cinema, even on your phone), have you ever wondered what makes it special? How is it different from surround sound? And how does it work in comparison to the familiar stereo format?
In this blog post we’ll answer all of those questions and more, exploring the history of audio playback and all of the exciting things Dolby Atmos is bringing to the table.
All About Stereo
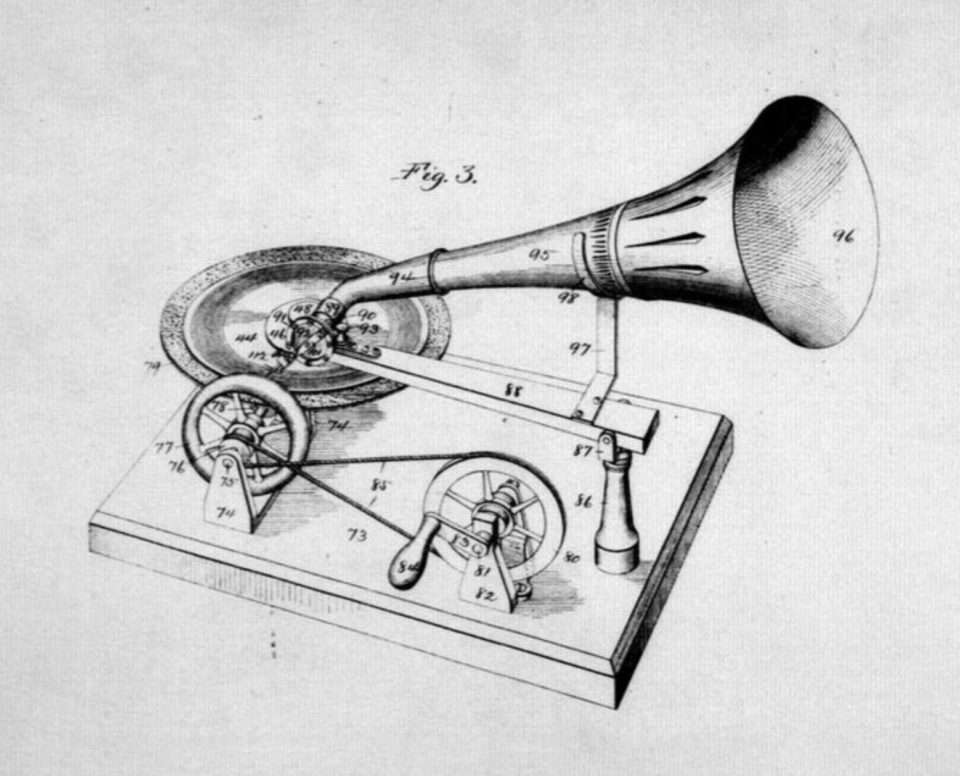
Early Gramophone Patent. United States Patent Office, Washington, D.C, 1895 (source)
Taking a quick look into the history of sound reproduction, we can see four main steps leading up to the creation of Dolby Atmos.
We began in ‘mono’ – a single channel recorded with a single microphone.
Around the 1930s, stereo audio began to appear. This type of audio can be recorded with two microphones positioned around the sound source (a guitar or piano are common examples) with the signals from each microphone assigned to either the left or right channel. The sound reaches each microphone with slight differences in timing and frequency creating the illusion of width and space when we listen back on stereo speakers.
A stereo listening setup involves two speakers. When a stereo track is played, an imaginary 1-dimensional ‘sound field’ is created between the speakers. To hear the most convincing ‘sound field’, you’ll either need to use headphones or stay equally distant from the left and right speakers.
We can move the position of a sound in between the left and right channels by decreasing either side’s signal level – this is called ‘panning’. A louder signal on the left side will move the sound towards the left and vice versa. We can also use mixing tools like EQ, dynamic control and reverb to give the illusion that sounds are closer or further away. Still, they remain trapped in the 1-dimensional sound field between the speakers.
Adding Other Dimensions
5.1 Surround Sound Setup
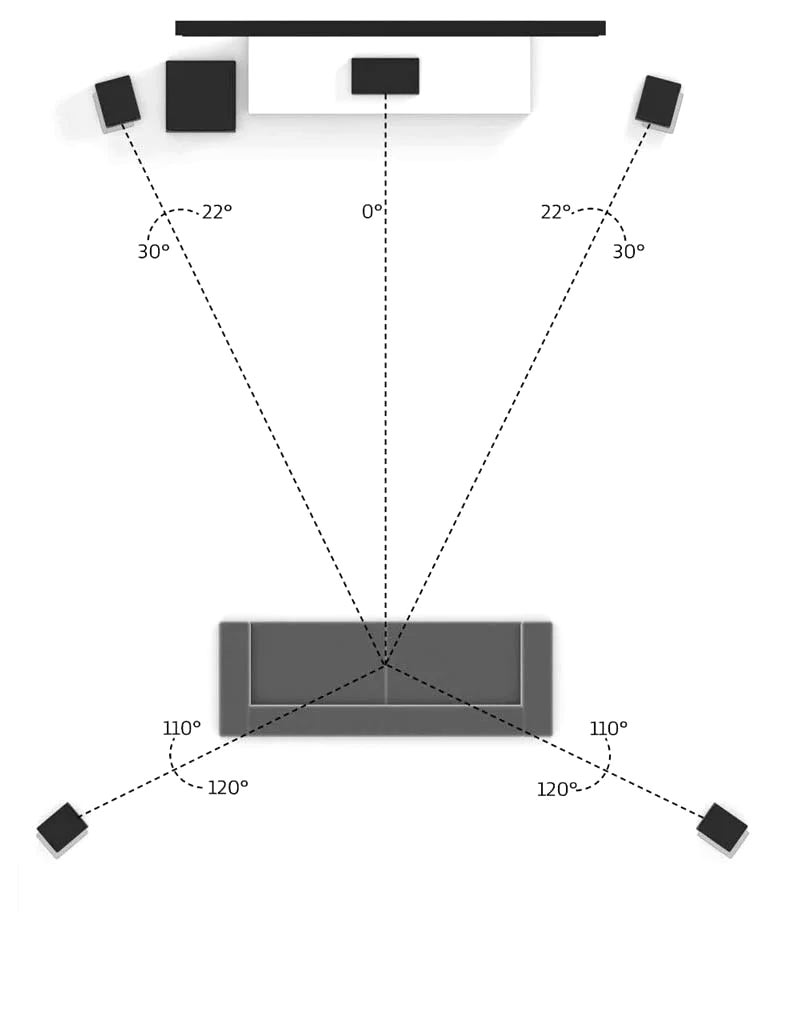
The next step after stereo was to add another dimension to our listening setup. A conventional surround sound format is described as either 5.1 or 7.1, meaning 5 or 7 speakers surrounding you at ear level (plus an added subwoofer, or the .1). This creates a 2-dimensional sound field where we can move sounds front-to-back as well as left-to-right.
5.1 is the most common surround sound speaker layout and is usually what you’ll find in a home cinema. It consists of centre, left and right speakers in front of the listener, plus surround left and right speakers slightly behind the listener. With this layout, we can pan sounds not just between a left and right speaker, but between any combination of the 5.
A 7.1 system uses 4 surround speakers, allowing us to split up the rear and side sound effects. In this layout, the side speakers are positioned at about 90 degrees to the listener, while the rear speakers sit behind.
These two layouts can be scaled up for commercial use. In a commercial surround sound cinema, for example, there will be multiple speakers in each position to account for the larger audience.
Expanding on this surround setup even more we can add either 2 or 4 height channels (written as .2 or .4) above the listener to reach the final step in our journey: a 3-dimensional sound field. With setups like these (such as 7.1.2), you become immersed in audio travelling front-to-back, left-to-right and up-and-down. Combining these makes for endless directional possibilities and adds a whole new creative dimension to the art of audio mixing.
All of these surround sound systems share one similar goal: to reproduce audio in a way that replicates how we hear in real life. It’s almost as if the sound is turned into a physical object within the space…
Channel-Based vs. Object-Based
Conventional stereo or surround formats are channel-based, meaning individual tracks in a mix are routed to a single stereo or surround output channel. A pan control on each track determines which speaker(s) the signal is sent to, whether it be left, right, back left, etc. In this format, the mix is committed to a specific number of channels, meaning that in order to listen to the mix, you need a playback device which is optimised for that type of mix and has the right number of speakers.
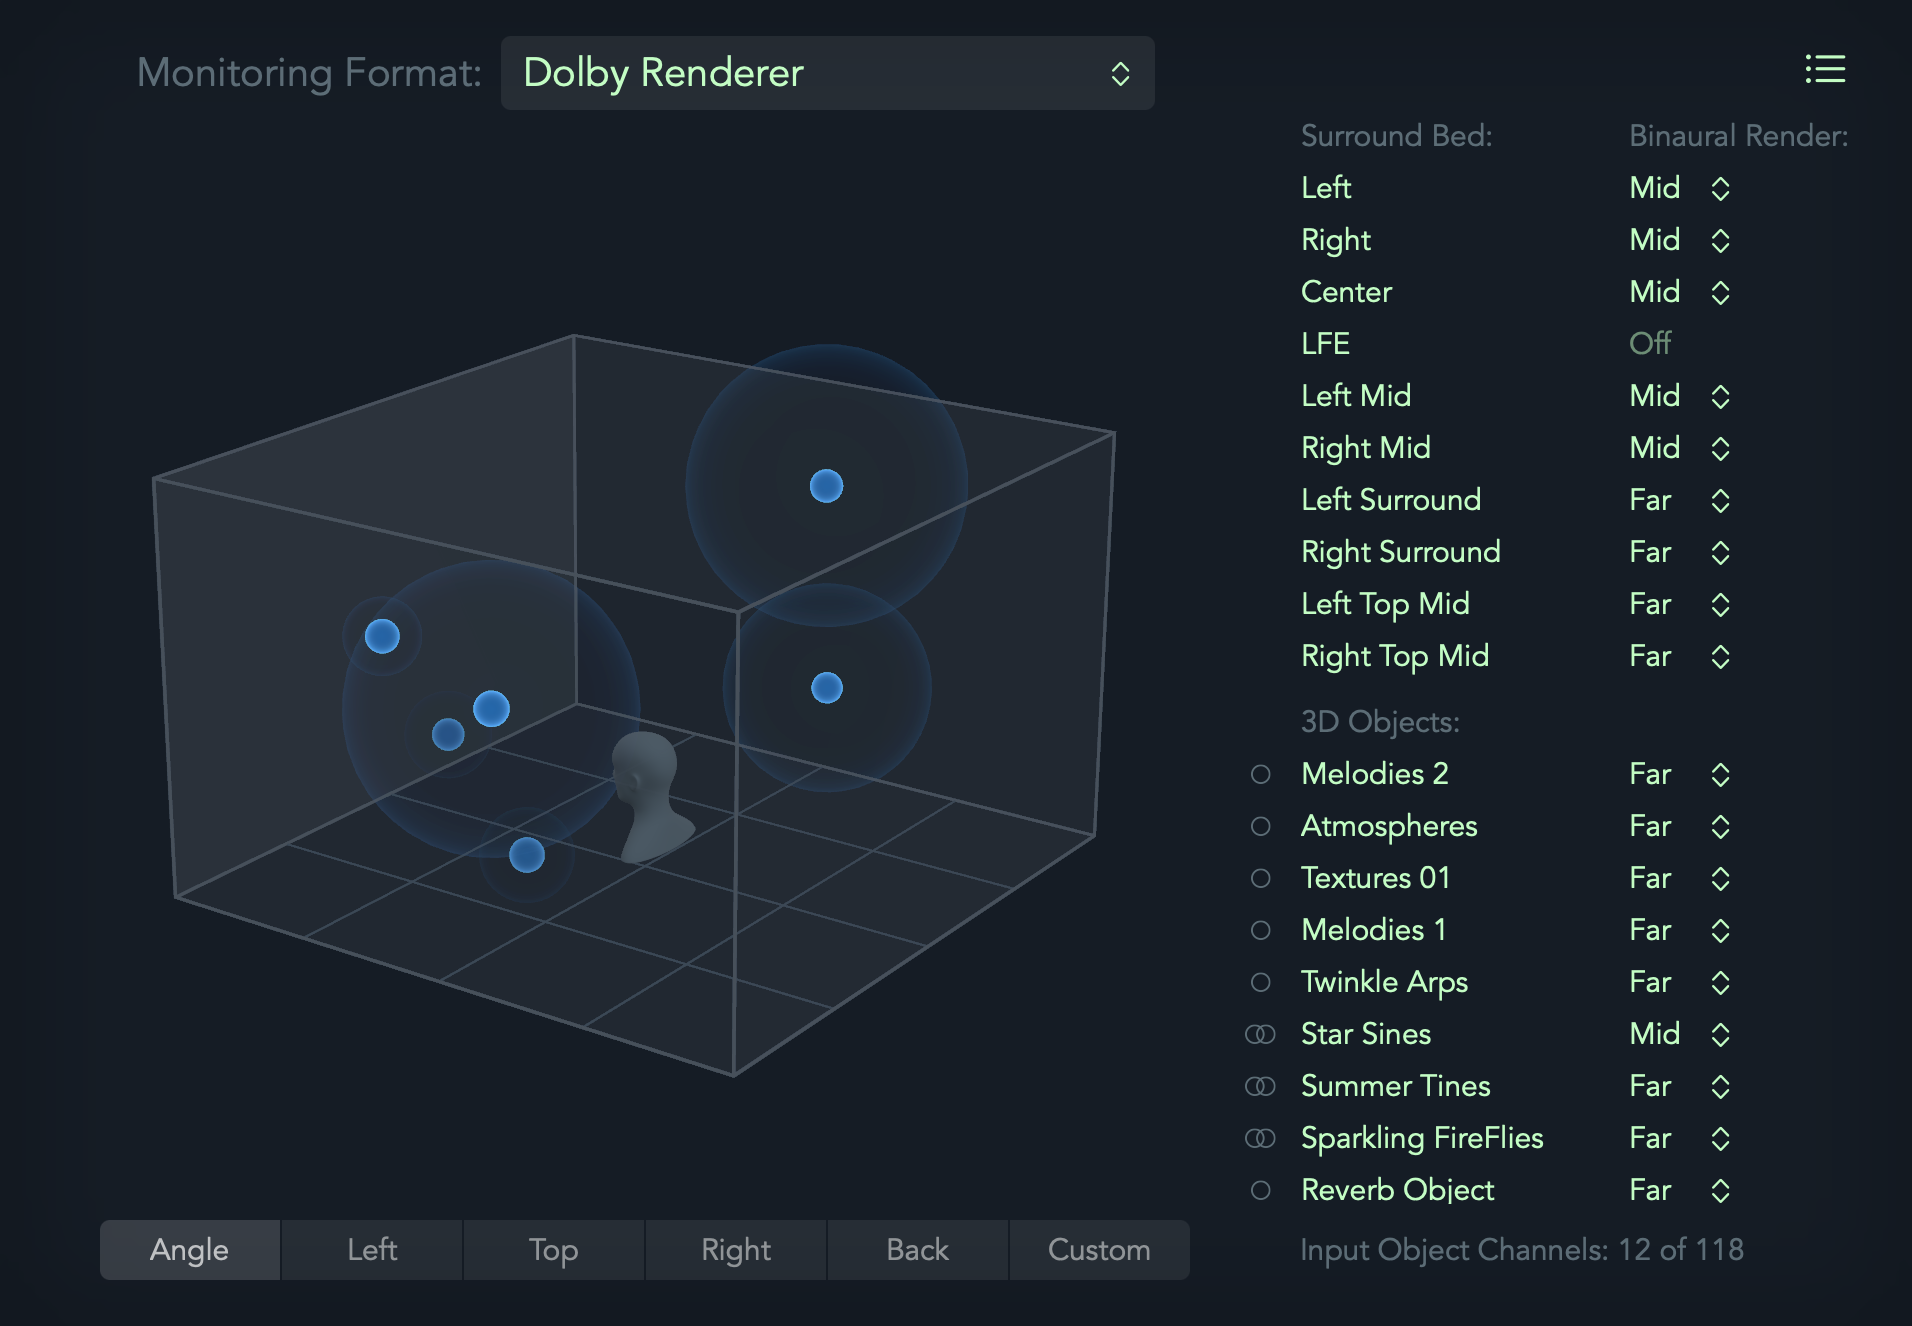
An object-based system like Dolby Atmos removes this restriction. Instead of panning a sound between a fixed number of channels, Dolby Atmos can store the position as metadata similar to X,Y and Z coordinates in the 3 dimensional sound field. When mixing, this metadata along with the audio for that track are sent separately to the Dolby Atmos rendering software. They are then re-combined to make an ‘object’.
However, the renderer software is not entirely object-based. You can also use it like a conventional channel-based system. This means that you can route some of your tracks to a surround output bus (like 7.1.2) and the surround panning position is baked into the signal rather than stored separately as metadata. These specific channels are referred to as the ‘bed’ in the Dolby Atmos Renderer.
Which should we use, object or bed? It’s easier to use a ‘bed’ for signals that won’t move around the 3D space, or those recorded in stereo or surround (with 2 or more microphones). Only tracks that are routed as a bed can be sent to the LFE channel, so that means any bass-heavy sounds should use a bed.
Objects are better for providing a really precise spatial location, or for signals that are going to move around. Objects can only have one audio signal, so multi-signal recordings like stereo would need multiple objects.
The vital part of Dolby Atmos is its renderer. With the renderer, the finished Dolby Atmos mix can be played back on systems with any speaker layout: stereo, 5.1, 7.1.2 etc. The renderer turns the signals into a channel-based output which fits the speaker layout it’s about to be played on.
Of course, this means that the more speaker channels you have available, the more accurate and precise the 3D sound field will be.
What About Headphones?
Stereo has always been our preferred listening format for music. Whether this means a pair of speakers in your home, at a live music venue, or on-the-go with your phone and a pair of headphones. But how can we make immersive audio with just a standard pair of headphones?
You may be familiar with binaural audio. This involves a recording technique where microphones are placed in a mannequin head to record a sound as if they were human ears. When we listen back on headphones, it’s as if we are inside a 3D sound field reconstruction of the recording location.
Our ears can detect the position of a sound by comparing volume, frequency content and timing differences between the sound in each ear. These differences are created by the physical distance between your ears and the shape of your head or ‘head shadow’. You can artificially recreate this by applying the same principals to an audio signal, a technique called binaural rendering.
Binaural rendering uses HRTF (Head Related Transfer Function) algorithms. It creates a virtual human head based on the average head shape and uses this to process the signal. Unfortunately, this means that the further away from the average shape you are, the less realistic the 3D binaural experience will be.
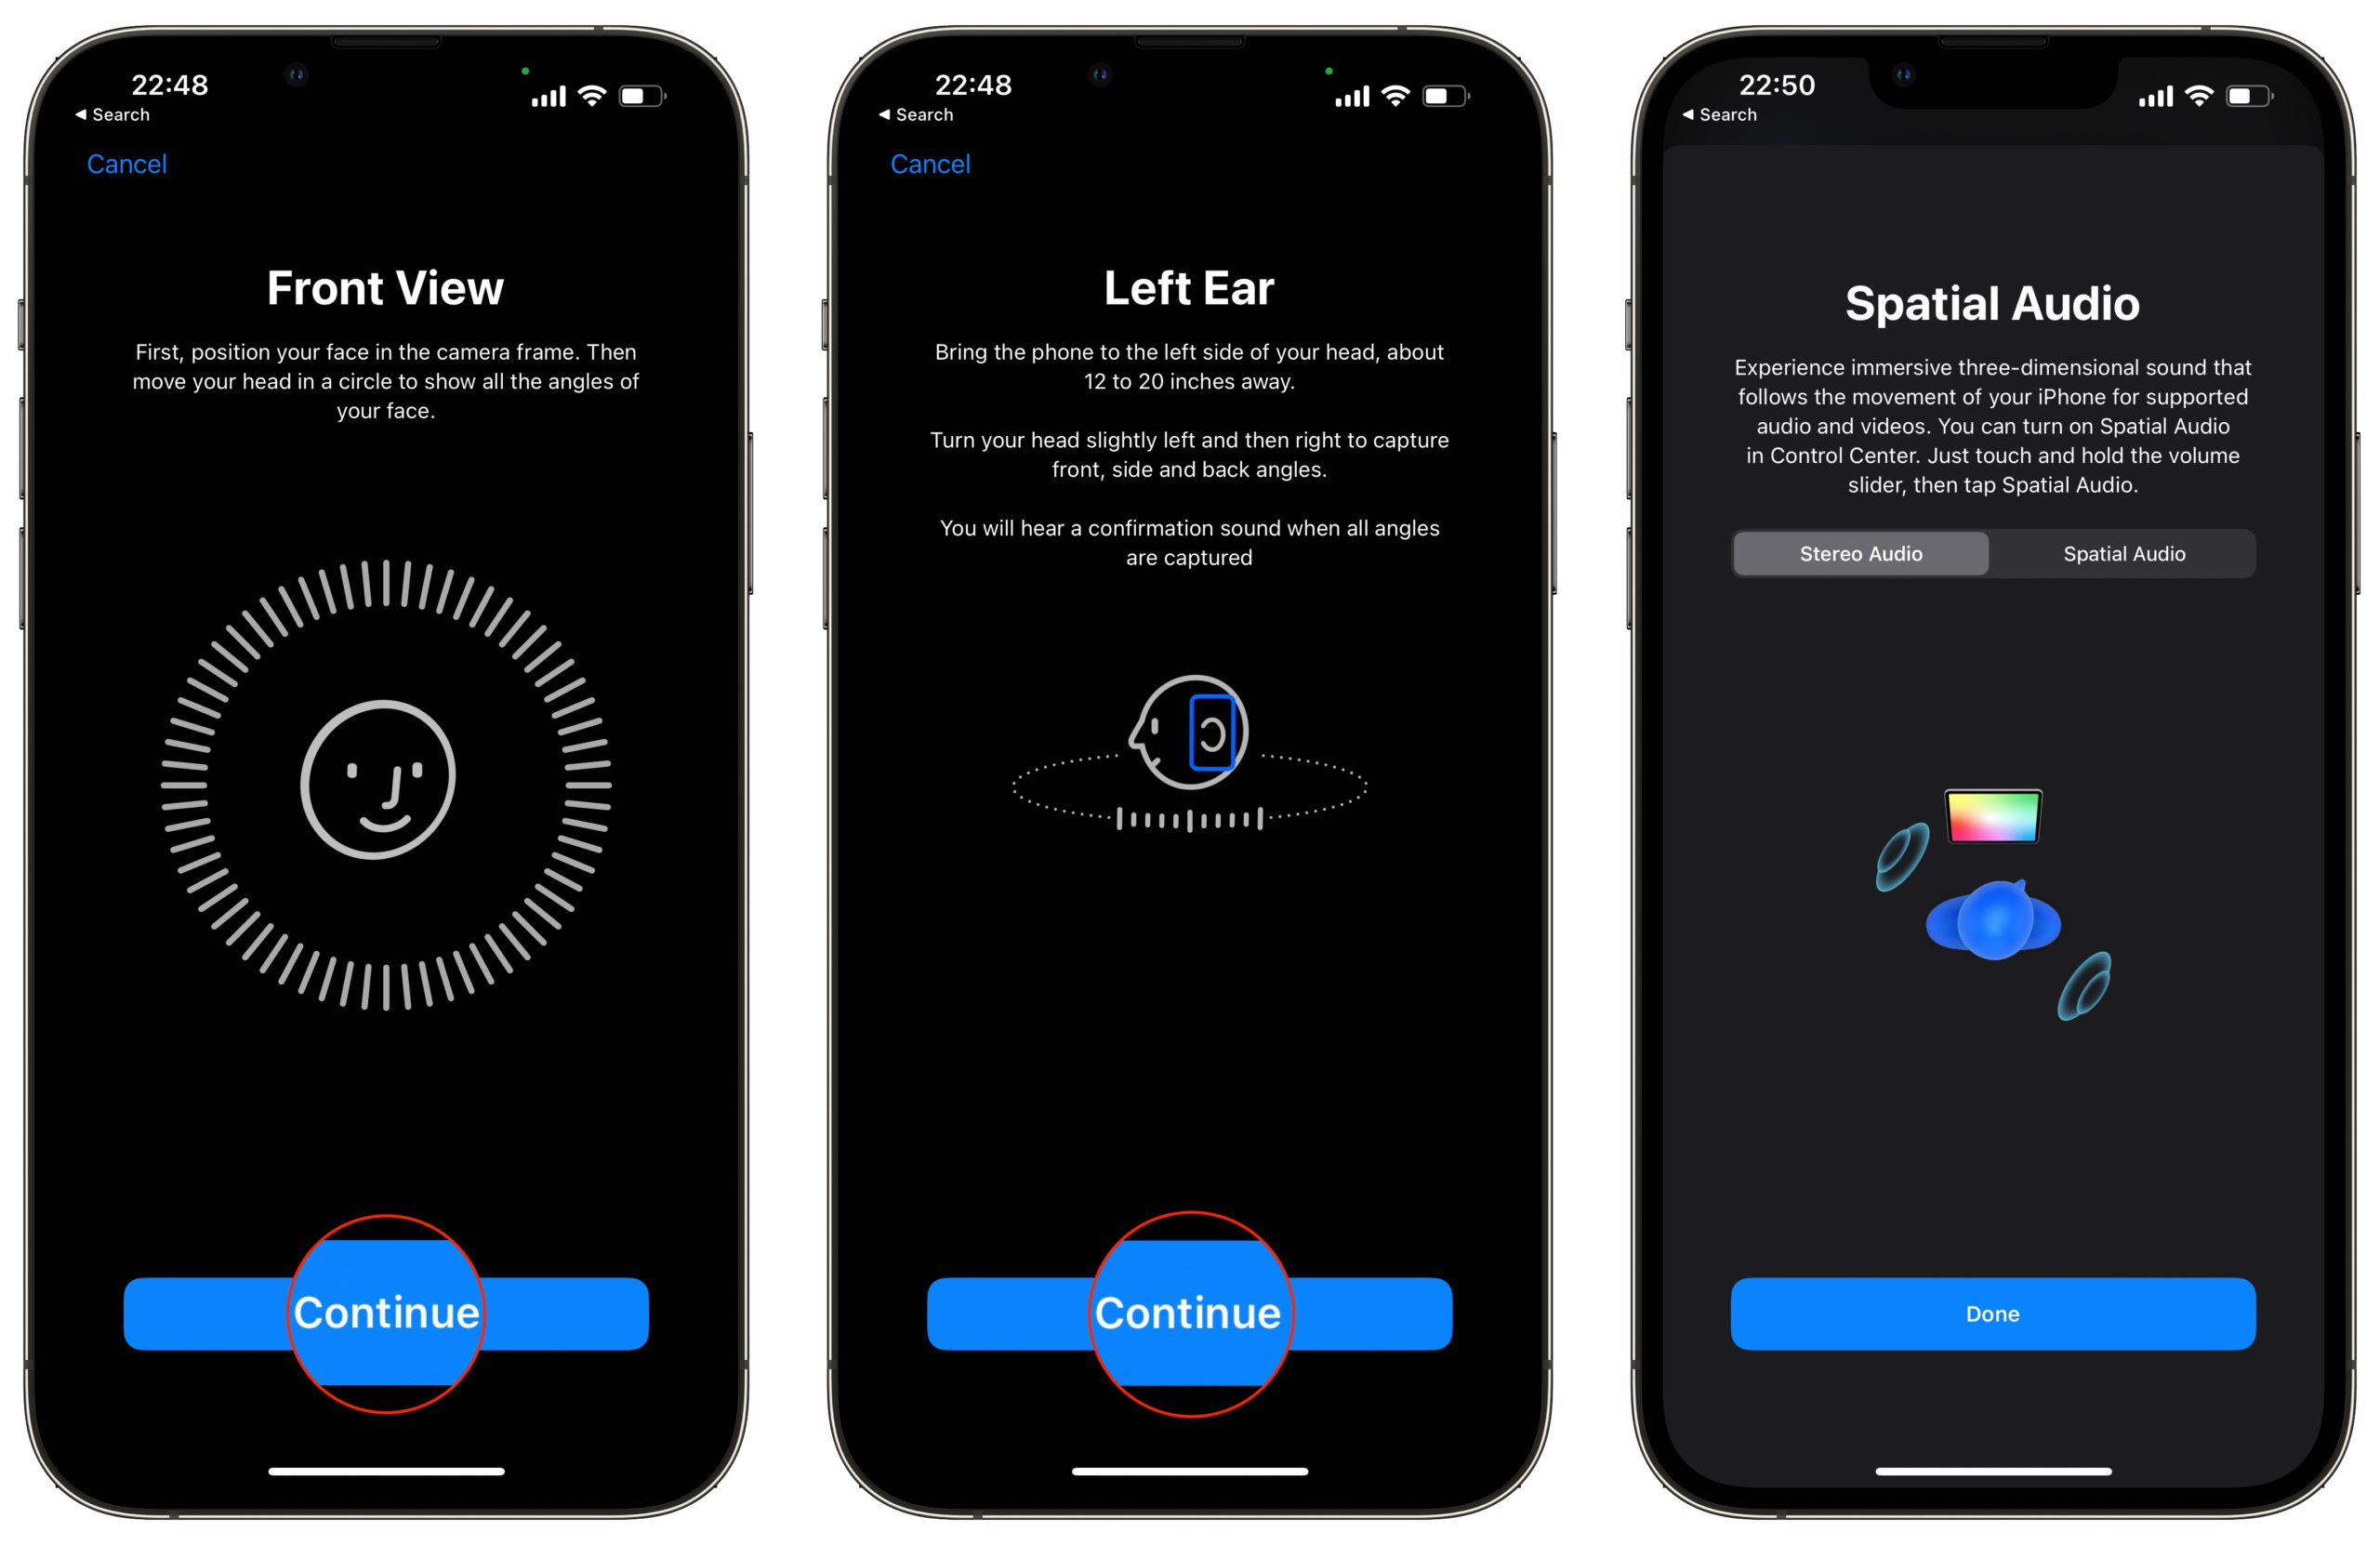
Measuring your personalised HRTF previously required measuring your head shape with complex technology in a sound-proofed room – not very easy to access. However, the release of iOS 16 this month has made ‘Personalised Spatial Audio’ available to iPhone users. To use it, you’ll need one of the more recent AirPods models plus an iPhone with iOS 16 and a ‘TrueDepth’ camera. The phone can then scan your face and ears in order to optimise the audio output for your unique facial profile.
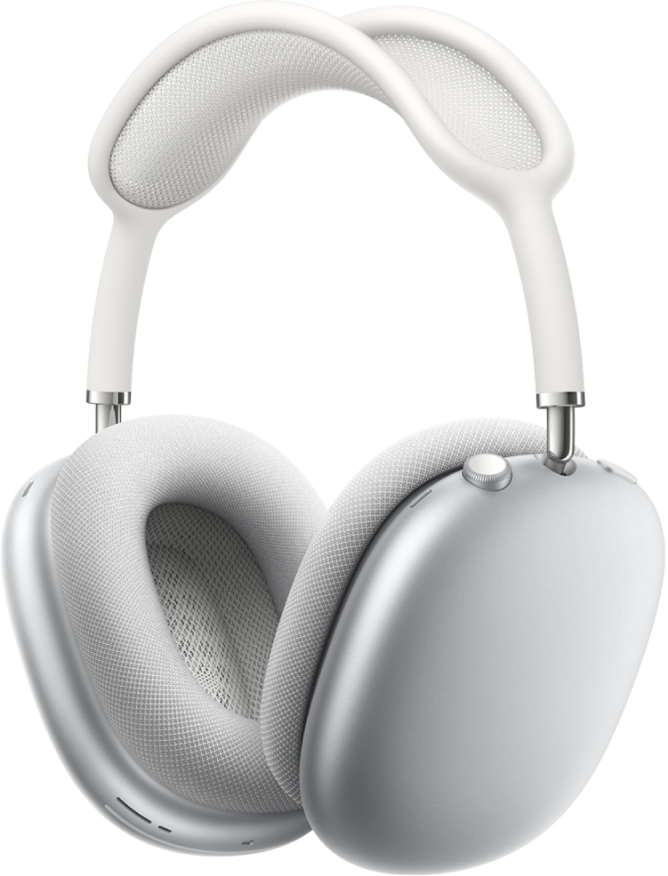
As well as various speaker systems, Dolby Atmos mixes can also be rendered to binaural audio. This is the vital feature which unlocks the world of Dolby Atmos music for average listeners using conventional headphone or stereo setups. Apple Music’s Spatial Audio with support for Dolby Atmos uses a similar system. Apple Music can now play Dolby Atmos tracks on all AirPods or Apple headphones, plus their latest devices with the right built-in speakers.
Dynamic head tracking is another important element in Apple Music’s Spatial Audio. This involves monitoring the position of your head and adjusting the audio so it appears to stay in the same place as you move. This enhances music-listening by not only recreating a live music experience but also allowing for our natural head movements when listening to sound.
Is Dolby Atmos the future of music?
At first it seemed unlikely, but with all of these developments towards integrating Dolby Atmos into every listening device and setup we use, the world of immersive audio is effortlessly establishing itself in our everyday lives just as stereo once did.
Do you want to know how to get your tracks mixed and mastered in Dolby Atmos?
A request we frequently receive at the studios is:
“Do you have a copy of my files? My laptop/hard drive died and I don’t have them anymore”.
With the rise of digital audio, computer and cloud-based data storage, we thought it may be helpful to provide some tips on good practice to keep your files safe and accessible for the long term.
It may be a tedious chore, but it is essential you back-up your important files. If the session files for your ground-breaking / genre-bending new music are only stored in one place, i.e. on your laptop, then you’re one tech disaster away from heartbreak. Hard drives have a relatively short lifespan; you should not expect them to last longer than 3 to 5 years, and sometimes much shorter than that. I’ve had drives fail that were mere months old. If you have your files only on the one hard drive that gives out, it can cost many thousands of dollars with a specialist to try and retrieve them.
A great and easy-to-remember concept for this is the “3-2-1 backup rule”, which you can read more about here. To surmise,
You want three copies of your files
On two different storage types
And one offsite backup
A practical example of this is to keep any important session files neatly organised on your computer, have a copy on an external hard drive, burn them to a DVD, and another copy in the cloud. That way you have more than covered the 3-2-1 rule and nothing short of armageddon will keep you from your files.
The next question then is, what should you keep? Well technically you can probably keep everything related to a session. Space is cheap these days so it may be worth holding onto all your files, i.e. the out-takes, the demos, the mixes, the masters. But then it’s also worthwhile considering future proofing your sessions. In 15+ years time it’s highly unlikely that you will be running the same system you are today, and if you try to open the project session you may find it incompatible, as plugins won’t load etc. It’s therefore good practice to render out the multitracks of your mixes into two sets of 32bit floating point WAV files, one set with plugins on and one set with them off, so if in the distant future you want to remix the tracks, you can recall all the elements with minimal fuss.
Key Takeaways:
Hard drives WILL fail so if you only have a single copy of important files you are setting yourself up for heartbreak.
Set aside an afternoon every few months to make sure your backups are up to date and remember to test them.
Be kind to your future self and assume your current projects won’t be compatible in the future so render as much as you can into WAV format.
You may have noticed that with the introduction of iOS 13 and macOS Catalina, Apple’s iTunes software application has disappeared from the Mac and been replaced by three separate apps: Apple Music, Apple TV, and Apple Podcasts. The iTunes Store does still exist, however is now housed within the Apple Music application.
In 2012, Apple introduced the ‘Mastered for iTunes’ format. Whether consumers purchased a song as a standard digital download or a Mastered for iTunes version, they still received the same AAC file from the iTunes Store. The difference lay in the files that were supplied by the mastering studio.
To receive the ‘Mastered for iTunes’ or ‘Apple Digital Master’ badge, mastering engineers and studios are required to be an Apple-certified mastering partner, and supply files where the true peak levels are below 0dbTP, 24bit, and at the highest possible sample rate. Upsampling is not permitted, however 44.1kHz is still accepted if the song is recorded at that rate. The reasoning is that the AAC encoder produces a better result from high-resolution files that do not have true peaks at or above 0dbTP.
Despite the rebrand from ‘Mastered for iTunes’ to ‘Apple Digital Masters’, mastering engineer submission guidelines remain the same and you’ll still be able to preserve the highest-possible quality master for digital distribution through Apple Music.
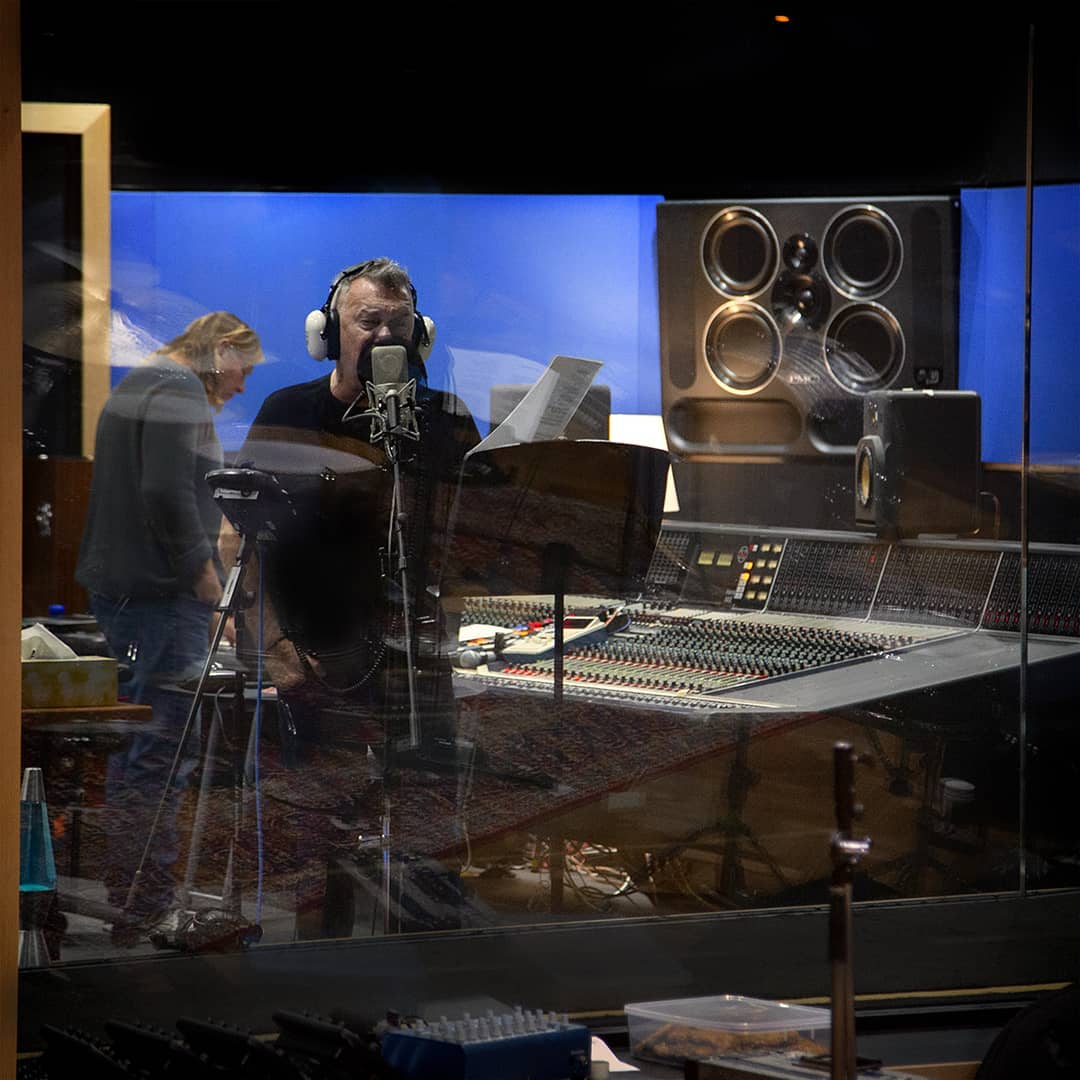
Studios 301 recently hosted the legendary Cold Chisel recording their new album in Studio 1 with producer Kevin Shirley. Our assistant engineer Owen Butcher who was on the sessions gives his recap of the experience and working alongside arguably the biggest act in Australian Rock.
written by Owen Butcher
Despite working at a well known studio it’s not every day you get to work with musicians that qualify for legendary status. You meet a lot of young, exciting and upcoming artists, but bands you grew up listening to on the radio are a different breed. You know all the words and how all the songs go, but as you don’t know them personally you make up your own stories and ideas of how they are as individuals. This can be a bit of a shock when they arrive at the studio as there is usually a certain amount of re-adjustment you need to do. Luckily in the case of Cold Chisel the band members are exactly as you’d imagine. Jimmy is excited and keen to get singing, Ian very thoughtful and considered in what he’s going to play, Don is all about the song and attention to detail, Phil is polite but always up for playing a mean bassline, and Charley is caring and always looking to push the songs to their limits. Kevin Shirley was producer on the record, and he liked to be very hands on with the Pro Tools, the band and the songs.
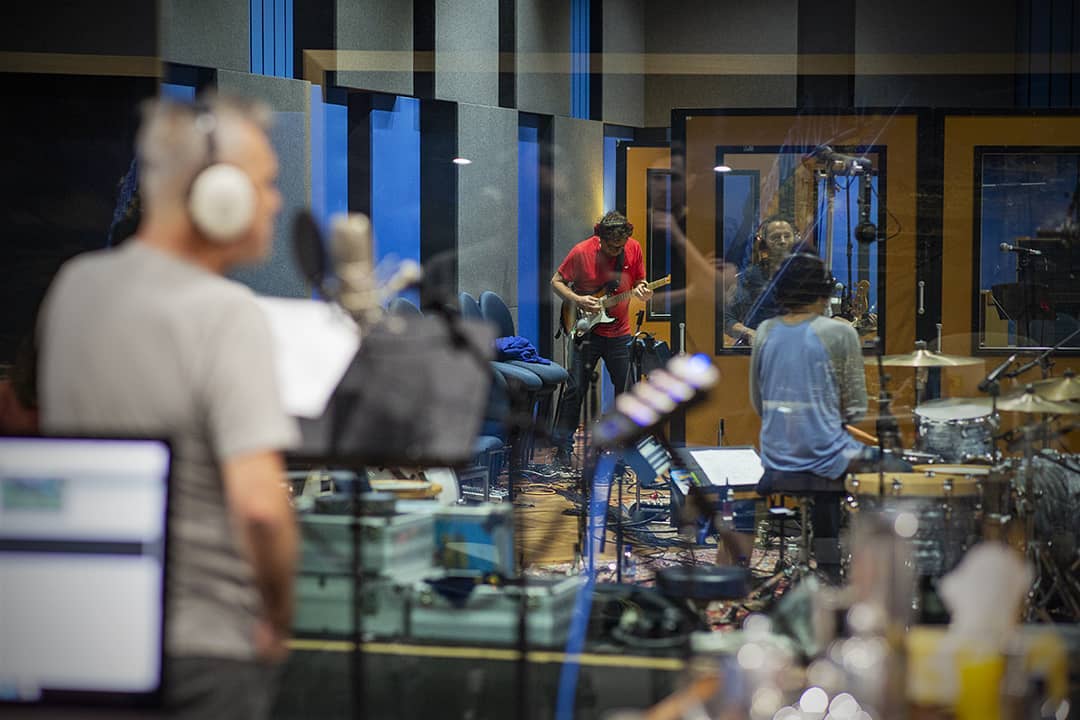
Fans of the band will be pleased to note that almost everything was tracked live with minimal overdubs. In almost all cases it was everyone in the room playing together. We set them up with Charley out in the large room to give the drums a bit of space, with Phil standing near the drumkit with a baffle in between them. We did this so Phil and Charley could communicate with each other visually through the window in the baffle, but also keep Phil’s headphone mix clear. Ian was also sitting in the same live room with his pedals and amp heads, with the speaker cabinet in a booth. We ended up keeping the booth door open and making what I dubbed a ‘sound corridor’ with baffles and tontine. This isolated the guitar amp enough from the drum mics, but also gave Ian the feedback he needs from the amp on the guitar strings and kept him as close to the drumkit as possible. When playing the upright and grand pianos, Don was in the other booth for isolation purposes. We took the front of the upright piano off to expose all the strings and make the piano less boxy sounding. When we was playing other keyboards he was sitting in the live room with everyone else as we could DI any Wurlitzer and Nord parts. Hammond organ was run through the Lesile cabinet (Don during recording: “You should see what I learned you could do with a Leslie back in the day after carrying it up 4 flights of stairs at the Grafton RSL club!!)”. Jimmy was actually singing in the Control Room. He liked to be near Kevin to discuss ideas, and he sings so loud that the studio monitors don’t cause big enough bleed issues.
Equipment and microphone wise, we used mostly basic microphones for the setup as they’re a straight up rock band (U47 kick drum, 421’s Toms, 57’s on guitars, snare etc), though we did add some Sony High Resolution microphones to the mix as Overheads (Sony C-100) and on the upright piano (Sony ECM-100N) to help give a bit more extended range to the other traditionally less detailed sounding mics. We used a Neumann M149 on vocals because it can take a higher SPL than our other vocal mics. All of these were run through the Neve 88R preamps and EQ, with compression from the 1176 on Vocals, LA2A and Pultec EQP1A on the bass and a touch of Amek 9098 compression on the piano.
After all the main tracking was completed, we finalised the guitar solos for each of the songs with Ian. This was a fun process, where we isolated the amp we were tracking in the booth with the door shut, but split the signal from his amps to another Marshall cabinet which we put near him. Any feedback or FX he could use the Marshall the create them, but they would play out of the amp in the booth. In addition to this, we have Genelec 1031A monitors from Mitchell Rd hung from the ceiling of the line room, so the whole band mix was pumped through that like a PA system as though he was playing at a live concert! This made him at feel more at home during tracking and we all know this produces much better results.
The band were a pleasure to work with. They worked very hard and purposefully throughout, making sure as they went to record what was best for each of the songs to do them justice. I also noted that they can appreciate a nice Whisky or two during any downtime, so they’re always welcome in a studio I’m working in.
Here at Studios 301, we field a lot of questions on how tracks should be prepared and submitted for mastering. Modern day digital audio workstations can throw up a dizzying array of options at the export window, thus we’ve outlined our preferences on how you can provide your mixes to our mastering engineers for optimal results.
We prefer interleaved 24Bit Stereo WAV files to work from. AIFF and/or dual mono LEFT and RIGHT files can also be accommodated. If you only have 16Bit source files, these are still acceptable.
The sample rate of the mixdown file should be the same as what the project was recorded at. Leave any downsampling to us. If you require masters outside of the standard 44.1Khz sample rate, please let us know.
A lot of queries we get regard master buss processing, whether it should be left on or not. This is often case-by-case, as it’s easy to overdo compression/saturation/limiting on the master buss. We don’t advise removing it however, as it may lose the intended vibe. If you are unsure, you can provide us with both a version with master buss processing on, and a version with it off, or ask us for a mix evaluation.
If you have any specifics about edits, fades, crossfades, or spacing between songs, let us know upfront to minimise delays in completing the project. You can provide us with audio examples of timings and fades as it’s often easier to do this than explain over email.
If you require versions of the masters as singular tracks as well as versions with the tracks crossfaded or edited together, it’s also best to let us know this in advance.
Please feel free to email mastering@studios301.com with any other questions. Otherwise, we’ll look forward to mastering your new tracks!
Blog by Jack Prest, Producer/ Engineer at Studios 301
If you’re working on electronic music production or online mixing, there will come a point in every track that you need to send things a little left of centre. Here’s some tips on how to get a little freak into your beats.
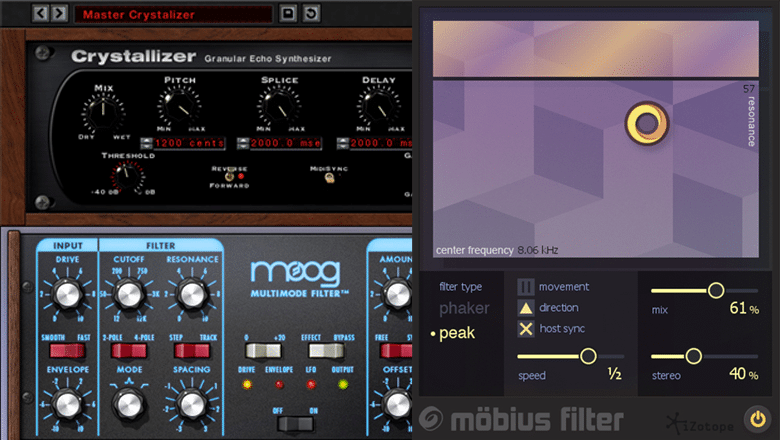
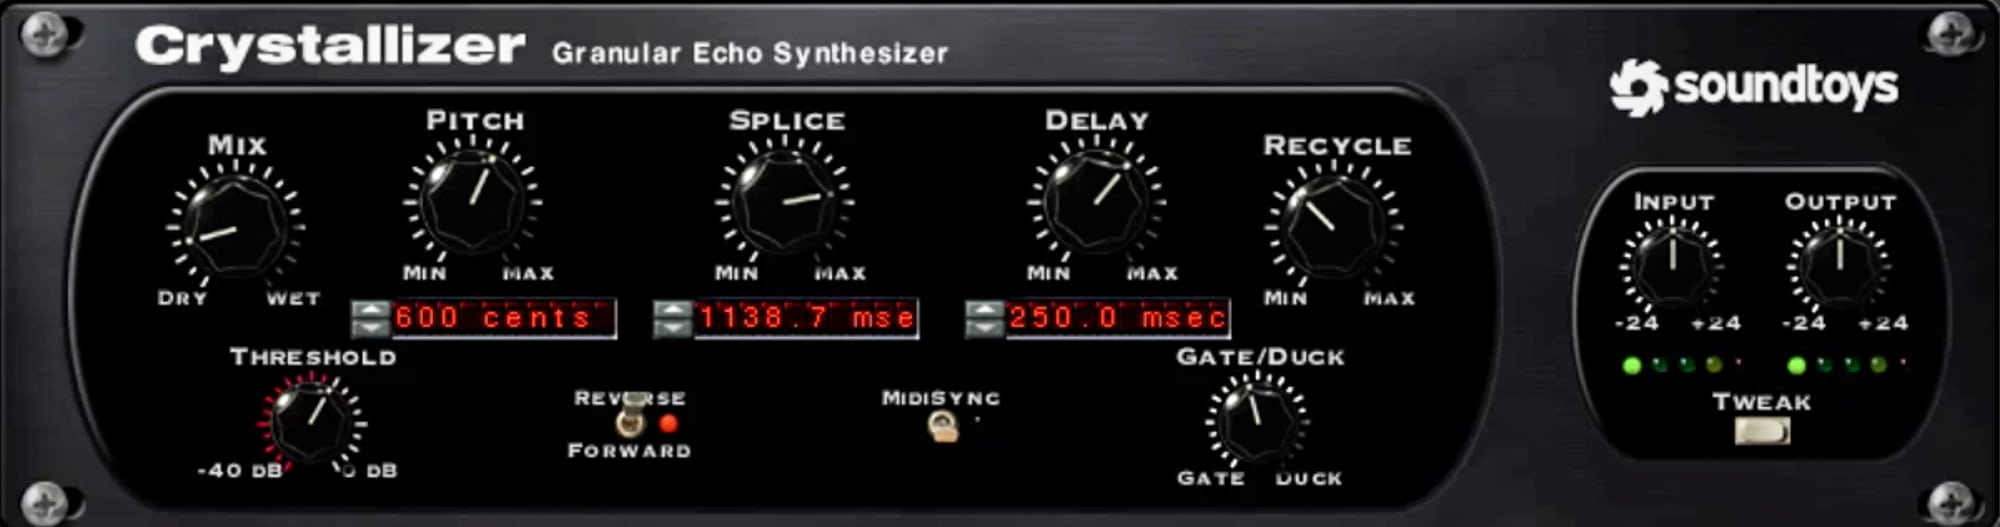
1. Crystallizer – Sound Toys
This plugin is epic and throws out all sorts of weird pitch modulations and sounds. The presets alone have a wealth of sonic possibilities and you can really get deep into sound design when you start tweaking. All Soundtoys plugins have a hidden layer or parameters, press the tweak button on the main GUI to access them.
2.Moog Multimode Filter – UAD
I love this plugin. Not only can you throw it on an average sounding soft synth and bring it to life but you can really get some crazy tones. The Drive function adds some super tasty harmonics (try the +20db switch for ultimate destruction) and the filter self-oscillates when you crank the resonance. You can also tempo sync the modulation which makes it great for mangling beats.
3. Re-Amping
I’d strongly recommend investing in a re-amp box and a little amp or some guitar pedals. There is a whole world of sounds available as stomp boxes and it’s a great way to add some real sounds to an otherwise ITB track. Even if the pedals are cheap and nasty and sometimes that’s exactly what you want…
4. Re-Micing
You should also try recording audio playing through your monitors with a microphone. The mic doesn’t need to be anything fancy. Move the mic around to create a sense of movement and modulation in the sound. Just be careful to mute the input of the mic to avoid feedback. Izotope make a plugin that imitates this process called Möbius Filter, that I highly recommend. (Fun Fact – This technique was a big part in how they made the original lightsaber sound!!!)
5. Record your own sounds.
No better way to get something weird and original into a track then to make it yourself. Experiment with things around the house (pretty much everything makes a noise) and sculpt those sounds using your DAW’s samplers and effects.
Plugins have come a long way, so much so that many people are now working purely ‘in-the-box’. While some of the big name developers are selling plugins for hundreds if not thousands of dollars, there are a tonne of great indie developers releasing plugs for free.
The following is by no means a comprehensive list, just a selection of my personal favourites:
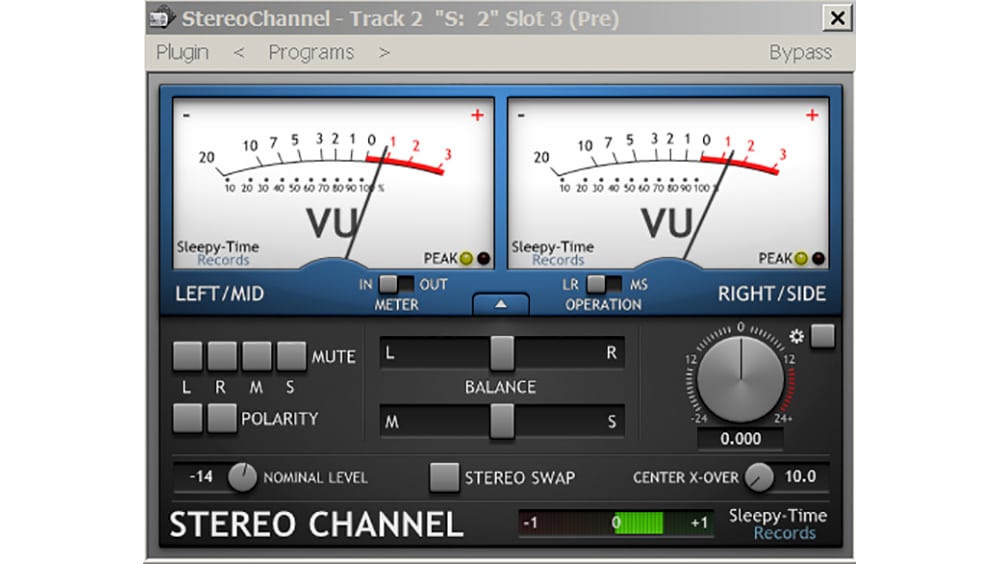
1. SleepyTime DSP StereoChannel
Learning how to read VU meters is invaluable for mixing and mastering. The way the needles move can tell you things about the mix that other types of meters can’t, yet finding good hardware VU boxes isn’t easy.
SleepyTime DSP’s StereoChannel is an excellent software alternative with nice big clear meters, and the ability to set a nominal level. It also sports very handy stereo based features
such as M/S and L/R balancing and muting, emulating features found on monitor controllers.
It’s one of those plugins that goes on the master channel of every project.
2. Reaper Free Plugins
I’m a Reaper convert. I love it’s flexibility, open and moddable nature that makes most other DAWs feel needlessly restrictive in comparison. Like every DAW Reaper, it comes with a bunch of built in plugins and they offer those plugins as free VSTs to use in other hosts if you prefer. While they won’t win any graphic design awards, they sound great and offer a lot of utility. You get the standards, a compressor, an EQ, delay, gate and multi-band compressor, but the really interesting pieces in the package are ReaStream, ReaFIR and ReaJS.
ReaStream lets you stream audio over a network. Put ReaStream in send mode as a VST insert on a track (you can also use it in multichannel mode), then on another computer on
your network open your DAW and insert ReaStream in receive mode. Hitting play on the sending computer will stream the audio to the receiving computer. It’s really simple to setup and very useful. Just make sure you know the IP of the receiving computer otherwise you could inadvertently DDOS your network.
At first glance ReaFIR looks like a standard EQ, though it’s anything but. I’ve found it useful to use in “subtract” mode for quick and easy noise reduction. Take a noise print then hold
CTRL and click on the graph to raise or lower the threshold of reduction, and you’ll have a surprisingly good and very light on CPU noise reducer (increasing FFT size will increase accuracy of the noise reduction). This can be great when you are working on multiple channels of audio that need noise reduction as more specialised plugins like Izotope RX can really tax your CPU load. You can also use it as a sound mangler using the compress and gate modes. It’s fun to grab a curve of a sound in the subtract “build noise print” mode, then carry that curve over to compress or EQ mode and essentially force that print onto a different sound. Things can get crazy sounding pretty quickly.
ReaJS is for the aspiring DSP programmers out there. You can use it to make or modify your own plugins in JavaScript. There’s a community of people out there making and sharing their own JS plugins, thus installing ReaJS opens up a whole world of more free plugs:
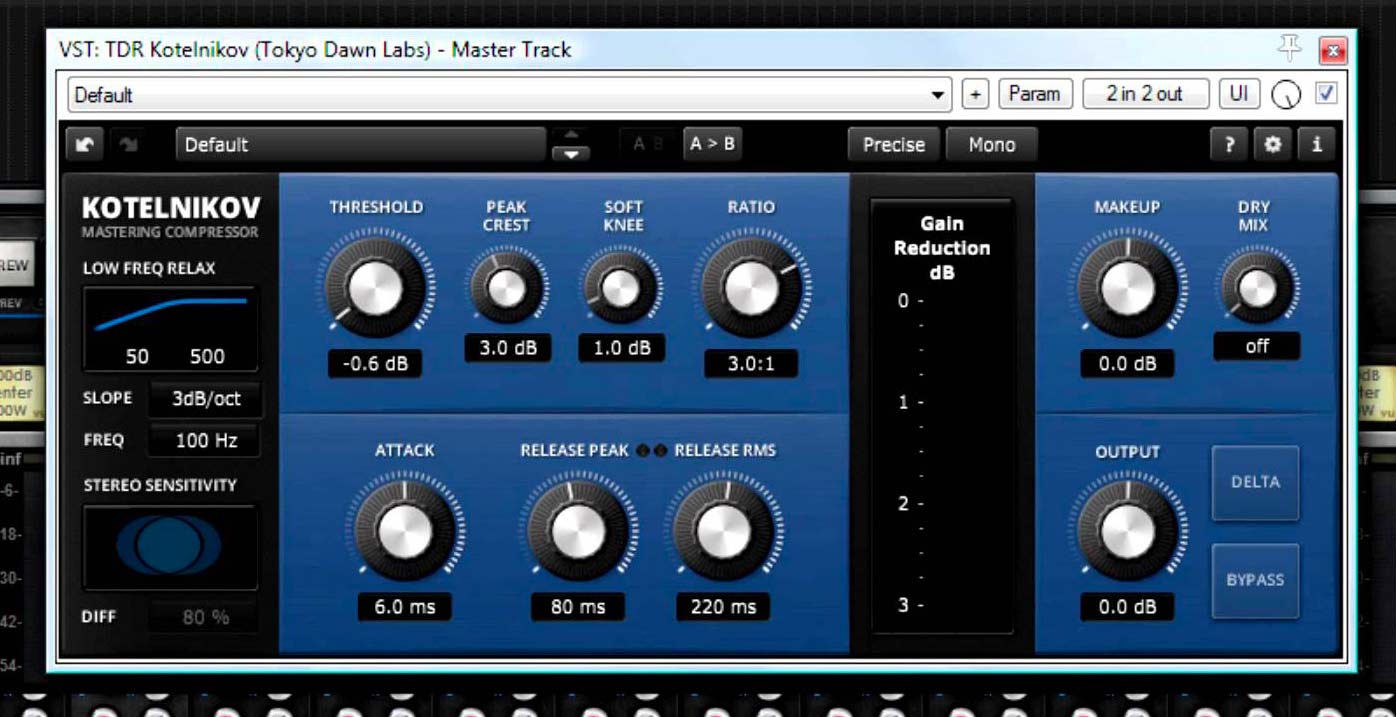
Tokyo Dawn Records is a record label with the unique distinction of also creating and distributing plugins, a lot of them free. They have a raft of amazing stuff, like the collaboration with Variety of Sound that resulted in the most excellent SlickEQ (http://www.tokyodawn.net/tdr-vos- slickeq/). My favourite is their buss compressor Kotelnikov which comes in both free and paid (albeit still cheap) versions. The free version is not as gimped as you might expect, and is preferable in some cases due to it stripping out a lot of the advanced features that you probably won’t need a lot of the time.
It works by using two thresholds and two releases, one for the peak and one for the RMS of the signal which results in an extremely clean and transparent sound. Kotelnikov works great as a master buss compressor due to the way it handles complex material.
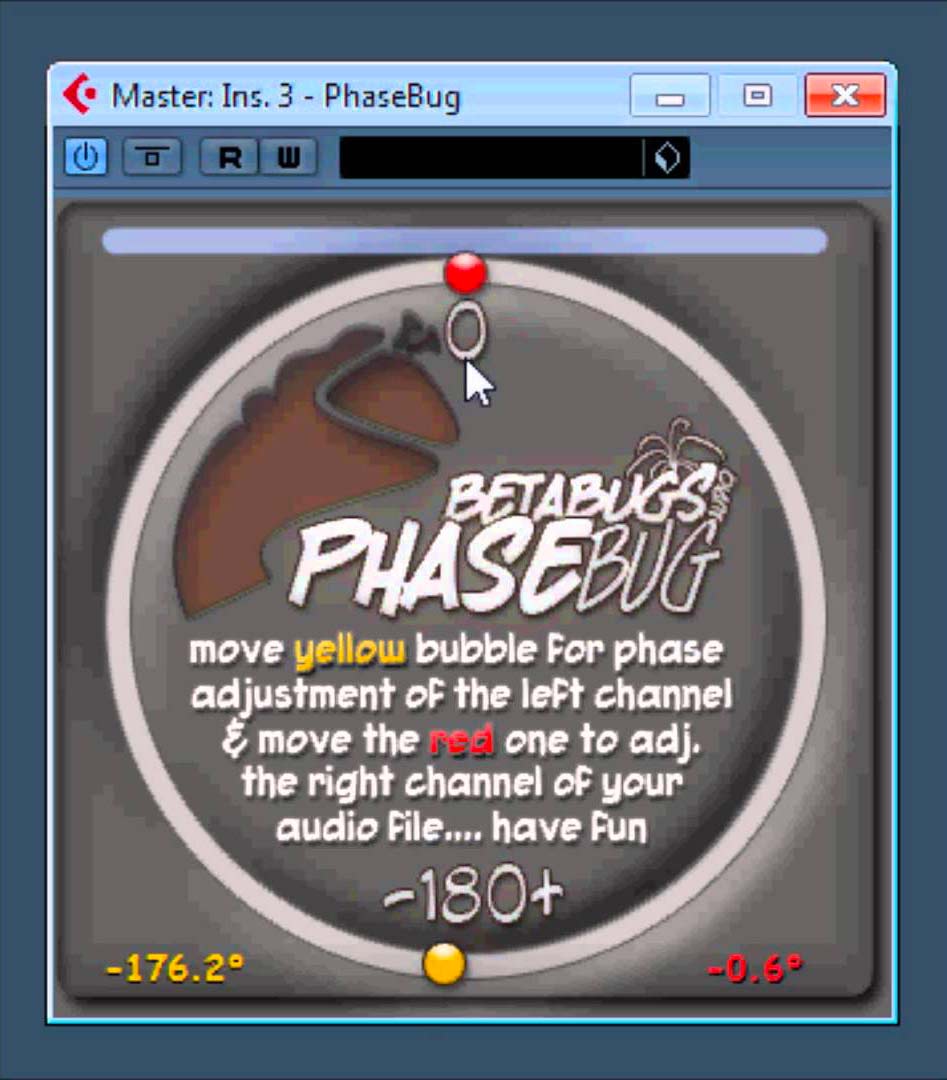
4. Phase Bug
Every DAW comes with an invert phase button, however you are usually limited to two choices, 0 or 180. Phase Bug by BetaBugs is a free plugin that lets you change the phase
on a piece of audio by degrees. It’s a simple concept, you have a wheel and you spin it. The mono version of the plugin is useful to use on things that have multiple sources as you can dial in a tone you like very quickly. For instance, when you have Bass Mic and Bass Di tracks: put Phase Bug on one of the tracks and spin the wheel around to listen to the tone
change as you go.
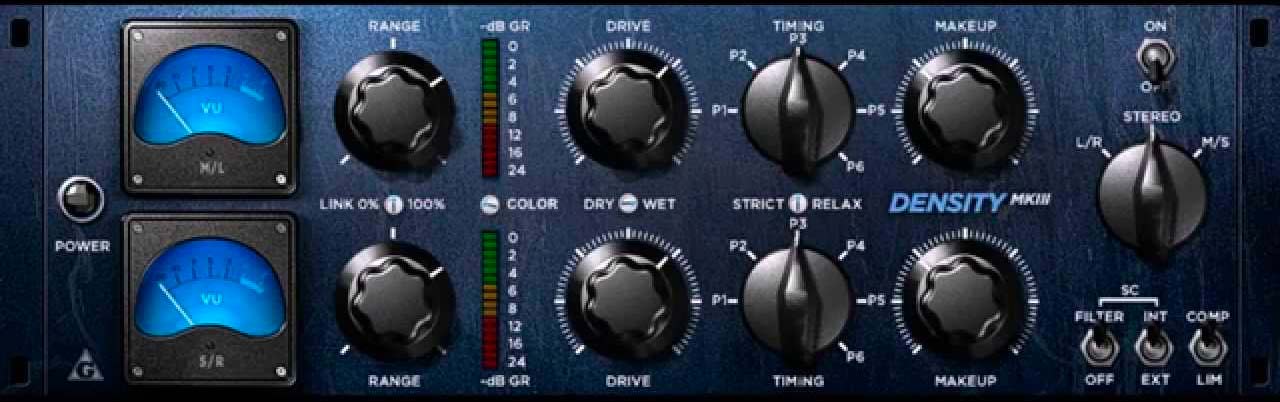
5. Variety of Sound Density mkIII
Variety of Sound offers a whole suit of awesome plugins, all for free. One I use fairly often is Density mkIII, a very nice buss compressor with an apt name. While it works pretty well on the master buss I like it on instrument sub-groups such as guitars to even out the level and add a bit of saturation with the colour knob. So there you have it, five of my favourite free plugins. There are many more great ones out there by the developers I’ve mentioned and ones I haven’t. If you like any of these I would highly recommend digging a little deeper as there is a whole community of passionate indie developers releasing great plugs for little to no cost.
One of the key tools in the mix engineer’s toolbox is EQ (I’m going to presume if you’re reading this you know what that stands for). Used for subtle cleaning of sounds right up to heavy sculpting, getting your EQ right is the key ingredient to getting a mix that’s got definition and clarity. Here’s my quick run down of 5 EQ plug-ins that I use on every mix.
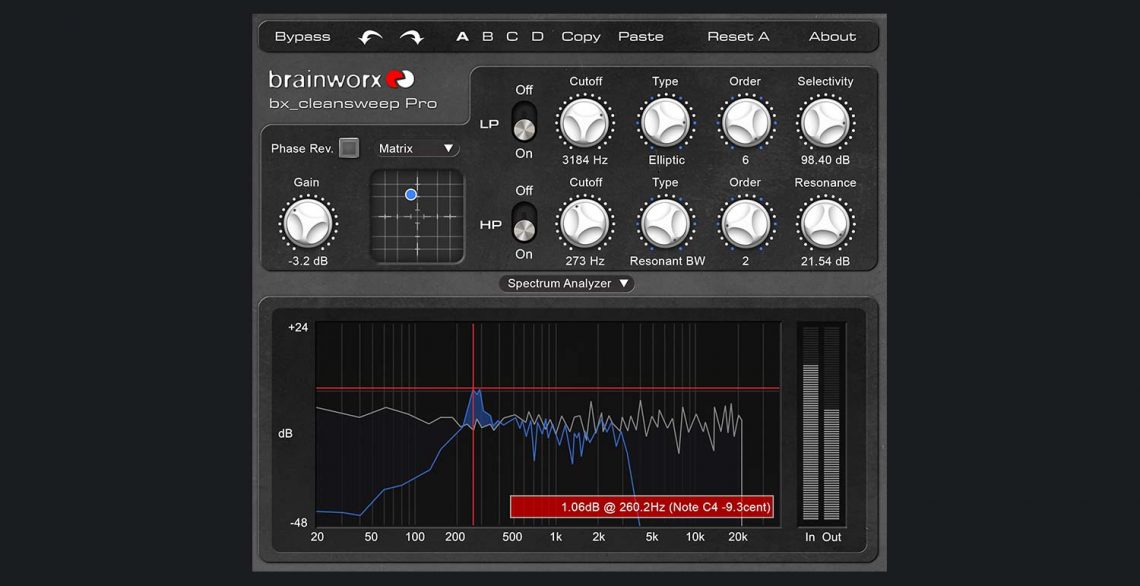
Brainworx Cleansweep Pro
Although technically a filter set rather than an EQ, ever since it’s release this plugin has been getting a solid workout. It enables me to remove the unwanted parts of a sound with great transparency, leaving everything I want retaining a really musical quality. The Chebyshev and Elliptical filters also allow for some pretty wild sound design possibilities.
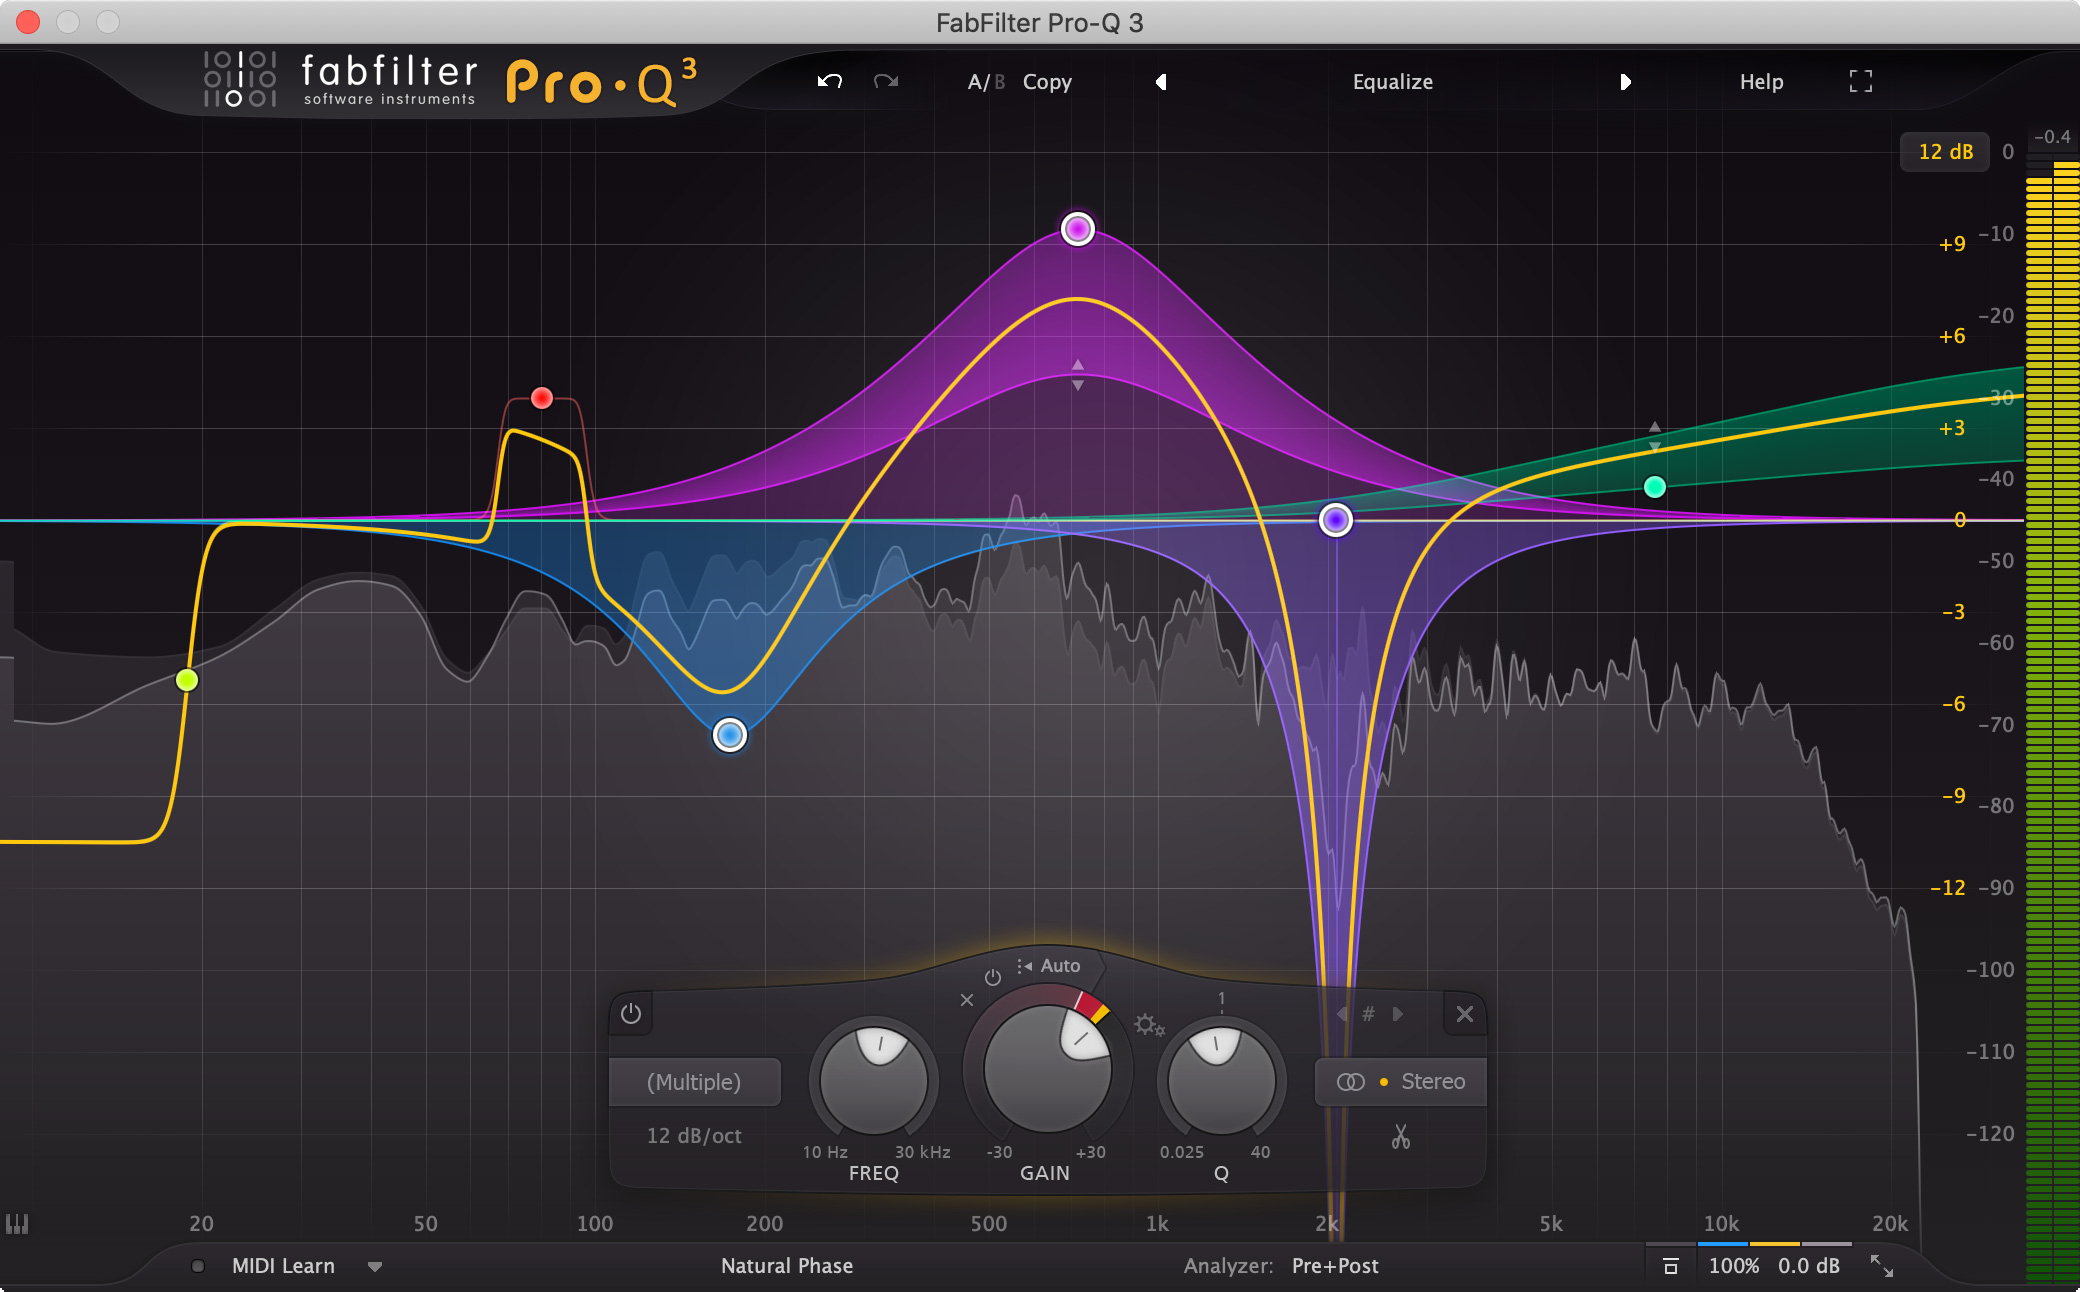
Fabfilter Pro-Q2
This EQ is pretty much my go to and will end up on nearly every track in one of my mixes. It’s incredibly flexible and the built in spectrum analyser and the intelligent solo mode enable you to quickly and easily find problem frequencies. The fact you can go up to 24 bands means you can tweak till your hearts content.
Kush Audio – Clariphonic DSP-MkII
This is one of those magic plugins, put it on tweak the knobs and listen as everything sounds amazing! Be careful though it’s easy to overdo it with this one. It’s especially good on synths, pianos and anything that needs a little extra sparkle.
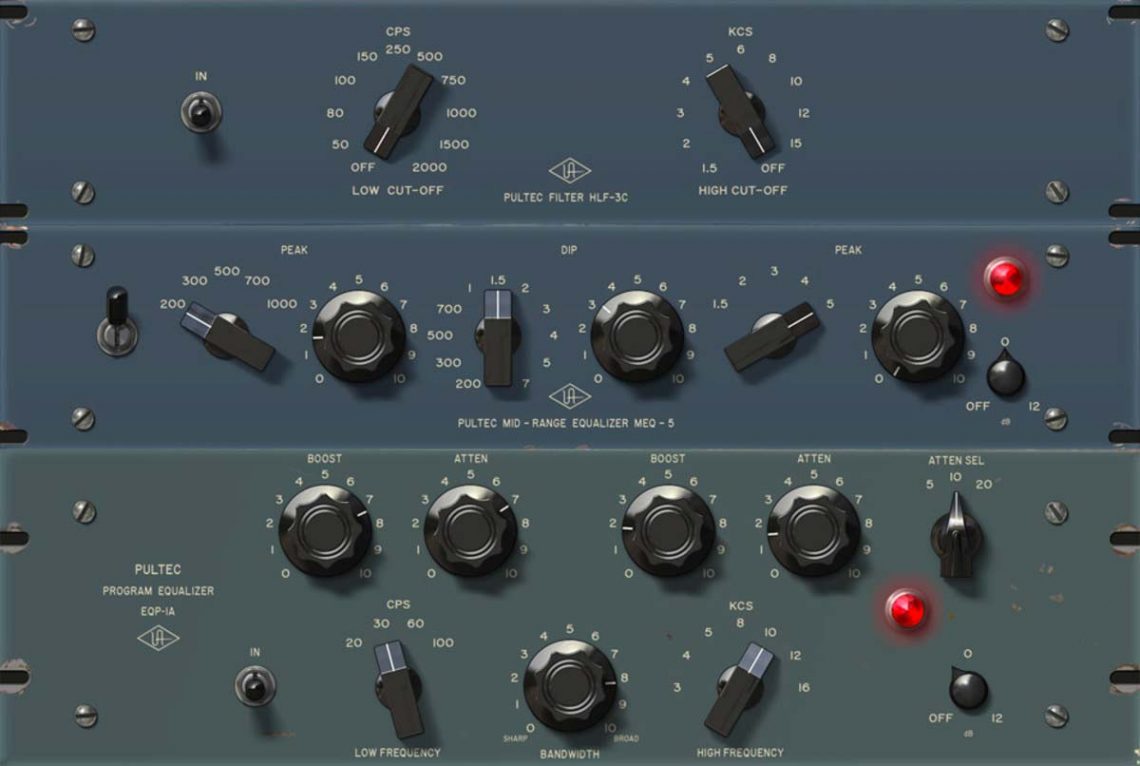
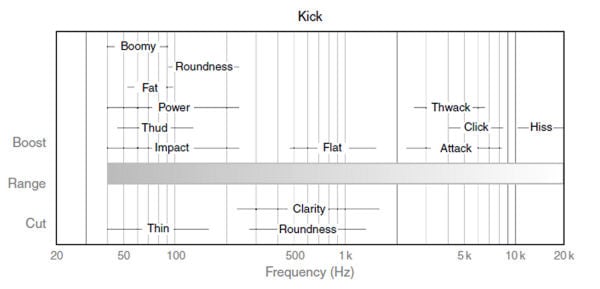
UAD – Pultec Passive EQ Collection
This is hands down the best analog emulation EQ, IMHO. The EQP-1A is amazing on bass and kicks and the MEQ-5 is great on guitars, vocals and pretty much anything else. You can even just drive the output of these for some extra harmonics.
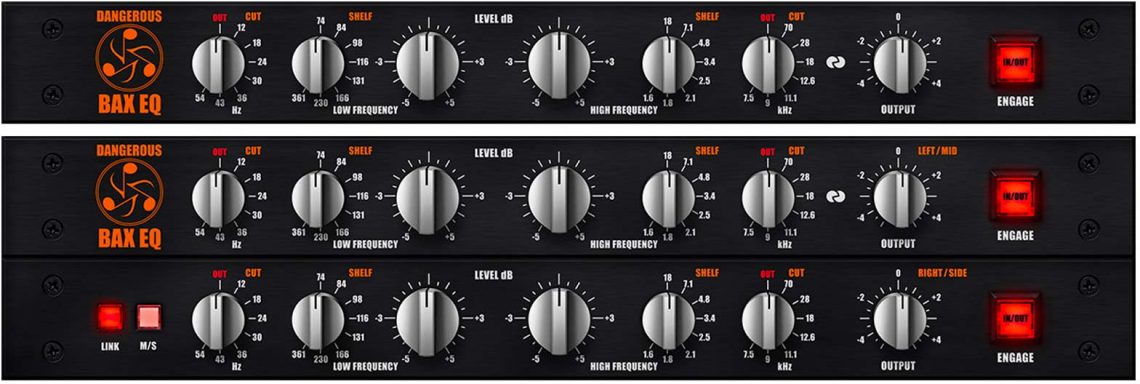
Dangerous – Bax EQ
This has been a staple on my mix bus for a while now. I love the high and low pass filters and the ability to make subtle changes to the frequency balance of the mix. It also makes everything sound bigger and wider just by passing audio through it. Makes things sound a little less in the box.
In the second part of this blog on loudness I’m going to delve more into metering and dynamic range in order to compare your music to other releases.
Level Matching
I often receive feedback from people that their track doesn’t sound like it has the same low end impact and presence as others. Quite often this is due to one aspect- the track they are comparing to is louder. Because of the way our ears perceive high and low frequencies, even a tiny 0.5-1dB difference will make the louder track appear to have more bass and top end, making it sound a little clearer and fuller – or slightly better, in most people’s opinion. If you want to make a fair comparison, you have to level match. Doing this, you may find that the track you are comparing to may actually sound worse.
Level matching is paramount in mastering when comparing your processed mix to the unprocessed mix. Incorrect or heavy handed processing will result in the mastered track sounding ‘smaller’ than the un-mastered track when level matched, especially noticeable by comparing the chorus or build-up of the track. When the chorus comes in the processing becomes even more apparent as it clamps down on the track. Using level matched A/B comparisons is the best way to check when your processing is improving the sound rather than just making it louder.
Peak and RMS metering
Loudness metering is generally done by a combination of ear and average level metering, such as the VU metering in Leon’s blog [link]. All software DAWs employ peak level metering to let you know about digital overs, which is very important to avoid clipping the signal, but will not give an indication of perceived loudness. Many also have average (RMS) metering now as well, emulating the VU meters found on analogue consoles. As they were traditionally mechanical, The VU metering rise time is slower than a digital Peak Programme meter (PPM), so the VU meter will represent an ‘average’ level rather than the instantaneous peaks, making the VU meter a more accurate representation of the perceived loudness. This is how people mix in the analogue world on a console.
All good so far, but what happens if you have a huge kick drum that dominates the mix? A low frequency high level sound wave will push the average level right up and your metering will ‘ping’ off the stops, yet as we learnt in part one [link], this does not necessarily mean it’s loud- you have to take the frequency balance into account. A big 60Hz sine wave will have huge RMS level, yet many speakers will struggle to produce this and you have just eaten up your entire spectrum.
When mixing, the PPM will show you the transients (like snare hits), and the VU will show you the average (RMS) level. If the average level is very high on certain bass notes or the kick drum, this is eating up all your available headroom and not letting the higher frequencies cut through, so you will lose clarity and impact. Try having more consistent energy in the sub region, and if you want a big sub, place that sound in isolation from other sounds in your arrangement. Use the PPM meters for transients. Again, try to keep these at a more consistent level so your transients don’t lose impact after peak limiting. Many meters now incorporate peak and RMS metering to help with mixing.
Dynamic Range
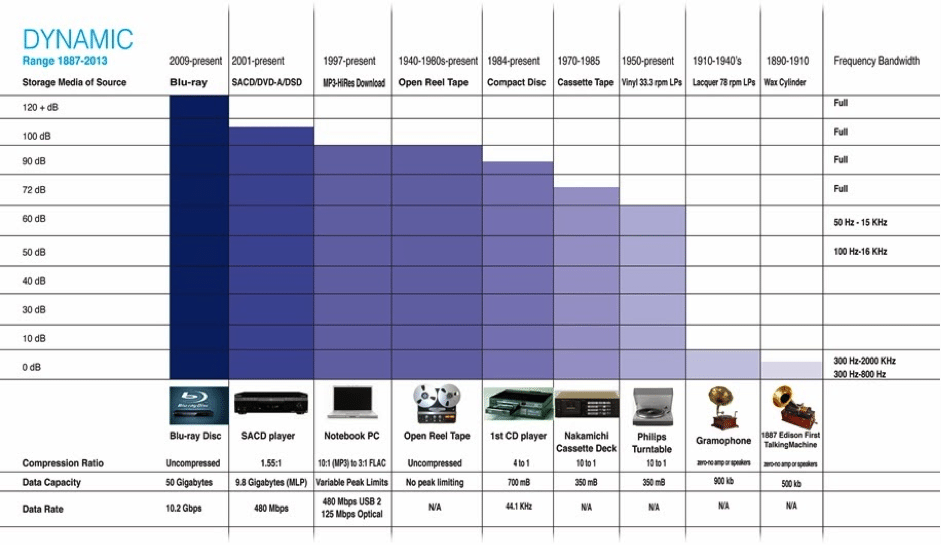
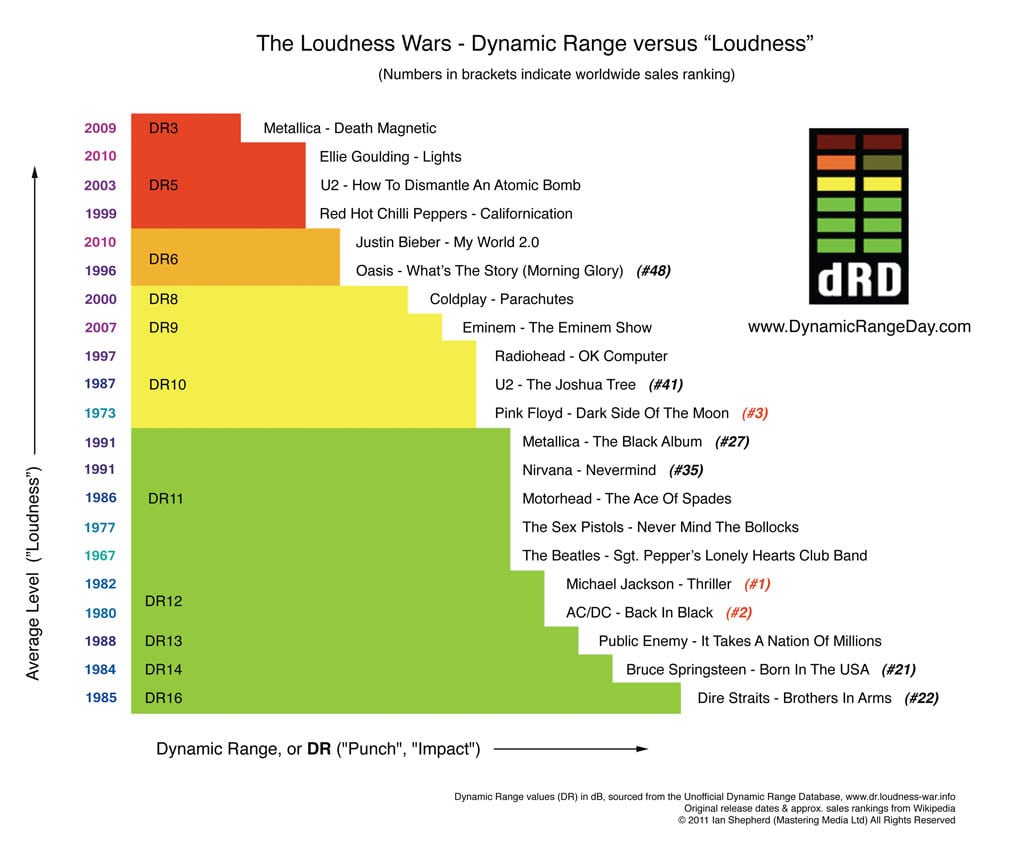
This brings us to Dynamic Range. Dynamic range is the measurement between the minimum and maximum volume level, given in decibels (dB). The dynamic range of human hearing is around 140dB- This is from the threshold of human hearing to a jet engine. The dynamic range is directly related to the audio bit rate, for each bit you will theoretically get 6dB of dynamic range. So CD quality is 16 x 6 = 96dB.
In the past, the dynamic range was limited by the recording medium (see chart). In order to fit record sources with a high dynamic range, such as an orchestra, the dynamic range had to be reduced. However, if you are reducing the dynamic range you are also reducing the impact of the sound. So the orchestra recording with a small dynamic range will have much less crescendo impact, due to the difference between the quiet and loud passages being reduced.
Looking at the dynamic range chart, storage media has increased in dynamic range by up to 30dB since cassette. Yet modern releases have been reduced in dynamic range by using excessive compression, peak limiting and clipping for loudness.
Now consumers are becoming more aware of this, and as you may have noticed, many artists are bringing back dynamic range into their masters with great success. You can search the Dynamic Range Database for your favourite artist here http://dr.loudness-war.info/
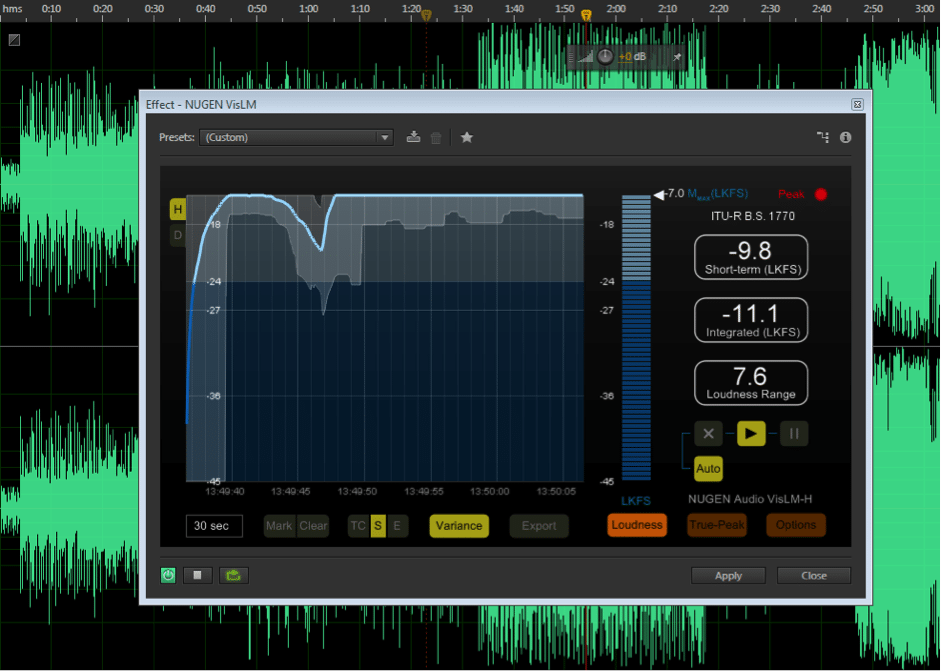
Loudness Metering
The latest loudness measuring tools take into account short term loudness, long term loudness, and frequency perception to give you a loudness number. There are many standards for metering, but the most common are EBU 128 and ITU BS.1770. Many software DAWs and mastering tools such as Ozone now have loudness metering standard.
Here are a few meters that you can use in your DAW:
Sequoia is designed for mastering and includes loudness metering.
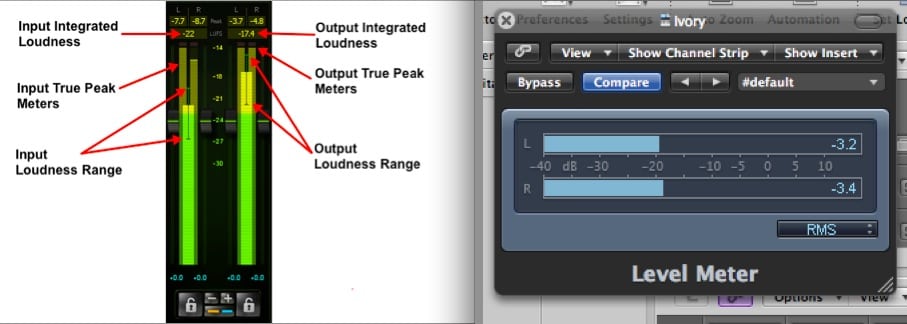
EBU 128 will give you an Loudness units relative to Full Scale(orLUFS) reading and ITU BS.1770 will give you an Loudness, K-weighted, relative to Full Scale (orLKFS) reading. Without getting too technical they are essentially the same except for the gate time. What you are looking for is the integrated loudness. Using loudness metering will assist you in making accurate A/B comparisons. Another advantage of proper loudness metering is the TP max (True Peak Max) number. This will alert you if the intersample peaks will overload a poor quality DAC or lossy encoder.
NUGEN VisLM is an excellent loudness tool
Conclusion
I know, I know, you want your track to be louder than everyone else’s. Maybe because I work as a mastering engineer you are thinking I have a secret technique for loudness. In reality it mostly comes down to the mix. Mastering should enhance what is already there, and not change the mix drastically in the pursuit of loudness. Keep in mind that a good song will still sell regardless of how loud it is. Hopefully in these two articles I’ve demonstrated that loudness is a delicate combination of frequency balance, dynamic range, and the arrangement of your mix. If you are pushing for level and your mix falls apart, then your track has reached its “loudness potential”.
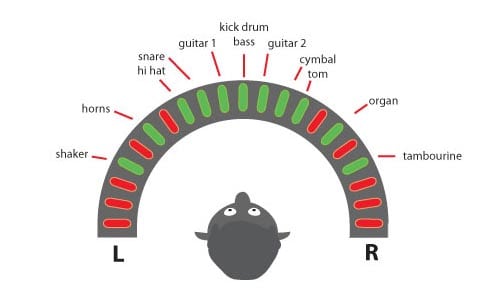
A lot of producers I meet are very interested in getting ‘width’ into their mixes, but there’s a common mistake that I frequently encounter in the mixes I’m sent for mastering.
All too often, the producer’s obsession for width sees them dragging ‘stereo widening’ type plugins onto nearly every channel, to… you know… get width right? Wrong.
Nothing can make house music more bland than doing something like this. The foundation of house music is the kick drum, which, for best results, should remain dead centre, and without any image processing applied, certainly nothing below ~350Hz. Then build the rest of your elements upon that.
The problem with widening plugins is that they tend to leave a big hole in the centre image, which is just as important as the sides.
Another problem with image processors, is that they will tend to homogenise any natural stereo content when applied.
Mixing for ‘Stereo’ in its simplest terms, means taking into account how sound affects us as two eared beings, in sonic, psychological and physiological terms. Ultimately, we want to create a sonic picture that provides pleasant stimulation for our brains.
Our brains and ears identify sound in the stereo field through subtle tonal and phase shifts. Widening processors create a ‘fake’ sense of width by modulating the phase in unnatural ways. Controlling these phase shifts also makes a sound less ‘exciting’ to the ear, and ultimately, it will become part of the background, like wallpaper.
Its the visual equivalent of placing a Guassian blur over every object. If everything has this filter applied, then the whole image just becomes a blur.
If you must use these plugins, leaving a few elements in their natural state to juxtapose the blurred background can greatly enhance the focus, or ‘Punch” of the sound.
Placing an image widener on a kick drum will have an adverse effect on what you may be hoping to achieve, so it’s best to leave it out, especially on the important sounds.
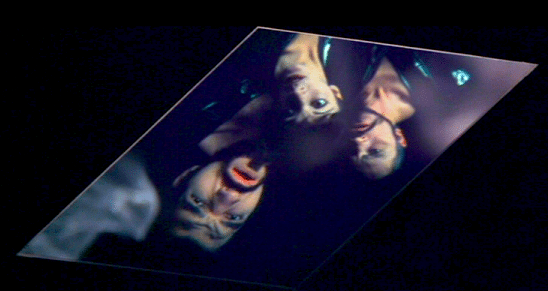
In fact using these plugins will create width, but remove all depth and movement, trapping the sound in a thin sounding layer… not unlike these guys:
Help – I’m trapped in a flat box of emotion!
Another Approach
The real secret to getting a much better sense of width, is to actually ditch the image wideners for the old faithful Pan pot. Panning elements in creative ways will give your mix a much more natural, and ultimately wider sense of ‘true width’.
Again going back to how the ear reacts to sound, our ears like sense of movement through tonal and phase shifts. Instead of submitting every bit of percussion, synth and vocal layer into this blurred fake stereo, try panning each element in ways that allow your ears to discover the sounds across the stereo field in musical ways.
For example, supposing you have two percussion lines that are rhythmically syncopated off each other, place one off the left and the other to the right, or maybe at the centre. Then place the closed and open hats slightly apart from eachother. Next, place that big reverbed clap that only happens once every 8 bars way off the right, and perhaps a little loud. It only happens occasionally, but when it does, it creates this shock of harmonic colour off to the right, and keeps the ear tuned in.
You can do the same thing with vocals, placing the lead in the centre and extreme Left/Right, but then add a little bit of random harmonics by placing only one of the vocal harmonies at the 3 o’clock position.
This technique will let your sonic picture sound harmonically richer and a hell of a lot more exciting.
Play around with placing one off sounds in extreme positions, or using a dynamic panner that pans around the field slowly/quickly. Try placing musical lines that are a call & response in different areas. Pretty soon, you’ll find the frequencies ‘dancing’ around the whole stereo field, giving you true width.
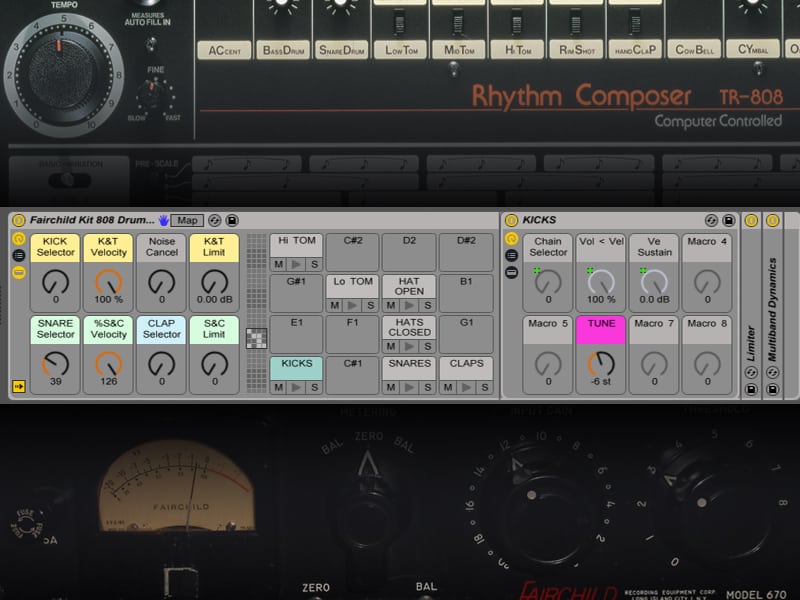
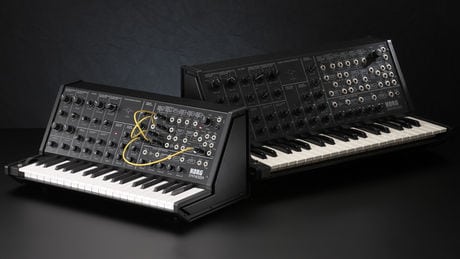
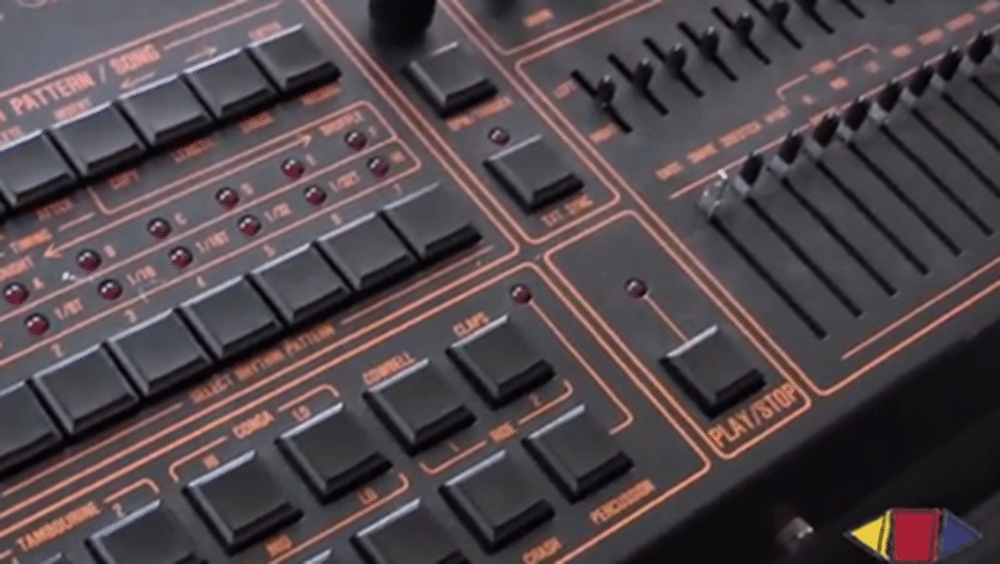
For part two of the Analogue versus digital shootout we will be comparing (arguably) the worlds most famous drum machine, the Roland TR-808 with its software equivalent inside Ableton, and the monstrous Korg MS-20 with its software MS-20 from the Korg Legacy collection.
Originally designed as an alternative for musicians who didn’t know (couldn’t afford) any drummers to perform with, the TR-808 (along with TR-909) went on to influence and shape and sound of a generation of electronic musicians. Testament to the universal appeal of the 808, in recent years it has become a staple of electronic production. Imagining club hip hop tracks without a booming 808 kick is like imagining garage rock without distorted guitars. The original TR-808 units have gained almost mythical status and fetch 10 times what they sold for when first released in the early 80’s; luckily enough we have one residing in Studio 6!
For this demo, I have programmed the same beat on the Ableton sampled 808, by cutting up audio of the TR-8 samples made in Studio 2 and then on the TR-808 analogue drum machine. There is also a version of the sequence inside Ableton triggering the analogue drum machine.
Our TR-808 via Fairchild 670 Sample Pack
For the MS-20, first I’ll A/B the basic waveforms with both the high and low-pass filters completely open. Then A/B of the high pass and low pass filters sweeping through their full range first with the resonance turned to 0 and second with the resonance turned to full.
Here are the recordings for you to compare:
For me this one is a no brainer, analogue hardware wins hands down. It’s the instantaneous feeling that you are working with a real sound. I find consistently when working with hardware that as soon as you get you sound right on the unit it requires little if any processing, where as I would need to work a lot harder to achieve a similar energy from a software instrument. In the case of the 808 the sequencer also brings something special with the groove and feel of the unit far out performing that of Ableton (although you can use groove quantizing to achieve similar results, the point is it’s already there to begin with on the hardware).
The other reason I love analog hardware is it’s hands on nature of operation which enable you to work far more organically that tweaking settings with a mouse. If you’re an electronic music producer I strongly recommend you get yourself some analogue hardware, even if it’s a crappy old cheap Casio. The limitations of the device enable you to generate something that can help to define your sound and give your production a unified direction. At the very least get yourself a quality midi controller and make templates for your favourite soft synths to help at least bring the interface into the real world.
[Written by Jack Prest who is an In-house Producer/Engineer at Studios 301]
To book Jack for your next project, contact us on 02 9698 5888
One of the most common questions people ask a mastering engineer is “why is my track not as loud as everyone else’s?”
In this article I’m going to explain in simple terms how humans perceive loudness and how it can be measured accurately. Since the early Motown days of pressing vinyl, there has always been a race to have the loudest cut. This was a skill developed by cutting engineers and is the foundation of mastering records. The idea being that the song would sound louder on a juke box and on the radio thus making it stand out from the rest. The loud cut was limited by the physical medium of the record and the cutting head.
When digital came along this all changed- there is a ceiling of 0 dBFS (decibel Full Scale) that is the maximum permissible limit of digital audio. Since the introduction of digital peak limiting and clipping in the 1990s the true “Loudness War” began, much to the detriment of listener enjoyment.
Television stations have been following loudness guidelines for years due to the many listener complaints that the ads were louder than the program content. In America this is known as the CALM act, and Australia is moving in a similar direction with OP59 standard. Most audio people know that the ads are louder do to the decrease in dynamic range of the ads compared to the normal program. Program audio has dialogue, music and background sounds so it needs to have some dynamic range in order to sound natural and also have impact for action scenes, whilst the ad is smashed to an inch of its life so the quiet parts are almost the same level as the loudest part.
Measuring loudness is quite difficult, and due to changing standards for television, accurate loudness metering has only recently been developed. Fortunately the same way of measuring loudness for broadcast is creeping into music, so when you tick Apple “Sound check” or Spotify’s “normalize” function the level of music is will remain consistent from track to track. This will be a revelation for the music industry and may put an end to the loudness war, as tracks mastered purely for loudness will actually sound worse when volume matched to music mastered at a more conservative level.
Human Perception
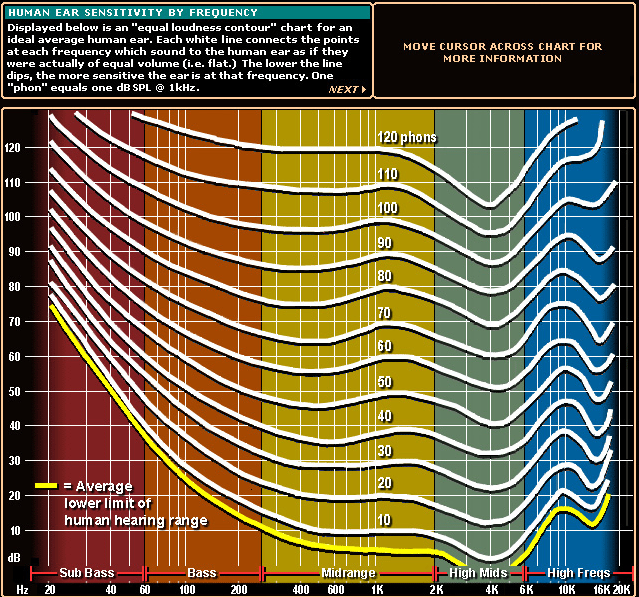
Sound has two properties, wavelength and amplitude. The frequency of the wavelength is measured in Hertz (Hz), and sound pressure level (SPL) is measured in Decibels (dB). The human ear of a small child can hear from 20Hz to 20kHz, and the high frequency response decreases with age and more rapidly with loud noise exposure. Just talk to a live sound engineer over dinner and you’ll get my drift. What many people don’t know is that humans do not hear the entire frequency range at the same loudness level. Furthermore; as amplitude changes, so does our ears response to the frequency spectrum.To understand why different frequencies are not heard equally, you’ll have to look at the research by Fletcher and Munson reported in a paper entitled “Loudness, its definition, measurement and calculation.”
The Y-axis represents Sound Pressure Level (dB SPL) or volume, in simple terms. The X-axis represents the frequency range. As you can see, our ears are most responsive to the middle range of the frequency spectrum around 1kHz-4kHz range right where human speech is. At lower volumes our ear does not hear the low or the high frequencies and well as the midrange. At higher volumes the curve begins to flatten out and we begin to hear a flatter frequency response compared to lower levels. The flattest response is around 85dB SPL, which is also about as loud as you should have your monitoring for 8 hours to avoid hearing damage.
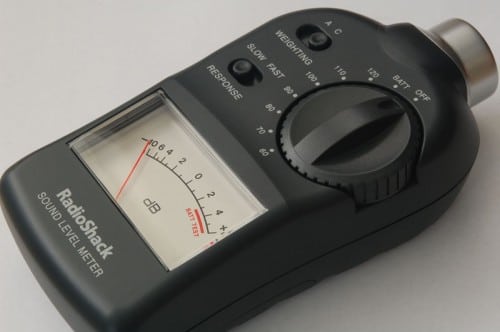
an SPL meter.
Grab an SPL meter from Jaycar, which should set you back $40 and sit in an equilateral triangle between your monitors. Ensure your monitors are away from wall and the corners of the room or you will have an inaccurate boost in the bass response. Put the meter on C weighting and play some pink noise from your DAW at -18dBFS. Once you are around 85dB SPL this is your listening reference level. You can even measure your room frequency response if by downloading test tones http://realtraps.com/test-cd.htm
Frequency Balance
What does this have to do with music loudness? Think about the different frequencies of instruments in your mix and where they sit in the audio spectrum. Here is an excellent frequency range chart that can also show you how each range is related to our hearing response:
When people say to me “why is my track not as loud as everyone else’s” I point them to the mix, not the mastering. I’ve noticed over the years as clients mixes improve (meaning, they both sounded better in the control room AND in the real world), they also become louder.
Look at it like this: if you’re mixing a hard rock tune, and your guitar and bass are masking your kick and snare, you need to turn the kick and snare up louder to give them the impact you need. That means transient material that is louder relative to the more steady-state (RMS) stuff. And that means a quieter mix. Now, if you carve out some low end from the bass that allows the kick to speak with impact at a lower fader level, and carve out some midrange from the guitar that lets the snare speak at a lower fader level, your transient-to-steady-state (peak-to-RMS) level will be lower, meaning a louder mix. You will also have better separation.
Then you’ll find that when the track is mastered and pushed to commercial loudness levels, the mix balances don’t fall apart, compared to an average mix that is pushed too hard. A word of warning though- as our ears are most sensitive to midrange, this is the area that can become unpleasant with excessive midrange boost.
The loudness of your mix mostly comes down to the frequency balance and where the spectral energy is. It also comes down to dynamic range, which I will discuss in part 2. The older VU meters and average level meters (RMS) will react strongly to low end, giving you a false representation how loud your mix is compared to others. Loudness meters take the way we hear into consideration with weighting filters and will give you a much more accurate number.
If you can make your mixes sound tighter when you are mixing, then I can take it the next level when mastering.
If you listen to the old vinyl “sound” that everyone loves, one of the reasons it sounds so pleasing is that it is mixed to accommodate the boundaries of disc cutting. When I first started out, mastering was disc cutting… That is, the master you would deliver to the factory would come back as a vinyl LP or single. As well as the mastering engineer, mixing and recording engineers always worked with the finished vinyl at the back of their mind. So, with the technical boundaries that vinyl had, engineers were watching all the peaks, controlling everything that jumped out (inevitably causing problem on vinyl) – and that’s why everything sounded so nice, round and tight.
(We also used more de-essing when we were cutting to lacquer, because the medium wasn’t very friendly to top end and would cause “sibilant” distortion, especially on vocal s’s, high hats and anything with an excessive amount of top end. So not only did you have limiters controlling the sound for tightness and roundness, you had de-essers which were giving the mix a nice rounded top-end.)
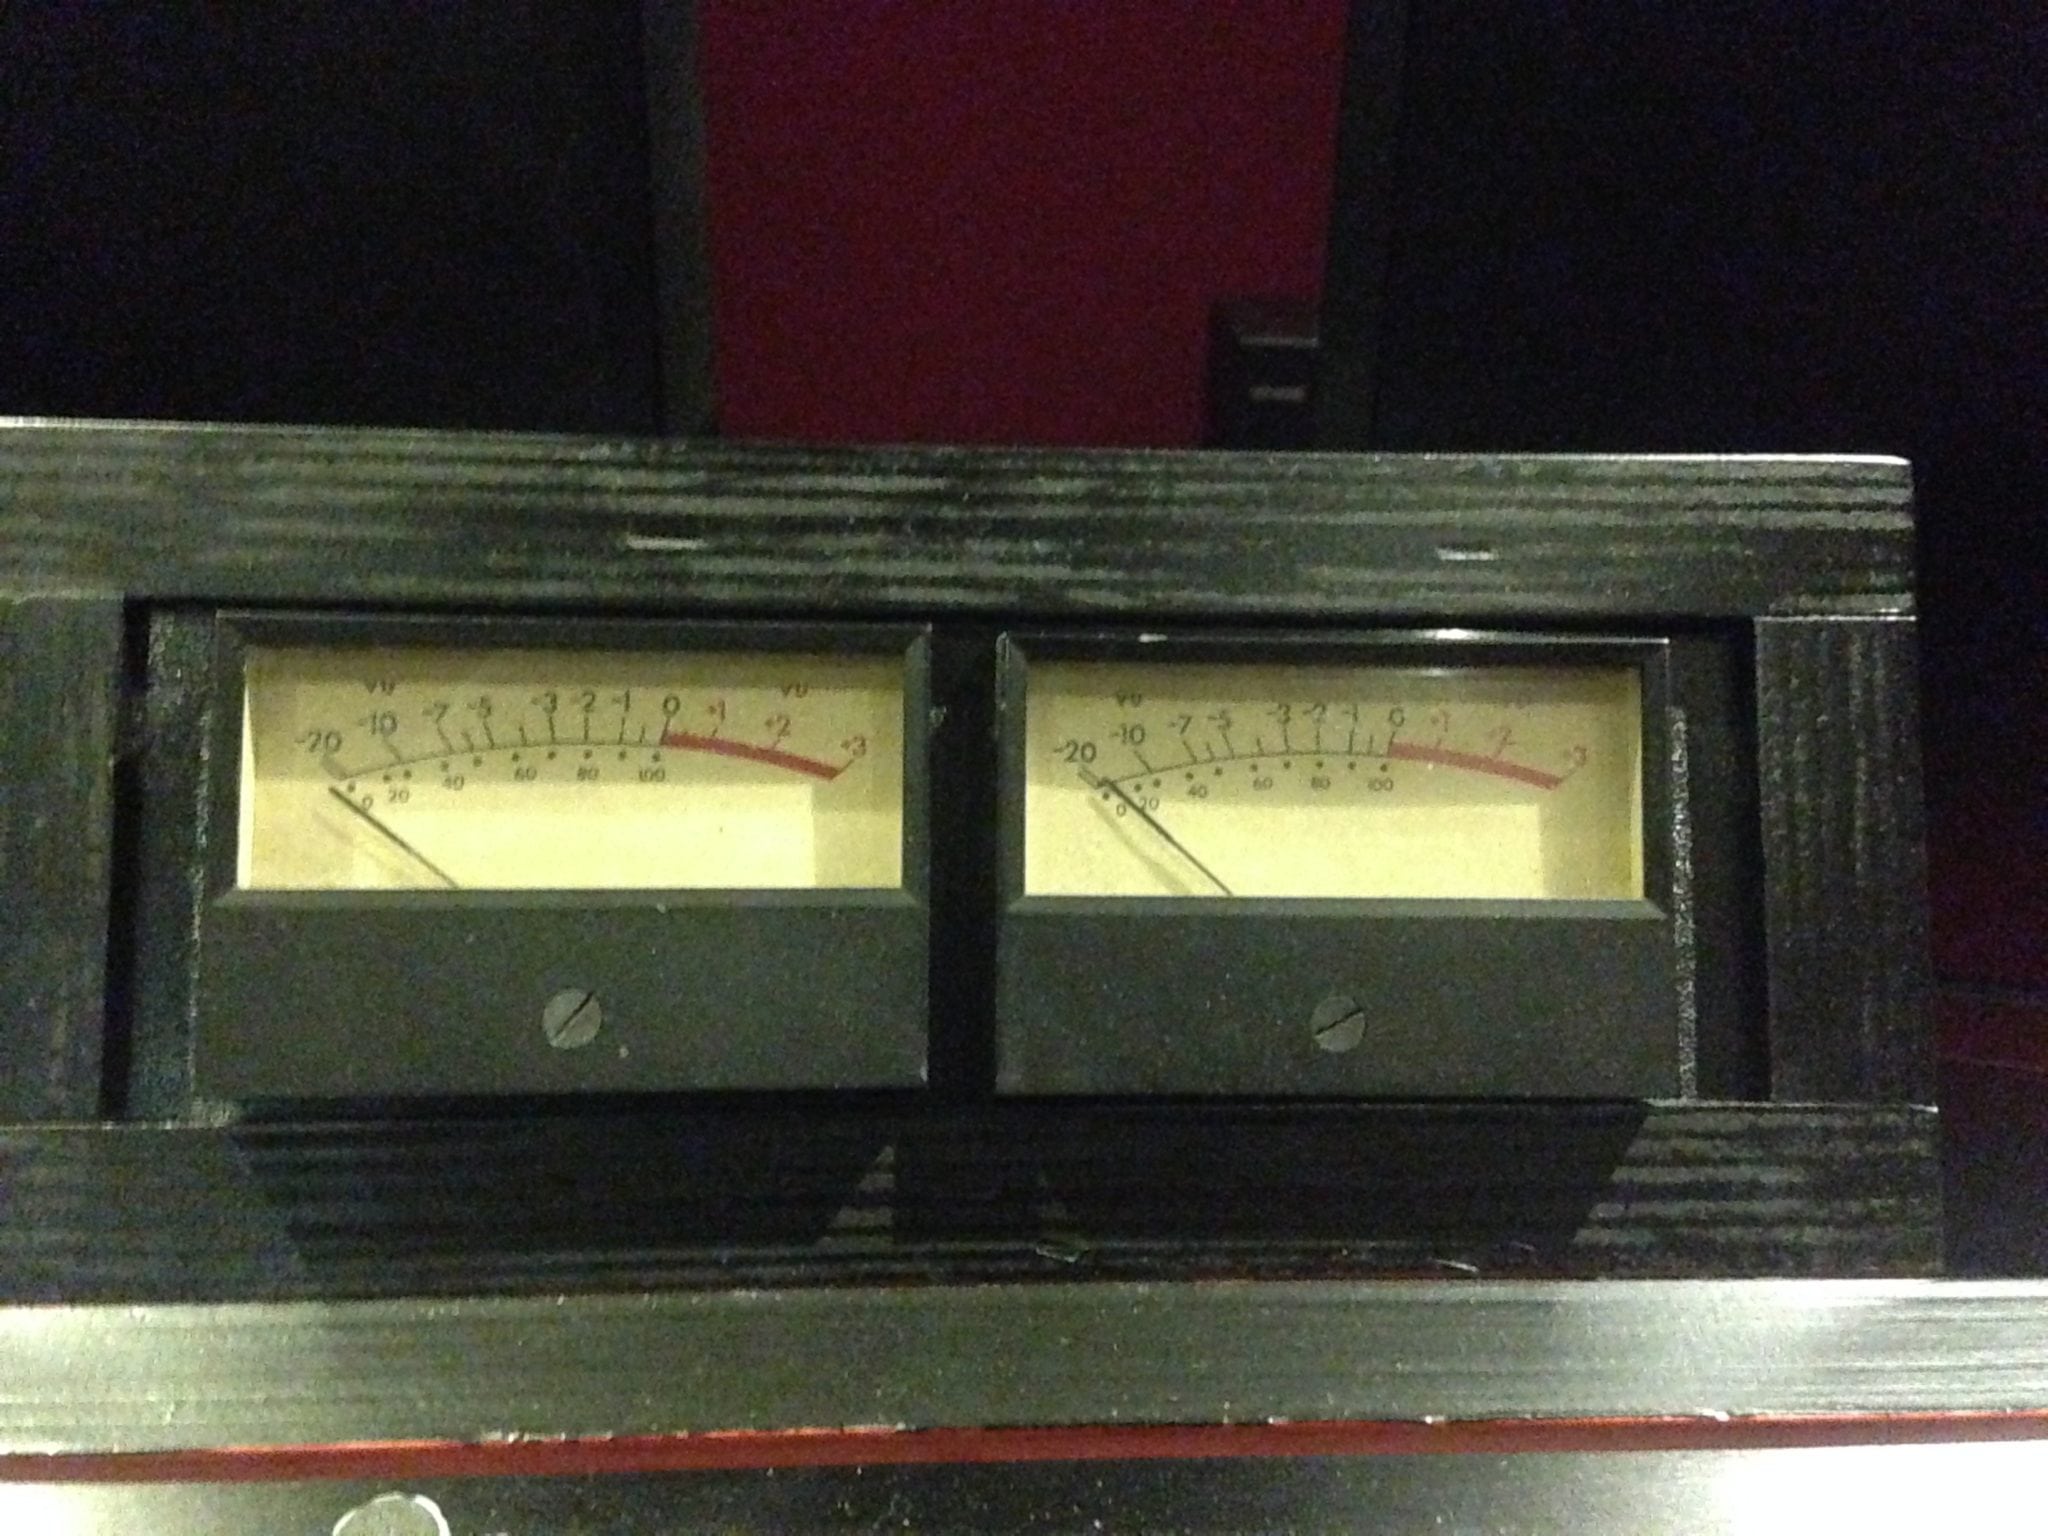
In order to achieve nice tight mixes nowadays, these techniques from working with vinyl still apply, and this is where VU Meters come in. A VU meter is like a rev counter in a car, it gives you a feel for what the car is doing, and the VU gives you a feel for the song, and how tight and “round” it is sounding.
What are VU Meters?
VU (Volume Unit) Meters essentially display an average of what we hear, rather than the very fast peaks that we don’t. Average level is important, as controlling this will make the mix sound tight. For example, with a kick drum, if you have a VU meter, you can see if the kick drum is adding kick and punch to the mix, or if it’s adding a lot of wooliness and getting in the way of everything else. If the VU meter is moving radically, just working on the kick drum, then you know by looking that you are losing tightness.
In the particular instance of a kick drum, (or other low end elements in your mix) your room acoustics might be deficient in low frequencies – and this is also where VU meters are indispensable. They are like your third ear – they will show you the energy in the low end, and if there is radical movement, then you probably have an issue with frequencies that you aren’t hearing.
Leon’s custom VU Meters built by Stephen Crane.
Watching the VU Meters move.
In order to achieve mix tightness, VU meters should “dance” smoothly and in a gentle manner, usually in time with the music, rather than in big jumps and erratic, out of time movement. This erratic movement implies that there are drastic level changes, which will be hard to control in mastering. A common, but undesirable, scenario when I’m mastering a track is when the tom fill comes in, the VU’s have excursions of 10dB. I can go in and fix that in the stereo mix, however at that point it is going to effect the rest of the mix, because when I push the toms back down, everything else in the mix will also be pushed down.
When I get mixes from the great engineers, I usually only add a little, if any, peak limiting in mastering because it’s all been taken care of during the mix. 9 times out of 10, this was done on the individual channels of the mix (as opposed to a buss output compressor). In this instance, VU meters will show you when levels and compression are adequate in the mix.
Don’t confuse limiting or tightening with squashing. In this manner, limiting should just be controlling the peaks rather the squashing the entire signal, and your mixes will by default sound louder. Again, this is where VU meters come in – they help you see the erratic movement caused by peaks and will help you apply just enough dynamic control.
Choosing your VU Meters.
There are different types of VU meters out there, and I have spent many hours experimenting to find the ones I liked best. I encourage you to do the same – some will move faster, some slower, and you should find the ones that behave the best for your individual preference and purpose. On top of this, VU meters can usually be calibrated for both speed and volume level, and these settings are essential for getting the best out of them, though again, the particular settings are very much personal taste. The VU meters I use are custom built by Stephen Crane at Studios 301.
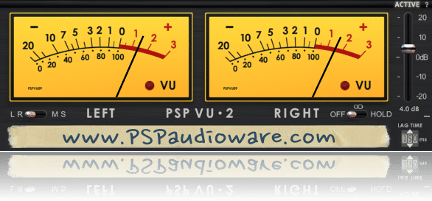
As far as software meters go, there are many options out there and I’m still experimenting with them. The main stumbling block I have found is finding software meters that behave how I want to “see” the signal, and are adjustable for the right reference level. So far, my favourite is the PSP VU2 meter plugin.
Everything is important about the gear and the studio you use it in, but if I had to pick my essential tools, they would be my monitoring – and my VU meters.
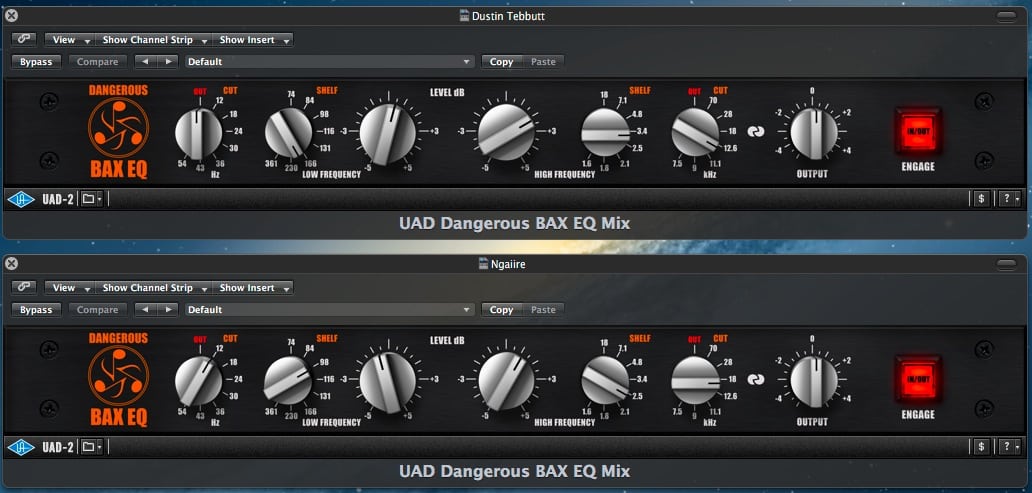
The Dangerous BAX EQ was released in 2009 and is based on the famous “Negative Feedback Tone Control” by P. J. Bandaxall designed in the 1950s. This circuit is used in many hi-fi equipment bass and treble “tilt” controls. The advantage of these curves is that they of a constant shape, being very gentle and do not “flatten off” at the limits of their audio range. It is similar to using a standard shelving equalizer with an extremely wide “Q”.
In order to further shape the upper and lower ends of the spectrum, the Dangerous BAX also offers transparent 12dB/Oct high pass and low pass filters. The designer of the Dangerous BAX, Chris Muth, spent many years on the prototypes in well-known mastering studios in order to get the most suitable frequencies. The Dangerous BAX quickly became renowned as a transparent and un-obstructive tone control, with turn over frequencies that were highly tuned for mastering.
Having owned the Dangerous BAX hardware since they became available in Australia, I can confidently say it’s the one piece of hardware that I could not do without. I would happily pay the price for the high pass filter alone. It’s one of the few equalisers that can instantly tighten the low end without affecting the punch of the kick and bass. The 12Hz and 18Hz works wonders on an 808 kick drum. Admittedly I use the BAX more for cutting rather than boosting, and mostly in the low end, although the high shelf boost can be very clean and can add that extra sparkle on mixes if required.
It also works very well after another parametric equalizer such as the GML or Sontec, as you can boost the low end in the sub region then use the BAX high pass filter to cut the extreme subsonic frequencies that may cause smaller speakers to distort. Conversely, you can use a high shelf boost on the BAX and use the low pass filter to smooth the extreme top end and make it sound more natural.
It looks deceivingly simple yet can be very powerful once you understand the depth of what the curves are capable of. I would describe the sound of the Dangerous BAX equaliser as quite transparent; it has a hint of the modern Op-Amp sound giving it a slight mid forward texture, and is fast with no loss of transients.
Now Universal Audio have released the Dangerous BAX on their UAD-2 platform. I’m a big fan of the Universal Audio emulations, especially the Massive Passive, which I used to own; so there is no “analogue is better” bias in this comparison – I’m approaching this with an open mind. The one caveat is that Universal Audio outsourced this emulation to Brainworx in Germany, so it’s not quite the same team that coded the Massive Passive emulation.
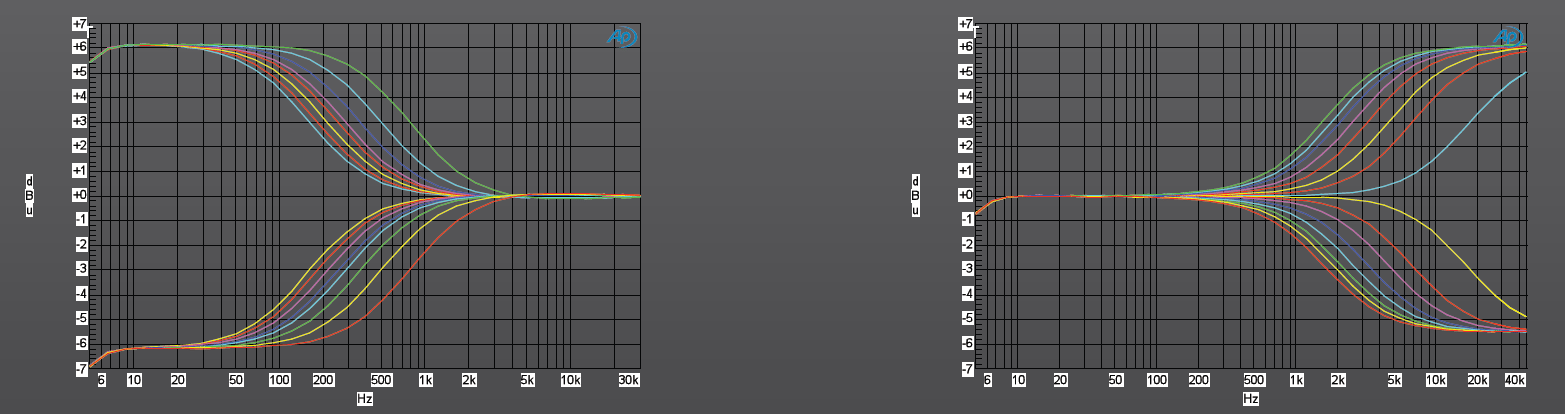
In order to make the comparison equal, my methodology was to use the same signal chain for the software as the hardware. The UAD BAX went through an analogue loop out if the DAW via the Prism DA-2, through the Dangerous BAX in relay hardware bypass, and into the Prism AD-2. Then the UAD BAX was bypassed and the hardware BAX inserted into the chain. This was all recorded into sequoia as a 24-bit 48kHz file. I used a variety of material that were all mastered using the hardware BAX, including folk, acoustic, electronic, and hip-hop from artists Ngaiire, Dustin Tebbutt, Flume and Suburban Dark.
The results were then compared in Studios 301’s Mastering Suite 2 on the Duntech Sovereigns and Adam S2X’s.
Listening to the results, my immediate impressions were that the UAD version did not sound as transparent as the hardware. The high frequency shelf needed more boost on the software to sound like the hardware, and the low boost was more exaggerated on the software compared to the hardware, so I had to dial in less low end on the software for an accurate comparison. The hardware had more open, silkier highs and more tightness in the low end, especially when using the filters. Whatever settings I used, the UAD plug-in had a tendency to sound darker and thicker than the hardware, with much less perceived depth.
This is one of the main issues that I encountered using the UAD for mastering; the front to back depth was flattened, something which I always aim to retain or even enhance with mastering grade hardware. The stereo width was quite close. It sounds like the plug-in has tried to capture the essence of using hardware, yet this is precisely why the Dangerous BAX is so good – it doesn’t really have much of a sonic footprint. On complex material the UAD almost sounds compressed compared to the hardware.
I’m going to give an elusive non-scientific opinion, but the software just doesn’t have the same subtleness or musical involvement as the hardware.
The UAD BAX does have some more tricks up its sleeve, as you can use the equaliser in mastering mode, enabling mid/side processing. This enables you to cut or boost the mid or side channels separately and opens up the BAX for many more possibilities, especially on problem mixes. For example, you can strengthen the kick or snare on the center channel without affecting the panned instruments in the stereo channel. Conversely, you can tame a panned high hat or sibilance in the out of phase whist not affecting the center channel. This is one advantage of the UAD BAX.
So by now you may have gathered that I’m rather fond of the Dangerous BAX hardware, and not so taken by the UAD BAX. I just don’t think Brainworx have nailed this emulation. After recording and comparing the files on a variety of systems, I would say that the average listener could probably not tell them apart. That may be good enough in online mixing situation. However, in a mastering studio you always want that 5-10% improvement, and this is where software emulation falls short.
For the next release in our drum samples series, and with our friends at Ableton Liveschool, we lined up a classic LinnDrum and sampled it through our Powered By Neve Custom Series 75 recording console, located in Studio 6 in Sydney.
Enter your email address below to be sent a download link (Your email address will be added to the 301 & Liveschool mailing lists, you can opt out later).
I recently wrote this piece for our friends at Liveschool, but realised its relevant to our audience too.
A wonderful thing about music production these days, is that you can do it without the need for a big studio. But if you’re interested in making bass heavy music, then there’s nothing more important than getting to know your bass better.
One of the main reason people struggle with getting their mixes to sound tight and punchy is because of poor monitoring environments, especially in the bottom end.
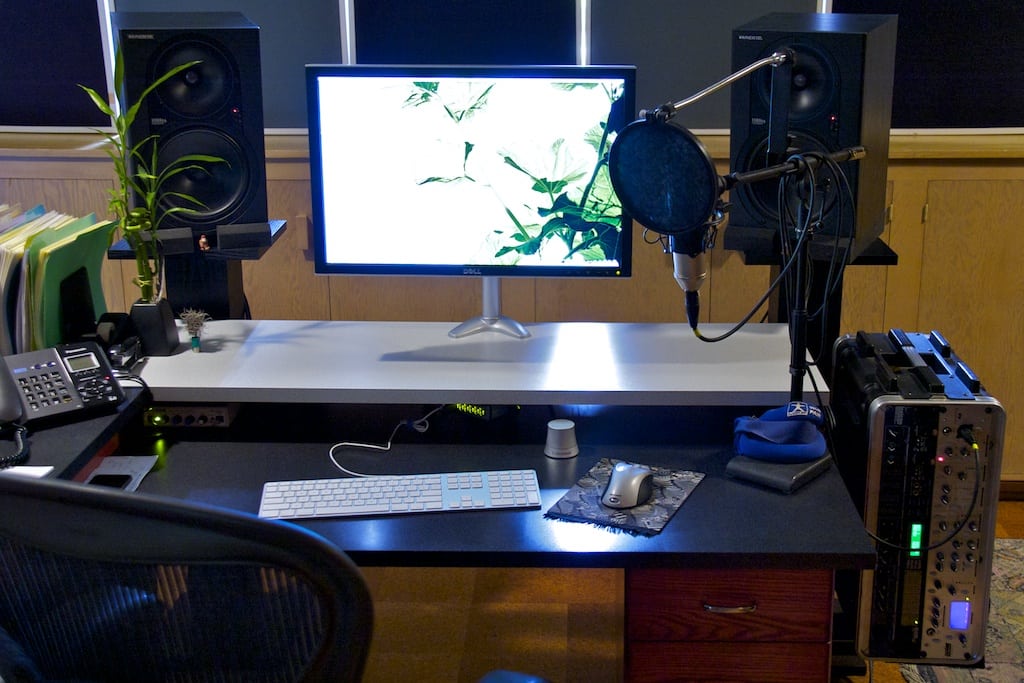
Example of a simple home studio environment.
One way to hear whats down there is to turn it up, and if you don’t have the luxury of an acoustically isolated space, you’re going to piss off your neighbours, girlfriend, parents, etc. Another way to do it would be to fork out on absurdly good headphones or a subwoofer (and again, piss off your….).
But there is cheap and effective solution!
I discovered this years ago by accident but got so used to it, that I still rely on it to this very day.
I used to place my monitors on my desk in a fairly small room; this created all sorts of negative issues, such as causing the table to resonate, and given how close the speakers were to the back wall, the entire room would sometimes resonate at certain frequencies, especially at higher volumes.
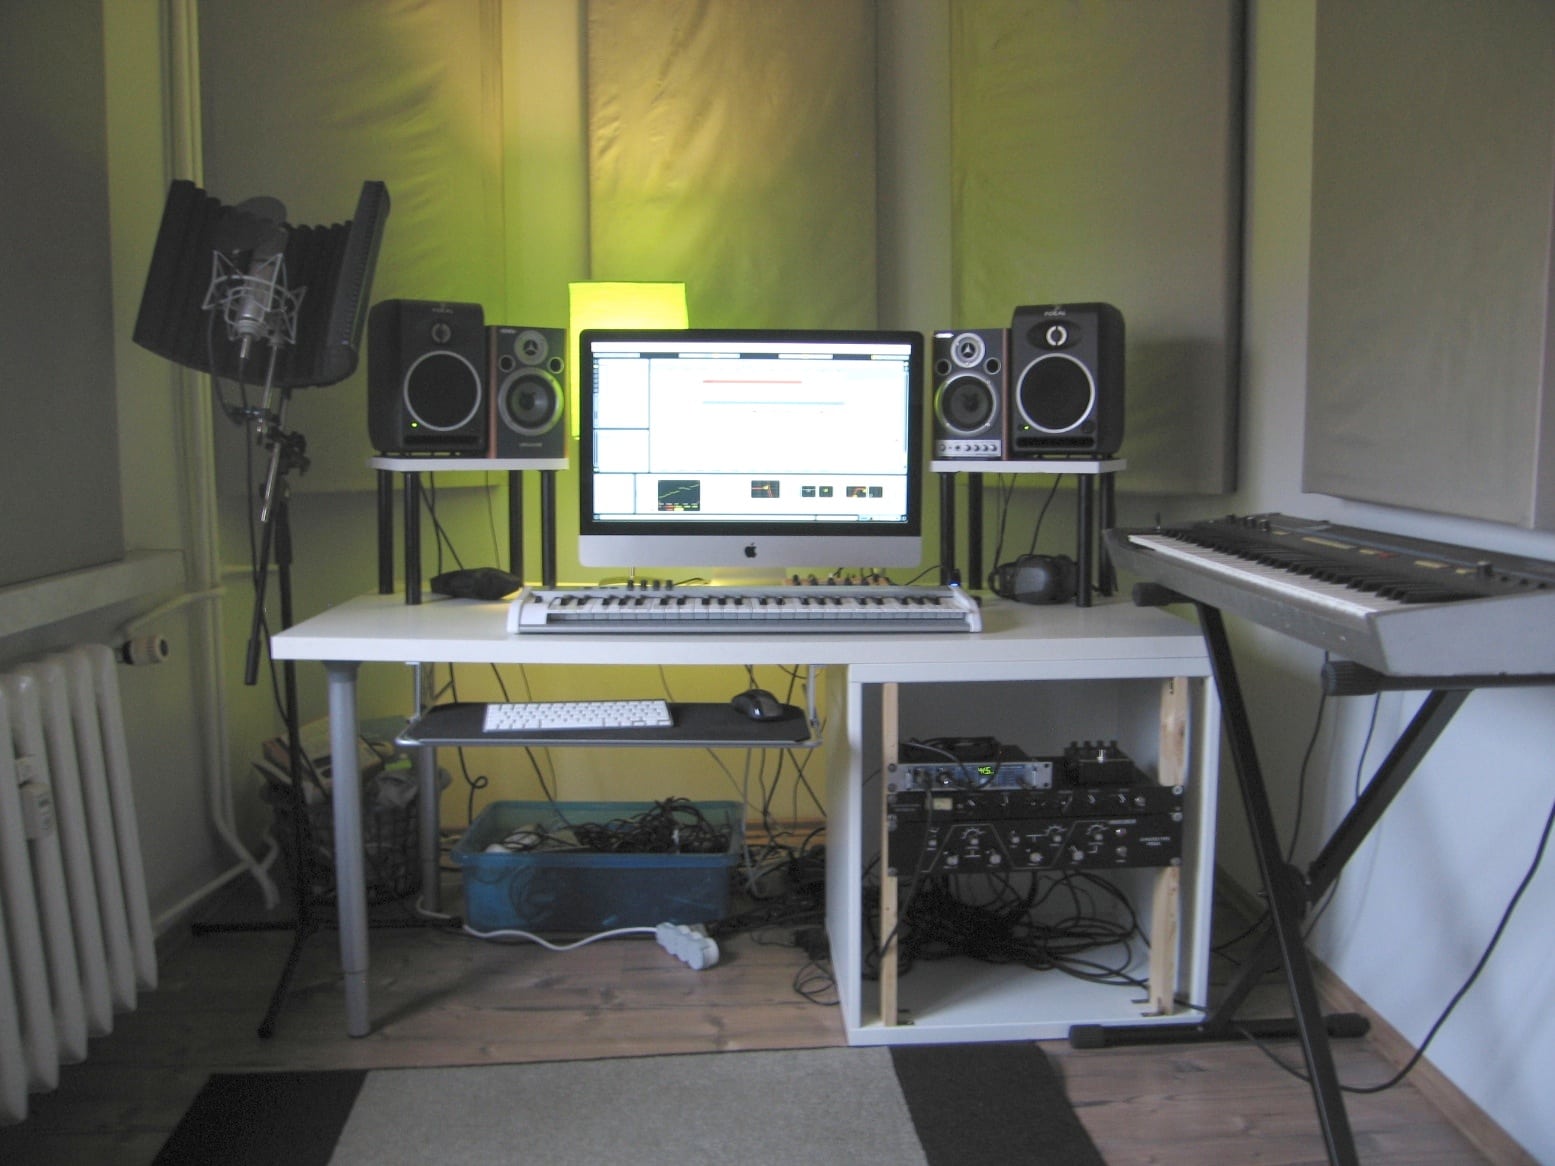
Another example home studio.
But at lower volumes when the room didn’t resonate, I noticed something else. The speakers were sitting directly on the wooden table because I couldn’t even afford any acoustic sponge to sit them on. This in turn caused low-frequencies to vibrate directly through the table. Another way to do it, is to actually touch the speaker cone, ever so carefully. This gives you a very precise sense of any bass movement, but be sure not to apply too much force, or you could damage the drivers!
Through this, I found myself *feeling* the bass. This became especially useful even when they were turned up, because even though I didn’t have a subwoofer, I could feel what was going on below 40Hz.
Another way is to actually look at the woofer. If at a moderate volume, you can visibly see the woofer moving back & forth (~5-15Hz) then you need to hi-pass something.
Feel the bass!
Doing this, I was able to have a sense of how fast the low-end was moving, or feel the separation between the kick and bass. I could also feel just how low the bass went. This in turn affected sound design and mix decisions… and when you get the low-end sounding good, the rest is a lot easier to build.
At first, it takes some getting used to… ie, knowing how much movement is *just right*, but you eventually pick it up, and it never leaves you. In fact you’ll start to be more aware of sub-sonic in clubs and other loud spaces. Lastly, you may have seen this technique in this part of that film “It’s All Gone Pete Tong” – I still use do this today and swear by it.
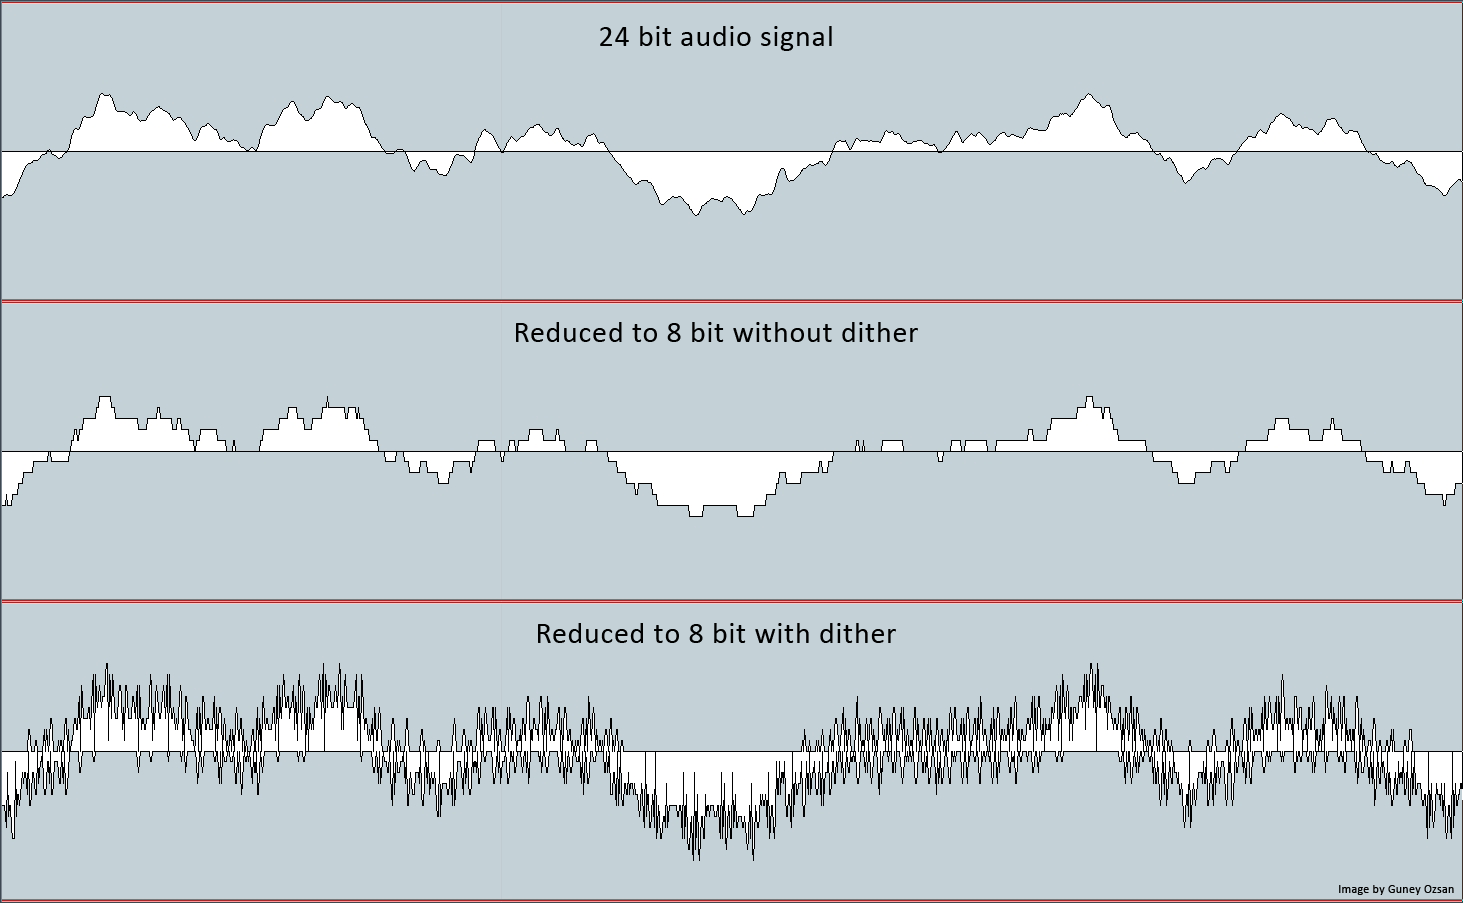
Any attempted discussion of dithering usually results in the collective groan by audio engineers everywhere; it is one of the most uninteresting and banal topics in the spectrum of audio production. However it is also one of the most common questions asked when submitting music for mastering. It is because of this that I will cover this topic, hoping to answer any of the questions that do come up.
So what is dither? A search on the Internet will very quickly tell you that dither is one of a few techniques that can be used to minimise a special type of distortion, called quantisation error. It does this by adding randomised noise to an audio signal during the process of quantisation… The three questions immediately drawn from this are:
Why would I want to add noise to my recording?
What is quantisation?
What are these errors all about?
Adding noise to your recordings?
The reason we would want to add noise to your recording is really only to enhance the absolute quietest parts of the music. Imagine when a piece of music is fading out to nothing (such as the tail of a piano note), there will become a point during quantisation where for a given input there will be a result of no output (at the final quietest step, from something that is able to be heard, to nothing being able to be heard). This is an example of quantisation error, and because this is a step, anyone would hear this as an unnatural, albeit given the right playback volume.
Quantisation error increases as the number of bits used to make a recording decreases. Dither in effect smooths out the inaccuracies of the recording system, by disguising the steps between different values of amplitude.
Audio bit reduction from 24-bit to 8-bit with and without dithering
Put simply, quantisation is part of the process that an audio signal will go through when being sampled and it is how a signal will be given a value for its amplitude (volume level). There are really two occasions when quantisation happens, either during conversion from an analogue waveform to a digital binary signal, or during a stage of digital signal processing.
The importance of dither is very much related to the level that a recording is made at, and hence the number of bits you use. It becomes more important with the quieter, or fewer number of bits used to encode the signal. When we make a 24-bit recording there are 2 (binary) to the power of 24 (number of bits) or 16,777,216 discrete values for amplitude that could be encoded to each digital sample. This covers an amazing 144dB of dynamic range, and really is more than you should ever need (just think that the noise floor of most equipment is around -95dBFS).
Examples of Dithering
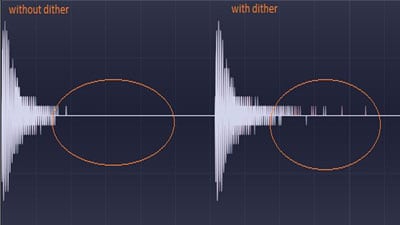
Below are some audio examples that I have prepared to demonstrate dither and quantisation error, along with an unaffected source for you to compare.
Please note that these examples simulate recording a signal at a very low volume, to better demonstrate the quality degradation experienced when using a small number of bits to encode a signal. This issue can easily be overcome by recording at an appropriate level, which under normal circumstances, will cause the effect of dither to be far less obvious. I have created these examples by following these steps; you can recreate the same results if you follow them too:
1. Import the source audio into your DAW of choice.
2. Use a gain plugin to change the volume of the source file by -70dBFS.
3. Export the file as a 44.1kHz, 16-bit, WAV; with and without dither.
4. Import the files created in step 3 into your DAW.
5. Use a gain plugin to change the volume of these files by +70dBFS.
6. Export these two files as 44.1kHz, 16 -bit, WAV; with dither applied.
When to use Dither
So I hear you ask, when should dither be applied to my music?
The easy answer is… Whenever the audio goes through a process of quantisation. In practical terms, it means that dither should be used at the point of conversion from analogue to digital, and also it should be used at the final stage of any digital processing.
It is worth mentioning that there are many different types of dither to choose from, too many to mention here. Their differences mostly lie in their sound, some will shift their noise away from the most audible frequencies. My advice on choosing the right dither for your music is to use your ears and make a decision that is based on your own preference. They all sound different and all have a subtle effect over the sound of your music. However there is no right or wrong and it comes down to personal taste. Many people even find they prefer the sound of no dither.
Dither is applicable to mastering in the sense that it is the very last thing that will be done to a mastered audio file. For instance, if there was any change made to the file after the dither was applied (be it a fade, or a change in volume by even 0.1dB), the audio would need to be dithered again. The dither applied will then compensate for the re-quantisation the audio went through.
This brings up an interesting question regarding the use of dither on top of dither and how this relates to the accumulation of noise within the recording. The truth of this matter is quite simply, when working with 32-bit, 24-bit, and even 16-bit audio; dither noise will accumulate within your recording. However the level of this noise is so low that any reasonable amount of accumulated dither noise will not be noticeable.
Furthermore, it is important to understand that dither is less applicable to program material that is focused on high volume. In a lot of modern music (especially applicable to electronic genres) where the instruments are digital, and hence, not captured via delicately placed microphones, the focus for these sounds is usually on their texture rather than their dynamics. Dithering on a pumping bassline which has been processed with saturators and heavy compression, for example, is less audible, and even immaterial, when compared to the effects of dither to preserve a piano’s sonic integrity. In short, dither is important about ‘very quiet passages’ and has little relevance to music that is all about being loud.
Try it yourself
If you want to experiment with dithering, here is where you can try it:
If you are printing your mix through an analogue board, recording back into software at 24-bit; dither to 24-bit at the analogue to digital converter (provided you can turn this on or off on your convertor);
If you are online mixing in the box and want to export to a 24-bit file; dither to 24-bits as the absolute last process;
If you are converting between bit depths; dither to the destination bit depth;
If you decide you want to make DSP based changes (no matter how small) to an already dithered file; dither again.
Finally if there is any advice I can give to anyone – from budding audio engineers getting started, through to the most experienced engineers in the business… when it comes to dither, I would always advise using dither when it makes the music sound better. But in regards to real noticeable improvements to audio quality, there are so many things within your control that make a significantly greater difference, such as microphone choice, microphone placement, the instrument, the room, the performance or the song. All these things matter far more to the end quality of your recording.
So with the finite amount of time that everyone has to commit to any project, I stress that you spend your precious time where it matters most. If you have any questions please don’t hesitate to ask us via mastering@studios301.com


 1. Crystallizer – Sound Toys
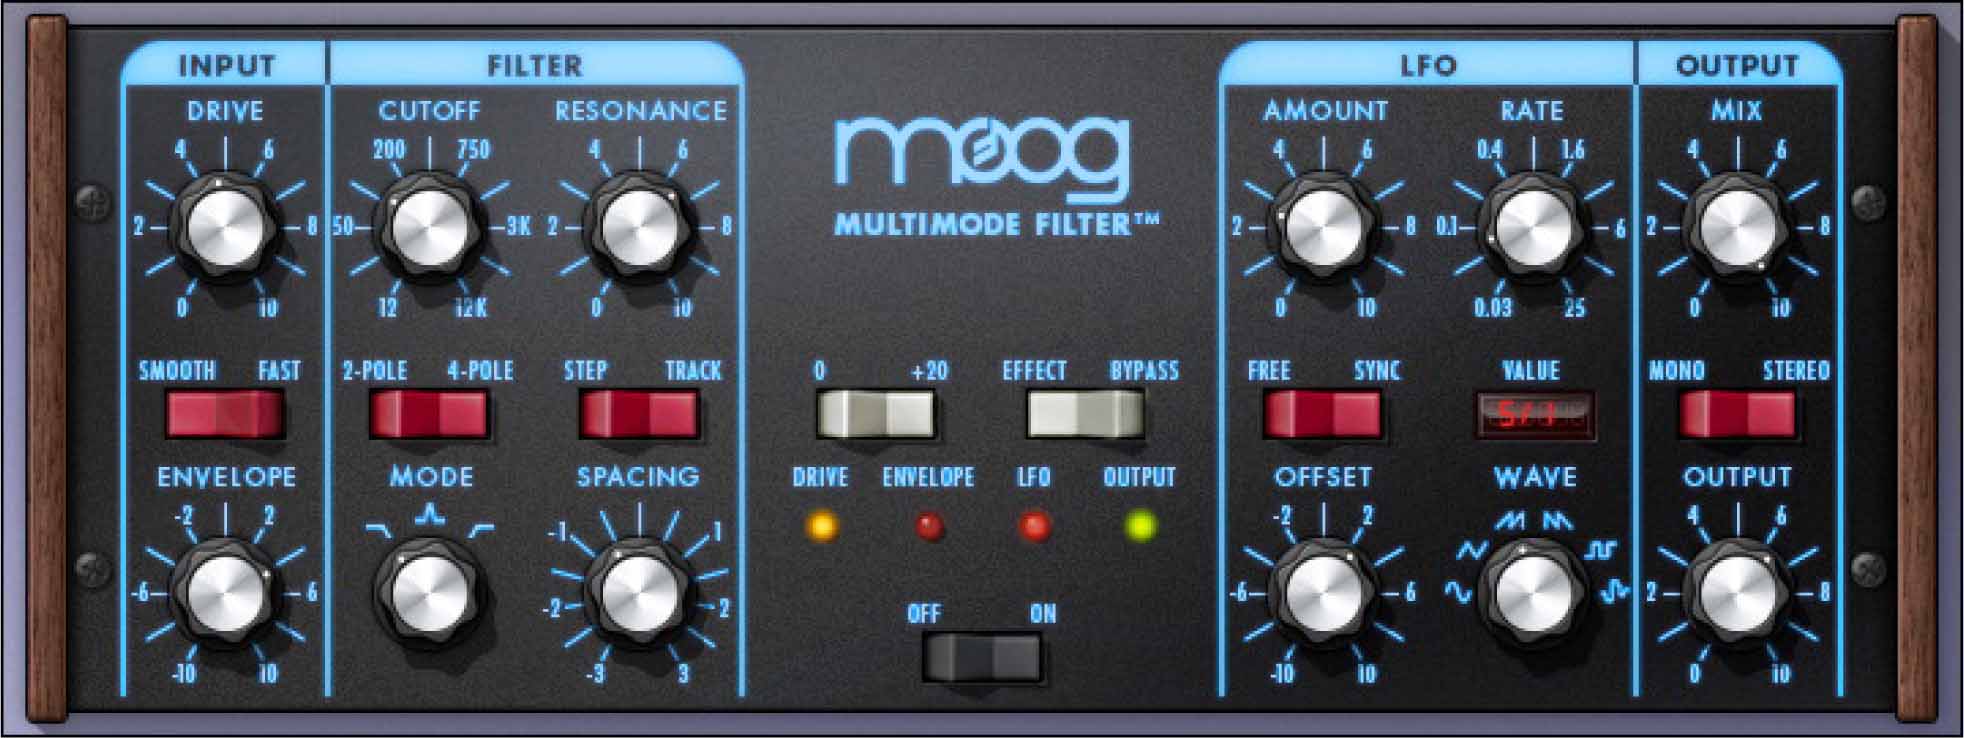 2.Moog Multimode Filter – UAD
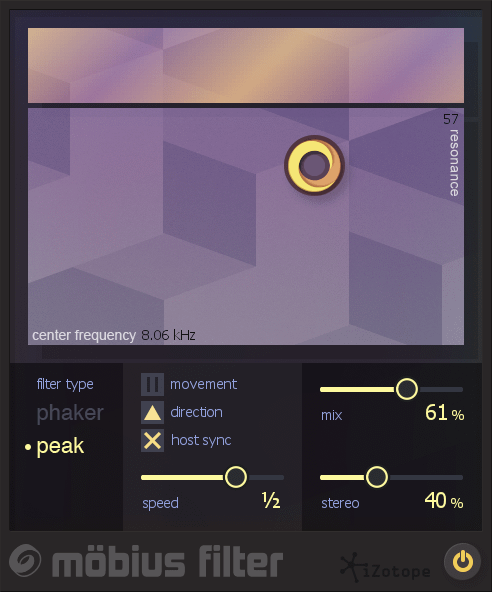
 Learning how to read VU meters is invaluable for mixing and mastering. The way the needles move can tell you things about the mix that other types of meters can’t, yet finding good hardware VU boxes isn’t easy.